Sony HVR Z1U Operating Instructions - Page 46
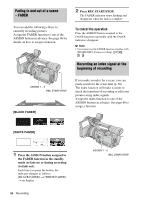
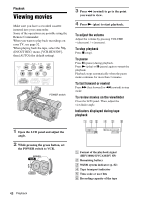
To stop recording, Press REC START/STOP to start
 |
UPC - 027242668799
View all Sony HVR Z1U manuals
Add to My Manuals
Save this manual to your list of manuals |
Page 46 highlights
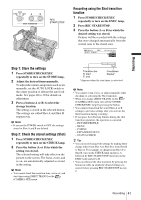
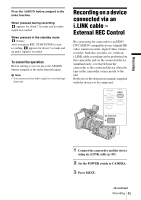
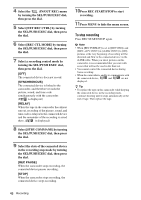
4 Select the (IN/OUT REC) menu by turning the SEL/PUSH EXEC dial, then press the dial. 5 Select [EXT REC CTRL] by turning the SEL/PUSH EXEC dial, then press the dial. 6 Select [REC CTL MODE] by turning the SEL/PUSH EXEC dial, then press the dial. 7 Select a recording control mode by turning the SEL/PUSH EXEC dial, then press the dial. [OFF] The connected device does not record. [SYNCHRONOUS] The connected device is linked to the camcorder, and therefore records the picture, sound, and time code simultaneously with the camcorder. ( is displayed.) [RELAY] When the tape in the camcorder has almost run out, recording of the picture, sound, and time code is relayed to the connected device and the remainder of the recording is saved there. ( is displayed.) 8 Select [STBY COMMAND] by turning the SEL/PUSH EXEC dial, then press the dial. 9 Select the state of the connected device in the recording stop mode by turning the SEL/PUSH EXEC dial, then press the dial. [REC PAUSE] When the camcorder stops recording, the connected device pauses recording. [STOP] When the camcorder stops recording, the connected device stops recording. 10Press REC START/STOP to start recording. 11Press MENU to hide the menu screen. To stop recording Press REC START/STOP again. b Note • When [REC FORMAT] is set to [HDV1080i], and [HDVtDV CONV] in [i.LINK CONV] to [ON], pictures at the very beginning of recording will be distorted and flow to the connected device via the i.LINK cable. When you shoot pictures on this camcorder, it is recommended that you start with scenes that will not be used in the final cut. • You cannot control the connected device during frame recording. • When the camcorder is unable to communicate with the connected device, and are not displayed. z Tip • To replace the tape on this camcorder while keeping the connected device in the recording mode, continue shooting until it stops automatically at the end of tape. Then replace the tape. 46 Recording
-
 1
1 -
2
-
3
-
4
-
5
-
6
-
7
-
8
-
9
-
10
-
11
-
12
-
13
-
14
-
15
-
16
-
17
-
18
-
19
-
20
-
21
-
22
-
23
-
24
-
25
-
26
-
27
-
28
-
29
-
30
-
31
-
32
-
33
-
34
-
35
-
36
-
37
-
38
-
39
-
40
-
 41
41 -
 42
42 -
 43
43 -
 44
44 -
 45
45 -
 46
46 -
 47
47 -
 48
48 -
 49
49 -
 50
50 -
 51
51 -
52
-
53
-
54
-
55
-
56
-
57
-
58
-
59
-
60
-
61
-
62
-
63
-
64
-
65
-
66
-
67
-
68
-
69
-
70
-
71
-
72
-
73
-
74
-
75
-
76
-
77
-
78
-
79
-
80
-
81
-
82
-
83
-
84
-
85
-
86
-
87
-
88
-
89
-
90
-
91
-
92
-
93
-
94
-
95
-
96
-
97
-
98
-
99
-
100
-
101
-
102
-
103
-
104
-
105
-
106
-
107
-
108
-
109
-
110
-
111
-
112
-
113
-
114
-
115
-
116
-
117
-
118
-
119
-
120
-
121
-
122
-
123
-
124
-
125
-
126
-
127
-
128
-
129
-
130
-
131
-
132
-
133
-
134
-
135
-
136
 |
 |
