Sony HVR Z1U Operating Instructions - Page 70
Using the (IN/OUT REC) menu - REC FORMAT/ DOWN CONVERT, etc
 |
UPC - 027242668799
View all Sony HVR Z1U manuals
Add to My Manuals
Save this manual to your list of manuals |
Page 70 highlights
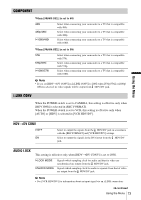
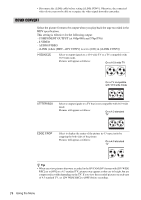
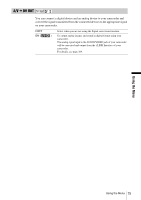
Using the (IN/OUT REC) menu - REC FORMAT/ DOWN CONVERT, etc. You can select the items listed below on the IN/ OUT REC menu. For details on how to select these items, see "Selecting menu items" (p. 57). The default settings are marked with G. The indicators in parentheses appear when the setting is selected. The settings you can adjust vary depending on the power mode of your camcorder. The screen shows the items you can operate at the moment. Unavailable items will be grayed out. I N / OUT REC STBY RETURN REC FORMAT HDV1080 i REC MODE DV WIDE REC EXT REC CTRL COMPONENT i . L I NK CONV DOWN CONVERT [ MENU ] : END VCR HDV/DV Select the playback signal. Normally select [AUTO]. When the camcorder is connected to another device using an i.LINK cable, select the signal to be input/output from the HDV/DV jack. The selected signal is recorded or played back. GAUTO HDV DV • Select this to play back signals by switching the format between HDV and DVCAM (DV) automatically. • For an i.LINK connection, select this to record/play back signals input/output from the HDV/DV jack by switching the format between HDV and DVCAM (DV) automatically. • Select this to play back the signals in the HDV format only. • For an i.LINK connection, select this to record/play back the input/ output signals in the HDV format only. Select this when connecting the camcorder to a computer, etc. (p. 96). • Select this to play back the signals in the DVCAM (DV) format only. • For an i.LINK connection, select this to record/play back the input/ output signals in the DVCAM (DV) format only. Select this when connecting the camcorder to a computer, etc. (p. 96). b Note • Disconnect the i.LINK cable before setting [VCR HDV/DV]. Otherwise, the connected TV may not be able to recognize the video signal from this camcorder. • When [AUTO] is selected and the signal switches between HDV and DV, the picture and sound disappear temporarily. • When [HDVtDV CONV] is set to [ON], and [AUDIO LOCK] to [LOCK MODE] in [i.LINK CONV], pictures are output as follows: - at [AUTO], an HDV signal is converted to an audio-locked DV signal; a DV signal is output as it is. - at [HDV], an HDV signal is converted to an audio-locked DV signal; a DV signal is not output. - at [DV], a DV signal is output as it is; an HDV signal is not output. • When [HDVtDV CONV] is set to [ON], and [AUDIO LOCK] to [UNLOCK MODE] in [i.LINK CONV], pictures are output as follows: - at [AUTO], an HDV signal is converted to an audio-unlocked DV signal; a DV signal is output as it is. 70 Using the Menu
-
 1
1 -
2
-
3
-
4
-
5
-
6
-
7
-
8
-
9
-
10
-
11
-
12
-
13
-
14
-
15
-
16
-
17
-
18
-
19
-
20
-
21
-
22
-
23
-
24
-
25
-
26
-
27
-
28
-
29
-
30
-
31
-
32
-
33
-
34
-
35
-
36
-
37
-
38
-
39
-
40
-
41
-
42
-
43
-
44
-
45
-
46
-
47
-
48
-
49
-
50
-
51
-
52
-
53
-
54
-
55
-
56
-
57
-
58
-
59
-
60
-
61
-
62
-
63
-
64
-
 65
65 -
 66
66 -
 67
67 -
 68
68 -
 69
69 -
 70
70 -
 71
71 -
 72
72 -
 73
73 -
 74
74 -
 75
75 -
76
-
77
-
78
-
79
-
80
-
81
-
82
-
83
-
84
-
85
-
86
-
87
-
88
-
89
-
90
-
91
-
92
-
93
-
94
-
95
-
96
-
97
-
98
-
99
-
100
-
101
-
102
-
103
-
104
-
105
-
106
-
107
-
108
-
109
-
110
-
111
-
112
-
113
-
114
-
115
-
116
-
117
-
118
-
119
-
120
-
121
-
122
-
123
-
124
-
125
-
126
-
127
-
128
-
129
-
130
-
131
-
132
-
133
-
134
-
135
-
136
 |
 |
