Sony HVR Z1U Operating Instructions - Page 39
Selecting the recording channel
 |
UPC - 027242668799
View all Sony HVR Z1U manuals
Add to My Manuals
Save this manual to your list of manuals |
Page 39 highlights
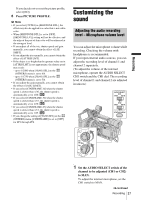
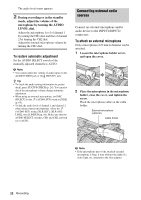
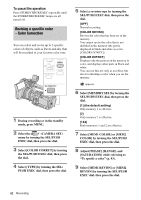
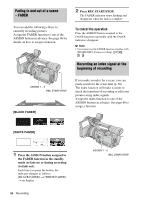
To connect the cable of the microphone or audio device Align the pins of the plug to the INPUT1 or INPUT2 connectors, and connect them securely. XLR connector (male) Selecting the recording channel The following settings are required to record the audio source connected to the INPUT1 or INPUT2 connector. 1 In the standby mode, press MENU. 2 Select the (AUDIO SET) menu by turning the SEL/PUSH EXEC dial, then press the dial. 3 Select [MIC SELECT] by turning the SEL/PUSH EXEC dial, then press the dial. 4 Select [XLR] by turning the SEL/ PUSH EXEC dial, then press the dial. 5 Select [XLR SET] by turning the SEL/ PUSH EXEC dial, then press the dial. 6 Select [XLR CH SET] by turning the SEL/PUSH EXEC dial, then press the dial. 7 Select a channel by turning the SEL/ PUSH EXEC dial, then press the dial. Connector XLR CH SET INPUT1 CH1 CH1, CH2 INPUT2 CH1 CH1, CH2 Recorded channel Channel 1 Channel 1 Channel 2 Channel 2 None 8 Set [INPUT1 LEVEL] or [INPUT2 LEVEL], and the PHANTOM switch for each connector. Source Con- Menu nector PHANTOM switch Microphone INPUT1 [INPUT1 ON LEVEL] - [MIC] INPUT2 [INPUT2 ON LEVEL] - [MIC] ,continued Recording 39 Recording
-
 1
1 -
2
-
3
-
4
-
5
-
6
-
7
-
8
-
9
-
10
-
11
-
12
-
13
-
14
-
15
-
16
-
17
-
18
-
19
-
20
-
21
-
22
-
23
-
24
-
25
-
26
-
27
-
28
-
29
-
30
-
31
-
32
-
33
-
 34
34 -
 35
35 -
 36
36 -
 37
37 -
 38
38 -
 39
39 -
 40
40 -
 41
41 -
 42
42 -
 43
43 -
 44
44 -
45
-
46
-
47
-
48
-
49
-
50
-
51
-
52
-
53
-
54
-
55
-
56
-
57
-
58
-
59
-
60
-
61
-
62
-
63
-
64
-
65
-
66
-
67
-
68
-
69
-
70
-
71
-
72
-
73
-
74
-
75
-
76
-
77
-
78
-
79
-
80
-
81
-
82
-
83
-
84
-
85
-
86
-
87
-
88
-
89
-
90
-
91
-
92
-
93
-
94
-
95
-
96
-
97
-
98
-
99
-
100
-
101
-
102
-
103
-
104
-
105
-
106
-
107
-
108
-
109
-
110
-
111
-
112
-
113
-
114
-
115
-
116
-
117
-
118
-
119
-
120
-
121
-
122
-
123
-
124
-
125
-
126
-
127
-
128
-
129
-
130
-
131
-
132
-
133
-
134
-
135
-
136
 |
 |
