Sony HVR Z1U Operating Instructions - Page 96
Connecting to a computer - software
 |
UPC - 027242668799
View all Sony HVR Z1U manuals
Add to My Manuals
Save this manual to your list of manuals |
Page 96 highlights
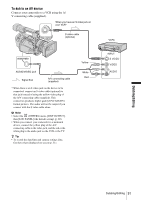
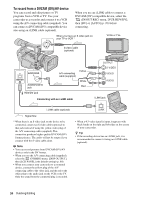
Connecting to a computer To use your camcorder by connecting it to a computer using an i.LINK cable, the computer must have an i.LINK interface, and application software to read video signals must be installed on the computer. Refer to the manual supplied with the application software for the system requirements of the computer. HDV/DV jack i.LINK cable (optional) Connecting the computer • Before connecting your camcorder to the computer with an i.LINK cable, be sure to insert the connector plug in the proper direction. If you insert the connector plug forcibly in the wrong direction, the terminal may be damaged, or this may cause a malfunction of your camcorder. • Connect the i.LINK cable to the computer first, then to your camcorder. Connecting in the opposite order may cause static electricity to build up, resulting in a malfunction of your camcorder. • Be sure to set [VCR HDV/DV] and [i.LINK CONV] on the (IN/OUT REC) menu before connecting the i.LINK cable. If you connect the i.LINK cable first, the computer may hang up or may not recognize the signal from your camcorder. b Note • Connect a computer that can handle the signal of the format indicated by the i.LINK lamps. If you connect a computer that cannot handle the signal, the computer may hang up or may not recognize the signal from your camcorder. • Disconnect the i.LINK cable before resetting [REC FORMAT] when the POWER switch is set to CAMERA. Otherwise, the computer may hang up. z Tip • The i.LINK lamp, HDV or DV, on the HDV/DV jack holder will light up and indicate the format of the input signal when you use an i.LINK cable. To import pictures on a tape to the computer • To scan pictures recorded in the HDV format on the tape in the HDV format, set [VCR HDV/DV] to [HDV] (p. 70) and [HDVtDV CONV] to [OFF] in [i.LINK CONV](p. 73). • To scan pictures recorded in the DVCAM (DV) format on the tape in the DVCAM (DV) format, set [VCR HDV/DV] to [DV] (p. 70). • To scan pictures recorded in the HDV format on the tape in the audio-locked DV format, set [HDVtDV CONV] to [ON] and [AUDIO LOCK] to [LOCK MODE] in [i.LINK CONV] (p. 73). • To scan pictures recorded in the HDV format on the tape in the audio-unlocked DV format, set [HDVtDV CONV] to [ON] and 96 Dubbing/Editing
-
 1
1 -
2
-
3
-
4
-
5
-
6
-
7
-
8
-
9
-
10
-
11
-
12
-
13
-
14
-
15
-
16
-
17
-
18
-
19
-
20
-
21
-
22
-
23
-
24
-
25
-
26
-
27
-
28
-
29
-
30
-
31
-
32
-
33
-
34
-
35
-
36
-
37
-
38
-
39
-
40
-
41
-
42
-
43
-
44
-
45
-
46
-
47
-
48
-
49
-
50
-
51
-
52
-
53
-
54
-
55
-
56
-
57
-
58
-
59
-
60
-
61
-
62
-
63
-
64
-
65
-
66
-
67
-
68
-
69
-
70
-
71
-
72
-
73
-
74
-
75
-
76
-
77
-
78
-
79
-
80
-
81
-
82
-
83
-
84
-
85
-
86
-
87
-
88
-
89
-
90
-
 91
91 -
 92
92 -
 93
93 -
 94
94 -
 95
95 -
 96
96 -
 97
97 -
 98
98 -
 99
99 -
 100
100 -
 101
101 -
102
-
103
-
104
-
105
-
106
-
107
-
108
-
109
-
110
-
111
-
112
-
113
-
114
-
115
-
116
-
117
-
118
-
119
-
120
-
121
-
122
-
123
-
124
-
125
-
126
-
127
-
128
-
129
-
130
-
131
-
132
-
133
-
134
-
135
-
136
 |
 |
