Sony HVR Z1U Operating Instructions - Page 108
Recording - tape stuck
 |
UPC - 027242668799
View all Sony HVR Z1U manuals
Add to My Manuals
Save this manual to your list of manuals |
Page 108 highlights
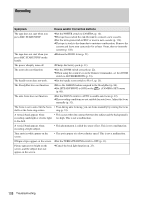
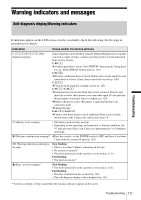
Recording Symptom Cause and/or Corrective Actions The tape does not start when you press REC START/STOP. cSet the POWER switch to CAMERA (p. 14). cThe tape has reached the end. Rewind it, or insert a new cassette. cSet the write-protect tab to REC or insert a new cassette (p. 114). cThe tape is stuck to the drum due to moisture condensation. Remove the cassette and leave your camcorder for at least 1 hour, then re-insert the cassette (p. 120). The tape does not start when you press REC START/STOP on the handle. cRelease the HOLD lever (p. 21). The power abruptly turns off. cCharge the battery pack (p. 11). The zoom does not function. cSet the ZOOM switch correctly (p. 22). cWhen using the zoom lever on the Remote Commander, set the ZOOM switch to LEVER/REMOTE (p. 23). The handle zoom does not work. cSet the handle zoom switch to H or L (p. 23). The SteadyShot does not function. cPress the ASSIGN button assigned to the SteadyShot (p. 86). cSet [STEADYSHOT] to [ON] on the (CAMERA SET) menu (p. 60). The auto focus does not function. cSet the FOCUS switch to AUTO to enable auto focus (p. 32). cThe recording conditions are not suitable for auto focus. Adjust the focus manually (p. 32). The focus is set to auto, but the focus • Even during auto focusing, you can focus manually by rotating the focus shifts as the focus ring rotates. ring (p. 33). A vertical band appears when • This occurs when the contrast between the subject and the background is recording candlelight or electric light too high. This is not a malfunction. in the dark. A vertical band appears when recording a bright subject. • This phenomenon is called the smear effect. This is not a malfunction. Tiny spots in white appear on the screen. • The spots appear at a slower shutter speed. This is not a malfunction. Oblique stripes appear on the screen. cSet the ZEBRA/PEAKING switch to OFF (p. 31). Picture appears too bright on the screen, and the subject does not appear on the screen. cCancel the back light function (p. 25). 108 Troubleshooting
-
 1
1 -
2
-
3
-
4
-
5
-
6
-
7
-
8
-
9
-
10
-
11
-
12
-
13
-
14
-
15
-
16
-
17
-
18
-
19
-
20
-
21
-
22
-
23
-
24
-
25
-
26
-
27
-
28
-
29
-
30
-
31
-
32
-
33
-
34
-
35
-
36
-
37
-
38
-
39
-
40
-
41
-
42
-
43
-
44
-
45
-
46
-
47
-
48
-
49
-
50
-
51
-
52
-
53
-
54
-
55
-
56
-
57
-
58
-
59
-
60
-
61
-
62
-
63
-
64
-
65
-
66
-
67
-
68
-
69
-
70
-
71
-
72
-
73
-
74
-
75
-
76
-
77
-
78
-
79
-
80
-
81
-
82
-
83
-
84
-
85
-
86
-
87
-
88
-
89
-
90
-
91
-
92
-
93
-
94
-
95
-
96
-
97
-
98
-
99
-
100
-
101
-
102
-
 103
103 -
 104
104 -
 105
105 -
 106
106 -
 107
107 -
 108
108 -
 109
109 -
 110
110 -
 111
111 -
 112
112 -
 113
113 -
114
-
115
-
116
-
117
-
118
-
119
-
120
-
121
-
122
-
123
-
124
-
125
-
126
-
127
-
128
-
129
-
130
-
131
-
132
-
133
-
134
-
135
-
136
 |
 |
