Sony HVR Z1U Operating Instructions - Page 38
Connecting external audio sources, sources - cables
 |
UPC - 027242668799
View all Sony HVR Z1U manuals
Add to My Manuals
Save this manual to your list of manuals |
Page 38 highlights
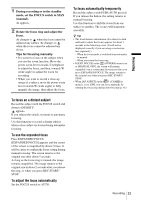
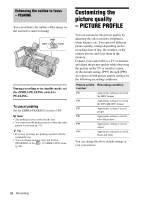
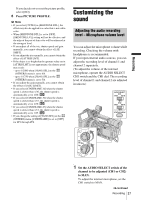
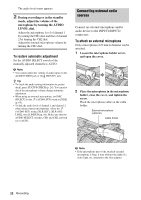
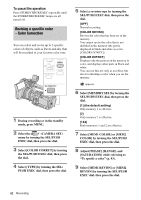
The audio level meter appears. 2 During recording or in the standby mode, adjust the volume of the microphone by turning the AUDIO LEVEL dial. Adjust the microphone level of channel 1 by turning the CH1 dial, and that of channel 2 by turning the CH2 dial. Adjust the internal microphone volume by turning the CH1 dial. To restore automatic adjustment Set the AUDIO SELECT switch of the manually adjusted channels to AUTO. b Note • You cannot adjust the volume of audio input via the AUDIO/VIDEO jack or the HDV/DV jack. z Tip • To check the audio setting information in greater detail, press STATUS CHECK (p. 24). You can also check the microphone volume during automatic adjustment. • When using an external microphone, set [MIC SELECT] on the (AUDIO SET) menu to [XLR] (p. 65). • To link the audio level of channel 1 and channel 2 when using external microphones, select the (AUDIO SET) menu, [XLR SET], [XLR AGC LINK], then [LINKED] (p. 66). Make sure that the AUDIO SELECT switches, CH1 and CH2, are both set to AUTO. Connecting external audio sources Connect an external microphone and/or audio device to the INPUT1/INPUT2 connectors. To attach an external microphone Only a microphone of 21 mm in diameter can be attached. 1 Loosen the microphone holder screw, and open the cover. 2 Place the microphone in the microphone holder, close the cover, and tighten the screw. Hook the microphone cable on the cable holder. External microphone (optional) Cable holder b Note • If the microphone part of the attached external microphone is long, it may obstruct the light of a video light, etc. attached to the shoe adaptor. 38 Recording
-
 1
1 -
2
-
3
-
4
-
5
-
6
-
7
-
8
-
9
-
10
-
11
-
12
-
13
-
14
-
15
-
16
-
17
-
18
-
19
-
20
-
21
-
22
-
23
-
24
-
25
-
26
-
27
-
28
-
29
-
30
-
31
-
32
-
 33
33 -
 34
34 -
 35
35 -
 36
36 -
 37
37 -
 38
38 -
 39
39 -
 40
40 -
 41
41 -
 42
42 -
 43
43 -
44
-
45
-
46
-
47
-
48
-
49
-
50
-
51
-
52
-
53
-
54
-
55
-
56
-
57
-
58
-
59
-
60
-
61
-
62
-
63
-
64
-
65
-
66
-
67
-
68
-
69
-
70
-
71
-
72
-
73
-
74
-
75
-
76
-
77
-
78
-
79
-
80
-
81
-
82
-
83
-
84
-
85
-
86
-
87
-
88
-
89
-
90
-
91
-
92
-
93
-
94
-
95
-
96
-
97
-
98
-
99
-
100
-
101
-
102
-
103
-
104
-
105
-
106
-
107
-
108
-
109
-
110
-
111
-
112
-
113
-
114
-
115
-
116
-
117
-
118
-
119
-
120
-
121
-
122
-
123
-
124
-
125
-
126
-
127
-
128
-
129
-
130
-
131
-
132
-
133
-
134
-
135
-
136
 |
 |
