Sony HVR Z1U Operating Instructions - Page 42
Revising a specific color - Color Correction, To cancel the operation - specifications
 |
UPC - 027242668799
View all Sony HVR Z1U manuals
Add to My Manuals
Save this manual to your list of manuals |
Page 42 highlights
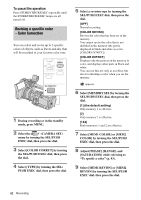
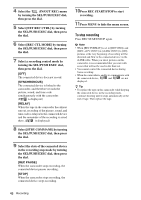
To cancel the operation Press STORE/CHECK/EXEC repeatedly until the STORE/CHECK/EXEC lamps are all turned off. Revising a specific color - Color Correction You can select and revise up to 2 specific colors of objects, such as leaves and sky, that will be recorded in your favorite color tone. 1 During recording or in the standby mode, press MENU. 2 Select the (CAMERA SET) menu by turning the SEL/PUSH EXEC dial, then press the dial. 3 Select [COLOR CORRCT] by turning the SEL/PUSH EXEC dial, then press the dial. 4 Select [TYPE] by turning the SEL/ PUSH EXEC dial, then press the dial. 5 Select a revision type by turning the SEL/PUSH EXEC dial, then press the dial. [OFF] Normal recording. [COLOR REVISN] Revises the color that has been set in the memory. You cannot revise the color that is not included in the memory (the part is displayed in black and white as set in [COLOR EXTRCT]). [COLOR EXTRCT] Displays only the parts set in the memory in color, and displays other parts in black and white. You can use this not only as an effect, but also for checking a color when you set the memory. appears. 6 Select [MEMORY SEL] by turning the SEL/PUSH EXEC dial, then press the dial. [1] (the default setting) Only memory 1 is effective. [2] Only memory 2 is effective. [1&2] Both memories 1 and 2 are effective. 7 Select [MEM1 COLOR] or [MEM2 COLOR] by turning the SEL/PUSH EXEC dial, then press the dial. 8 Adjust [PHASE], [RANGE], and [SATURATION] while referring to "To specify a color" (p. 43). 9 Select [MEM1 REVISN] or [MEM2 REVISN] by turning the SEL/PUSH EXEC dial, then press the dial. 42 Recording
-
 1
1 -
2
-
3
-
4
-
5
-
6
-
7
-
8
-
9
-
10
-
11
-
12
-
13
-
14
-
15
-
16
-
17
-
18
-
19
-
20
-
21
-
22
-
23
-
24
-
25
-
26
-
27
-
28
-
29
-
30
-
31
-
32
-
33
-
34
-
35
-
36
-
 37
37 -
 38
38 -
 39
39 -
 40
40 -
 41
41 -
 42
42 -
 43
43 -
 44
44 -
 45
45 -
 46
46 -
 47
47 -
48
-
49
-
50
-
51
-
52
-
53
-
54
-
55
-
56
-
57
-
58
-
59
-
60
-
61
-
62
-
63
-
64
-
65
-
66
-
67
-
68
-
69
-
70
-
71
-
72
-
73
-
74
-
75
-
76
-
77
-
78
-
79
-
80
-
81
-
82
-
83
-
84
-
85
-
86
-
87
-
88
-
89
-
90
-
91
-
92
-
93
-
94
-
95
-
96
-
97
-
98
-
99
-
100
-
101
-
102
-
103
-
104
-
105
-
106
-
107
-
108
-
109
-
110
-
111
-
112
-
113
-
114
-
115
-
116
-
117
-
118
-
119
-
120
-
121
-
122
-
123
-
124
-
125
-
126
-
127
-
128
-
129
-
130
-
131
-
132
-
133
-
134
-
135
-
136
 |
 |
