Sony HVR Z1U Operating Instructions - Page 43
Recording, To cancel the operation, To specify a color, A recommended way to specify a color
 |
UPC - 027242668799
View all Sony HVR Z1U manuals
Add to My Manuals
Save this manual to your list of manuals |
Page 43 highlights
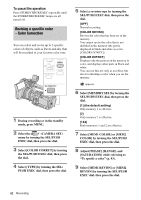
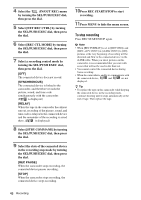
Recording 10Adjust the color tone. Increasing [R] makes the selected color reddish, and decreasing [R] makes it less reddish (as cyan increases). Increasing [B] makes the selected color blueish, and decreasing [B] makes it less blueish (as yellow increases). No adjustment will be made at 0. 11Select [OK] by turning the SEL/PUSH EXEC dial, then press the dial. 12Press MENU to hide the menu screen. To cancel the operation Select [OFF] in step 5. b Note • If the selected color range is too narrow, the color revision may not be visible. • In the [COLOR EXTRCT] setting, only the colors of the effective memory are applied. • In the [COLOR REVISN] setting, the color of the memory that is set to be ineffective will neither be applied nor revised. z Tip • If you set both memories to the same setting, the revision effect will be doubled. • The Color Correction setting will be retained even if the power is turned off. However, if you want to revise colors influenced by time of a day, weather, location, etc., it is recommended that you revise them just before recording. • If you change the setting of the white balance value, [WB SHIFT] of PICTURE PROFILE, [SATURATION], and [PHASE], color range and phase adjusted will change. If the above settings have changed from when you set the Color Correction, check the Color Correction setting before recording. • When the white balance is adjusted automatically, the white balance setting may vary automatically depending on the object. To use the Color Correction effectively, adjust the white balance manually. To specify a color Option PHASE RANGE SATURATION Select Color phase from 0 through 31. 0 (violet) - 8 (red) - 16 (yellow) - 24 (green) - 31 (blue) In the default setting, memory 1 is set to 19, memory 2 to 8. Range of color phase from 0 though 31. 0: No color is selected. 1: Narrow range (single color) - 31: Wide range (The other colors of similar color phase are also selected.) In the default setting, memory 1 is set to 13, memory 2 to 8. Color saturation from 0 through 31. 0: Colors from deep to light are all selected - 31: Only deep colors are selected. In the default setting, memory 1 is set to 0, memory 2 to 15. A recommended way to specify a color 1 Select [COLOR EXTRCT] to change colors to black and white, except the target color. You will easily recognize the selected range. 2 Set [RANGE] to 4 or 5 to make a memory of a single color. 3 Set [SATURATION] to 0 to select very light colors. 4 Set [PHASE] so that a color is applied to the target object. 5 Set [RANGE] so that the desired range of the picture can be previewed in the selected color. 6 If you do not need the light colored part, set [SATURATION] so that colors are applied only to the desired part. 7 To use the setting as a revised color, select [OK], go back to [TYPE] and change the setting from [COLOR EXTRCT] to [COLOR REVISN]. Recording 43
-
 1
1 -
2
-
3
-
4
-
5
-
6
-
7
-
8
-
9
-
10
-
11
-
12
-
13
-
14
-
15
-
16
-
17
-
18
-
19
-
20
-
21
-
22
-
23
-
24
-
25
-
26
-
27
-
28
-
29
-
30
-
31
-
32
-
33
-
34
-
35
-
36
-
37
-
 38
38 -
 39
39 -
 40
40 -
 41
41 -
 42
42 -
 43
43 -
 44
44 -
 45
45 -
 46
46 -
 47
47 -
 48
48 -
49
-
50
-
51
-
52
-
53
-
54
-
55
-
56
-
57
-
58
-
59
-
60
-
61
-
62
-
63
-
64
-
65
-
66
-
67
-
68
-
69
-
70
-
71
-
72
-
73
-
74
-
75
-
76
-
77
-
78
-
79
-
80
-
81
-
82
-
83
-
84
-
85
-
86
-
87
-
88
-
89
-
90
-
91
-
92
-
93
-
94
-
95
-
96
-
97
-
98
-
99
-
100
-
101
-
102
-
103
-
104
-
105
-
106
-
107
-
108
-
109
-
110
-
111
-
112
-
113
-
114
-
115
-
116
-
117
-
118
-
119
-
120
-
121
-
122
-
123
-
124
-
125
-
126
-
127
-
128
-
129
-
130
-
131
-
132
-
133
-
134
-
135
-
136
 |
 |
