Sony HVR Z1U Operating Instructions - Page 40
Recording a picture using various features, Developing scenes smoothly - Shot transition
 |
UPC - 027242668799
View all Sony HVR Z1U manuals
Add to My Manuals
Save this manual to your list of manuals |
Page 40 highlights
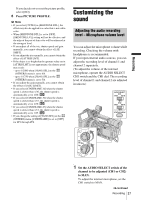
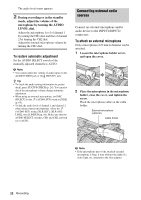
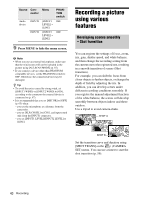
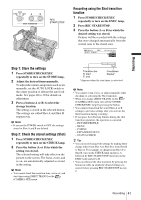
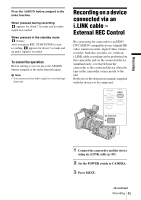
Source Con- Menu nector PHANTOM switch Audio device INPUT1 [INPUT1 OFF LEVEL] - [LINE] INPUT2 [INPUT2 OFF LEVEL] - [LINE] 9 Press MENU to hide the menu screen. b Note • When you use an external microphone, make sure that the wind screen will not be included in the picture using [ALLSCAN MODE] (p. 87). • If you connect a device other than PHANTOM compatible devices, set the PHANTOM switch to OFF. Otherwise, the connected device may be damaged. z Tip • To avoid the noise caused by strong wind, set [INPUT1 WIND] or [INPUT2 WIND] to [ON], according to the connector the external device is connected to (p. 67). • It is recommended that you set [MIC NR] to [OFF] (p. 65) when: - you use the microphone at a distance from the camcorder. - you set [XLR CH SEL] to [CH1], and input sound only from the INPUT1 connector. - you set [INPUT1 LEVEL]/[INPUT2 LEVEL] to [LINE]. Recording a picture using various features Developing scenes smoothly - Shot transition You can register the settings of focus, zoom, iris, gain, shutter speed, and white balance, and then change the recording setting from the current one to the registered one, resulting in a smooth transition of scenes (Shot transition). For example, you can shift the focus from closer objects to farther objects, or change the depth of field by adjusting the iris. In addition, you can develop scenes under different recording conditions smoothly. If you register the manual adjustment function of the white balance, the scenes will develop smoothly between objects indoor and those outdoor. Use a tripod to avoid camera-shake. SHOT A SHOT B Set the transition curve and duration using [SHOT TRANS] on the (CAMERA SET) menu. You can use a timer to start the shot transition (p. 59). 40 Recording
-
 1
1 -
2
-
3
-
4
-
5
-
6
-
7
-
8
-
9
-
10
-
11
-
12
-
13
-
14
-
15
-
16
-
17
-
18
-
19
-
20
-
21
-
22
-
23
-
24
-
25
-
26
-
27
-
28
-
29
-
30
-
31
-
32
-
33
-
34
-
 35
35 -
 36
36 -
 37
37 -
 38
38 -
 39
39 -
 40
40 -
 41
41 -
 42
42 -
 43
43 -
 44
44 -
 45
45 -
46
-
47
-
48
-
49
-
50
-
51
-
52
-
53
-
54
-
55
-
56
-
57
-
58
-
59
-
60
-
61
-
62
-
63
-
64
-
65
-
66
-
67
-
68
-
69
-
70
-
71
-
72
-
73
-
74
-
75
-
76
-
77
-
78
-
79
-
80
-
81
-
82
-
83
-
84
-
85
-
86
-
87
-
88
-
89
-
90
-
91
-
92
-
93
-
94
-
95
-
96
-
97
-
98
-
99
-
100
-
101
-
102
-
103
-
104
-
105
-
106
-
107
-
108
-
109
-
110
-
111
-
112
-
113
-
114
-
115
-
116
-
117
-
118
-
119
-
120
-
121
-
122
-
123
-
124
-
125
-
126
-
127
-
128
-
129
-
130
-
131
-
132
-
133
-
134
-
135
-
136
 |
 |
