Sony HVR Z1U Operating Instructions - Page 99
Dubbing/Editing, The channel on which the audio is, recorded, Recording sound
 |
UPC - 027242668799
View all Sony HVR Z1U manuals
Add to My Manuals
Save this manual to your list of manuals |
Page 99 highlights
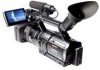
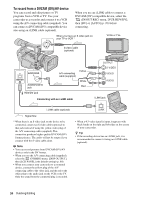
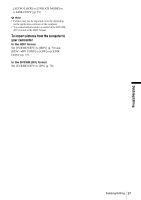
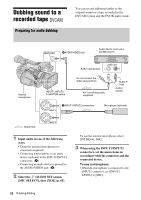
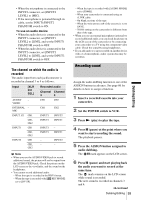
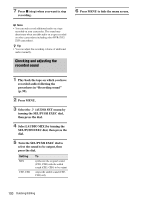
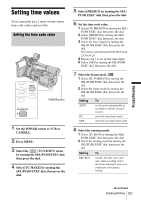
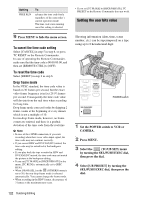
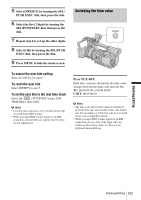
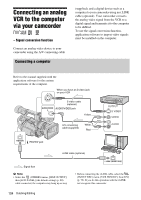
• When the microphone is connected to the INPUT2 connector, set [INPUT2 LEVEL] to [MIC]. • If the microphone is powered through its cable, set the INPUT1/INPUT2 PHANTOM switch to ON. To use an audio device • When the audio device is connected to the INPUT1 connector, set [INPUT1 LEVEL] to [LINE], and set the INPUT1 PHANTOM switch to OFF. • When the audio device is connected to the INPUT2 connector, set [INPUT2 LEVEL] to [LINE], and set the INPUT2 PHANTOM switch to OFF. The channel on which the audio is recorded The audio input from each jack/connector is recorded in channel 3 or 4 as follows: Input [XLR CH SEL] Recorded audio Channel Channel 3 4 AUDIO/ - VIDEO INTERNAL - MIC INPUT 1/2 CH1 CH1, CH2 INPUT1 CH1 CH1, CH2 INPUT2 CH1 CH1, CH2 CH1 CH2 CH1 CH2 INPUT1 INPUT1 INPUT2 INPUT1 INPUT1 INPUT1 - INPUT1 - INPUT2 - - b Note • When you use the AUDIO/VIDEO jack to record additional sound, the picture will not be output from the AUDIO/VIDEO jack. Check the picture on the LCD screen or the viewfinder, and the sound on the headphones. • You cannot record additional audio: - When the tape is recorded in the HDV format. - When the tape is recorded with [ REC MODE] set to [DV SP]. - When the tape is recorded with [AUDIO MODE] set to [FS48K]. - When your camcorder is connected using an i.LINK cable. - On blank sections of the tape. - When the write-protect tab of the cassette is set to SAVE. - 50i/60i setting on the camcorder is different from that of the tape. • When you use an external microphone (optional) to record additional audio, you can check the picture on the LCD screen of the camcorder or by connecting your camcorder to a TV using the component video cable. Check the sound by using headphones. • If you add audio to a tape recorded on another device with a 4-ch microphone, audio system data may be rewritten. Recording sound Assign the audio dubbing function to one of the ASSIGN buttons in advance. See page 86 for details on how to assign a function. 1 Insert a recorded cassette into your camcorder. 2 Set the POWER switch to VCR. 3 Press N (play) to play the tape. 4 Press X (pause) at the point where you want to start recording the sound. The playback pauses. 5 Press the ASSIGN button assigned to audio dubbing. The X mark appears on the LCD screen. 6 Press X (pause) and start playing back the audio you want to record at the same time. The mark remains on the LCD screen while sound is recorded. The new sound is recorded in channels 3 and 4. ,continued Dubbing/Editing 99 Dubbing/Editing
-
 1
1 -
2
-
3
-
4
-
5
-
6
-
7
-
8
-
9
-
10
-
11
-
12
-
13
-
14
-
15
-
16
-
17
-
18
-
19
-
20
-
21
-
22
-
23
-
24
-
25
-
26
-
27
-
28
-
29
-
30
-
31
-
32
-
33
-
34
-
35
-
36
-
37
-
38
-
39
-
40
-
41
-
42
-
43
-
44
-
45
-
46
-
47
-
48
-
49
-
50
-
51
-
52
-
53
-
54
-
55
-
56
-
57
-
58
-
59
-
60
-
61
-
62
-
63
-
64
-
65
-
66
-
67
-
68
-
69
-
70
-
71
-
72
-
73
-
74
-
75
-
76
-
77
-
78
-
79
-
80
-
81
-
82
-
83
-
84
-
85
-
86
-
87
-
88
-
89
-
90
-
91
-
92
-
93
-
 94
94 -
 95
95 -
 96
96 -
 97
97 -
 98
98 -
 99
99 -
 100
100 -
 101
101 -
 102
102 -
 103
103 -
 104
104 -
105
-
106
-
107
-
108
-
109
-
110
-
111
-
112
-
113
-
114
-
115
-
116
-
117
-
118
-
119
-
120
-
121
-
122
-
123
-
124
-
125
-
126
-
127
-
128
-
129
-
130
-
131
-
132
-
133
-
134
-
135
-
136
 |
 |