Sony HVR Z1U Operating Instructions - Page 35
Select [SETTING] by turning the SEL, Select an item to be adjusted
 |
UPC - 027242668799
View all Sony HVR Z1U manuals
Add to My Manuals
Save this manual to your list of manuals |
Page 35 highlights
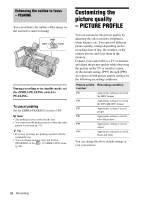
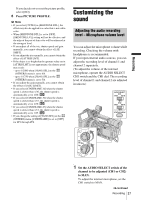
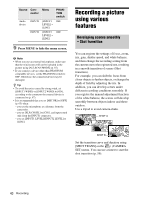
1 In the standby mode, press PICTURE PROFILE. 2 Select a picture profile number by turning the SEL/PUSH EXEC dial, then press the dial. [PP1] through [PP6] are available. 3 Select [SETTING] by turning the SEL/ PUSH EXEC dial, then press the dial. 4 Select an item to be adjusted by turning the SEL/PUSH EXEC dial, then press the dial. 5 Adjust the picture quality by turning the SEL/PUSH EXEC dial, then press the dial. Item [COLOR LEVEL] [COLOR PHASE] [SHARPNESS] Adjustment -7 (low) to +7 (high) -8: black and white -7 (greenish) to +7 (reddish) 0 (softer) to 15 (clearer) Item Adjustment [SKINTONE DTL] To make wrinkles less noticeable by suppressing the outlines on the part in skin color to be enhanced. [OFF]: No adjustment [TYPE1] (the color range recognized as a skin color is narrow) to [TYPE3] (the color range recognized as a skin color is wide) [SKINTONE LVL] Sets the enhancement level of the edge of the part in skin color for setting [SKINTONE DTL]. [HIGH] (to enhance strongly) to [LOW] (to enhance weakly) [AE SHIFT] -7 (darker) to +7 (lighter) [AGC LIMIT] Select the upper limit for the auto gain control (AGC) ([OFF], 12dB, 6dB, 0dB). [OFF] is 18dB. [AT IRIS LMT] Select the highest aperture value for the automatic adjustment (F11, F6.8, F4). [WB SHIFT] -7 (to make white parts bluish) to +7 (to make white parts reddish) [ATW SENS] To set the auto white balance operation under a reddish light source such as an incandescent lamp or candle, or under a blueish light source such as in outdoor shade. [HIGH] (reddishness or blueishness is reduced) to [LOW] (reddishness or blueishness is increased) [ATW SENS] is not effective under a clear sky or the sun. [BLACK STRTCH] [ON]: To raise the γ curve characteristics of the dark part so that the gradation of the dark part is reproduced better. ,continued Recording 35 Recording
-
 1
1 -
2
-
3
-
4
-
5
-
6
-
7
-
8
-
9
-
10
-
11
-
12
-
13
-
14
-
15
-
16
-
17
-
18
-
19
-
20
-
21
-
22
-
23
-
24
-
25
-
26
-
27
-
28
-
29
-
 30
30 -
 31
31 -
 32
32 -
 33
33 -
 34
34 -
 35
35 -
 36
36 -
 37
37 -
 38
38 -
 39
39 -
 40
40 -
41
-
42
-
43
-
44
-
45
-
46
-
47
-
48
-
49
-
50
-
51
-
52
-
53
-
54
-
55
-
56
-
57
-
58
-
59
-
60
-
61
-
62
-
63
-
64
-
65
-
66
-
67
-
68
-
69
-
70
-
71
-
72
-
73
-
74
-
75
-
76
-
77
-
78
-
79
-
80
-
81
-
82
-
83
-
84
-
85
-
86
-
87
-
88
-
89
-
90
-
91
-
92
-
93
-
94
-
95
-
96
-
97
-
98
-
99
-
100
-
101
-
102
-
103
-
104
-
105
-
106
-
107
-
108
-
109
-
110
-
111
-
112
-
113
-
114
-
115
-
116
-
117
-
118
-
119
-
120
-
121
-
122
-
123
-
124
-
125
-
126
-
127
-
128
-
129
-
130
-
131
-
132
-
133
-
134
-
135
-
136
 |
 |
