Symantec BRIGHTMAIL Installation Guide - Page 100
Active Directory Users and Computers, Service Account - default password
 |
UPC - 037648248754
View all Symantec BRIGHTMAIL manuals
Add to My Manuals
Save this manual to your list of manuals |
Page 100 highlights
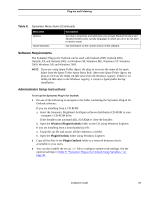
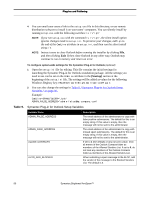
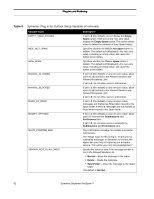
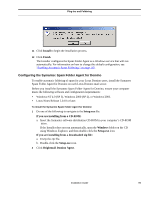
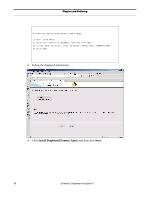
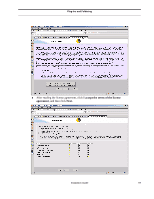
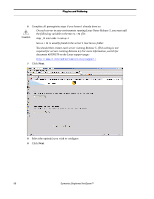
Plug-Ins and Foldering To install the Spam Folder Agent (Exchange 5.5 or Exchange 2000): 1 Do one of the following to navigate to the Setup.exe file: If you are installing from a CD-ROM: a. Insert the Symantec software distribution CD-ROM in your computer's CD-ROM drive. If the Installer does not run automatically, open the Windows folder on the CD using Windows Explorer and Setup.exe. If you are installing from a downloaded zip file: a. Unzip the zip file. b. Double-click Setup.exe 2 Click Next to skip the introductory dialog box. 3 After reading the license agreement, click I accept the terms of this license agreement, and then click Next. 4 Choose a setup type, and then click Next. Setup options include Complete and Custom. The Complete option installs all software in a predefined set of folders and files. The Custom option allows you to tailor installation options. 5 Under Service Account, specify an account to be used by the Spam Folder Agent. Type the Active Directory or NT Domain, as well as the user name and password. For instructions on creating the service account for Exchange, see the Symantec Brightmail AntiSpam Deployment Planning Guide. 6 In the Mailbox field, specify the mailbox alias of a valid mailbox for the Spam Folder Agent to use. To find this alias, click Active Directory Users and Computers, right-click User properties, and then click the General tab. The account specified in the last step must have Full Access to this mailbox. 7 In the Spam folder name field, specify the name of the folder in each end user's mailbox where spam will be foldered, 8 In the Spam expiration field, specify the period in days for which you want to retain spam messages. The default period is 30 days. You may need to adjust this setting based on the volume of spam you receive at your organization. 9 Click Next. 10 Click OK. NOTE: If the installation process is unable to verify the existence of the spam folder because you have insufficient user rights, the following message is displayed. You can either continue without verification, or return to the Configuration dialog box and halt installation. 94 Symantec Brightmail AntiSpam™
-
 1
1 -
2
-
3
-
4
-
5
-
6
-
7
-
8
-
9
-
10
-
11
-
12
-
13
-
14
-
15
-
16
-
17
-
18
-
19
-
20
-
21
-
22
-
23
-
24
-
25
-
26
-
27
-
28
-
29
-
30
-
31
-
32
-
33
-
34
-
35
-
36
-
37
-
38
-
39
-
40
-
41
-
42
-
43
-
44
-
45
-
46
-
47
-
48
-
49
-
50
-
51
-
52
-
53
-
54
-
55
-
56
-
57
-
58
-
59
-
60
-
61
-
62
-
63
-
64
-
65
-
66
-
67
-
68
-
69
-
70
-
71
-
72
-
73
-
74
-
75
-
76
-
77
-
78
-
79
-
80
-
81
-
82
-
83
-
84
-
85
-
86
-
87
-
88
-
89
-
90
-
91
-
92
-
93
-
94
-
 95
95 -
 96
96 -
 97
97 -
 98
98 -
 99
99 -
 100
100 -
 101
101 -
 102
102 -
 103
103 -
 104
104 -
 105
105 -
106
-
107
-
108
-
109
-
110
-
111
-
112
-
113
-
114
-
115
-
116
-
117
-
118
-
119
-
120
-
121
-
122
-
123
-
124
-
125
-
126
-
127
-
128
-
129
-
130
-
131
-
132
-
133
-
134
-
135
-
136
-
137
-
138
-
139
-
140
-
141
-
142
-
143
-
144
-
145
-
146
-
147
-
148
-
149
-
150
-
151
-
152
-
153
-
154
-
155
-
156
-
157
-
158
-
159
-
160
 |
 |
