Symantec BRIGHTMAIL Installation Guide - Page 59
Verifying Brightmail Scanner Installation, Brightmail SMTP Harvester - removal tool
 |
UPC - 037648248754
View all Symantec BRIGHTMAIL manuals
Add to My Manuals
Save this manual to your list of manuals |
Page 59 highlights
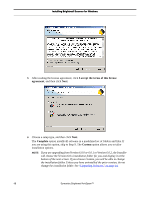
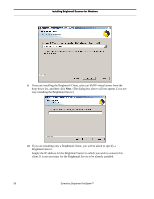
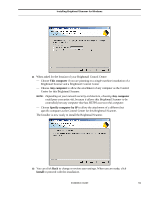
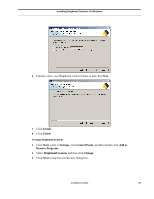
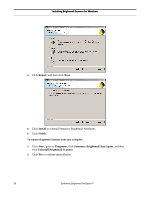
Installing Brightmail Scanner for Windows 3 If your site requires a proxy server for HTTPS access, click Proxy Settings to specify the proxy server. 4 Click Finish to exit the Registration Wizard. 5 To complete installation, click Finish. 6 Click Exit in the main installation menu, or click the appropriate button to install the spam folder agent of your choice. See "Configuring the Spam Folder Agent," on page 93 or "Configuring the Symantec Spam Folder Agent for Domino," on page 95. Verifying Brightmail Scanner Installation 1 Click Start, point to Settings, click Control Panel, and then double-click Add/ Remove Programs. The entry Brightmail Scanner should be displayed in the list. 2 From the Control Panel, double-click Administrative Tools, then double-click Services. If only the Brightmail Client is installed, only Brightmail Agent is added to the list of services. If you installed the Brightmail Server, you will also see Brightmail Server, Brightmail Conduit, Brightmail SMTP Harvester, and Brightmail Virus Cleaner. NOTE: The Brightmail Client is not a process in Windows. It runs as part of the Windows SMTP service. Installation Guide 53
-
 1
1 -
2
-
3
-
4
-
5
-
6
-
7
-
8
-
9
-
10
-
11
-
12
-
13
-
14
-
15
-
16
-
17
-
18
-
19
-
20
-
21
-
22
-
23
-
24
-
25
-
26
-
27
-
28
-
29
-
30
-
31
-
32
-
33
-
34
-
35
-
36
-
37
-
38
-
39
-
40
-
41
-
42
-
43
-
44
-
45
-
46
-
47
-
48
-
49
-
50
-
51
-
52
-
53
-
 54
54 -
 55
55 -
 56
56 -
 57
57 -
 58
58 -
 59
59 -
 60
60 -
 61
61 -
 62
62 -
 63
63 -
 64
64 -
65
-
66
-
67
-
68
-
69
-
70
-
71
-
72
-
73
-
74
-
75
-
76
-
77
-
78
-
79
-
80
-
81
-
82
-
83
-
84
-
85
-
86
-
87
-
88
-
89
-
90
-
91
-
92
-
93
-
94
-
95
-
96
-
97
-
98
-
99
-
100
-
101
-
102
-
103
-
104
-
105
-
106
-
107
-
108
-
109
-
110
-
111
-
112
-
113
-
114
-
115
-
116
-
117
-
118
-
119
-
120
-
121
-
122
-
123
-
124
-
125
-
126
-
127
-
128
-
129
-
130
-
131
-
132
-
133
-
134
-
135
-
136
-
137
-
138
-
139
-
140
-
141
-
142
-
143
-
144
-
145
-
146
-
147
-
148
-
149
-
150
-
151
-
152
-
153
-
154
-
155
-
156
-
157
-
158
-
159
-
160
 |
 |
