Symantec BRIGHTMAIL Installation Guide - Page 57
This computer, Any computer, Specify computer by IP, Install
 |
UPC - 037648248754
View all Symantec BRIGHTMAIL manuals
Add to My Manuals
Save this manual to your list of manuals |
Page 57 highlights
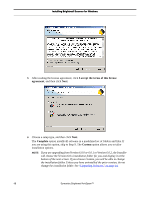
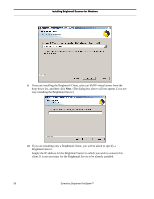
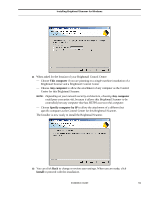
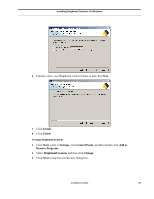
Installing Brightmail Scanner for Windows 11 When asked for the location of your Brightmail Control Center: - Choose This computer if you are planning on a single machine installation of a Brightmail Scanner and a Brightmail Control Center - Choose Any computer to allow the attachment of any computer as the Control Center for this Brightmail Scanner. NOTE: Depending on your network security architecture, choosing Any computer could pose a security risk, because it allows this Brightmail Scanner to be controlled from any computer that has HTTPS access to this computer. - Choose Specify computer by IP to allow the attachment of a different but specific computer as the Control Center for this Brightmail Scanner. The Installer is now ready to install the Brightmail Scanner. 12 You can click Back to change or review your settings. When you are ready, click Install to proceed with the installation. Installation Guide 51
-
 1
1 -
2
-
3
-
4
-
5
-
6
-
7
-
8
-
9
-
10
-
11
-
12
-
13
-
14
-
15
-
16
-
17
-
18
-
19
-
20
-
21
-
22
-
23
-
24
-
25
-
26
-
27
-
28
-
29
-
30
-
31
-
32
-
33
-
34
-
35
-
36
-
37
-
38
-
39
-
40
-
41
-
42
-
43
-
44
-
45
-
46
-
47
-
48
-
49
-
50
-
51
-
 52
52 -
 53
53 -
 54
54 -
 55
55 -
 56
56 -
 57
57 -
 58
58 -
 59
59 -
 60
60 -
 61
61 -
 62
62 -
63
-
64
-
65
-
66
-
67
-
68
-
69
-
70
-
71
-
72
-
73
-
74
-
75
-
76
-
77
-
78
-
79
-
80
-
81
-
82
-
83
-
84
-
85
-
86
-
87
-
88
-
89
-
90
-
91
-
92
-
93
-
94
-
95
-
96
-
97
-
98
-
99
-
100
-
101
-
102
-
103
-
104
-
105
-
106
-
107
-
108
-
109
-
110
-
111
-
112
-
113
-
114
-
115
-
116
-
117
-
118
-
119
-
120
-
121
-
122
-
123
-
124
-
125
-
126
-
127
-
128
-
129
-
130
-
131
-
132
-
133
-
134
-
135
-
136
-
137
-
138
-
139
-
140
-
141
-
142
-
143
-
144
-
145
-
146
-
147
-
148
-
149
-
150
-
151
-
152
-
153
-
154
-
155
-
156
-
157
-
158
-
159
-
160
 |
 |
