TP-Link TL-WA7210N User Guide - Page 126
ARP List
 |
View all TP-Link TL-WA7210N manuals
Add to My Manuals
Save this manual to your list of manuals |
Page 126 highlights
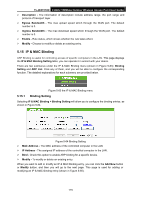
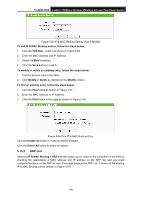
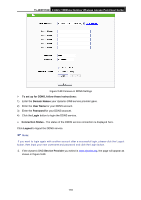
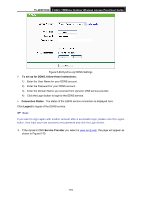
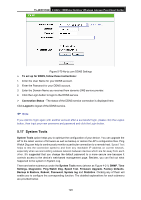
TL-WA7210N 2.4GHz 150Mbps Outdoor Wireless Access Point User Guide Figure 5-65 IP & MAC Binding Setting (Add & Modify) To add IP & MAC Binding entries, follow the steps below. 1. Click the Add New... button as shown in Figure 5-64. 2. Enter the MAC Address and IP Address. 3. Select the Bind checkbox. 4. Click the Save button to save it. To modify or delete an existing entry, follow the steps below. 1. Find the desired entry in the table. 2. Click Modify or Delete as desired on the Modify column. To find an existing entry, follow the steps below. 1. Click the Find button as shown in Figure 5-64. 2. Enter the MAC Address or IP Address. 3. Click the Find button in the page as shown in Figure 5-66. Figure 5-66 Find IP & MAC Binding Entry Click the Enable All button to make all entries enabled. Click the Delete All button to delete all entries. 5.15.2 ARP List Selecting IP & MAC Binding > ARP List will enable you to observe the computers in the LAN by checking the relationship of MAC address and IP address on the ARP list, and you could configure the items on the ARP list also. This page displays the ARP List; it shows all the existing IP & MAC Binding entries (shown in Figure 5-67). 116
-
 1
1 -
2
-
3
-
4
-
5
-
6
-
7
-
8
-
9
-
10
-
11
-
12
-
13
-
14
-
15
-
16
-
17
-
18
-
19
-
20
-
21
-
22
-
23
-
24
-
25
-
26
-
27
-
28
-
29
-
30
-
31
-
32
-
33
-
34
-
35
-
36
-
37
-
38
-
39
-
40
-
41
-
42
-
43
-
44
-
45
-
46
-
47
-
48
-
49
-
50
-
51
-
52
-
53
-
54
-
55
-
56
-
57
-
58
-
59
-
60
-
61
-
62
-
63
-
64
-
65
-
66
-
67
-
68
-
69
-
70
-
71
-
72
-
73
-
74
-
75
-
76
-
77
-
78
-
79
-
80
-
81
-
82
-
83
-
84
-
85
-
86
-
87
-
88
-
89
-
90
-
91
-
92
-
93
-
94
-
95
-
96
-
97
-
98
-
99
-
100
-
101
-
102
-
103
-
104
-
105
-
106
-
107
-
108
-
109
-
110
-
111
-
112
-
113
-
114
-
115
-
116
-
117
-
118
-
119
-
120
-
 121
121 -
 122
122 -
 123
123 -
 124
124 -
 125
125 -
 126
126 -
 127
127 -
 128
128 -
 129
129 -
 130
130 -
 131
131 -
132
-
133
-
134
-
135
-
136
-
137
-
138
-
139
-
140
-
141
-
142
-
143
-
144
-
145
-
146
-
147
-
148
-
149
-
150
 |
 |
