TP-Link TL-WA7210N User Guide - Page 69
To enable Daylight Saving
 |
View all TP-Link TL-WA7210N manuals
Add to My Manuals
Save this manual to your list of manuals |
Page 69 highlights
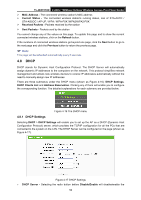
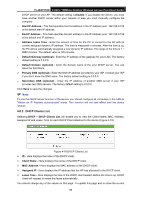
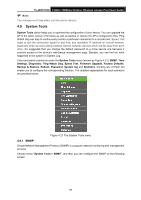
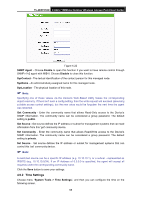
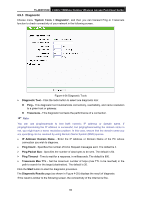
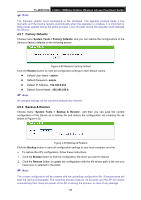
TL-WA7210N 2.4GHz 150Mbps Outdoor Wireless Access Point User Guide Figure 4-23 Time settings Time Zone - Select your local time zone from this pull-down list. To set time manually: 1. Select your local time zone. 2. Enter the Date in Month/Day/Year format. 3. Enter the Time in Hour/Minute/Second format. 4. Click Save. For automatic time synchronization: 1. Enter the address or domain of the NTP Server I or NTP Server II. 2. Click the Get GMT button to get GMT from the Internet. To enable Daylight Saving: 1. Select the Enable Daylight Saving checkbox to enable daylight saving function. 2. Schedule the span of time which this function will effect. For example, if you want this function work at 0 o'clock(am) on the 1st Sunday of April and last until at 6 o'clok(pm) on the 2nd Saturday of September, you need choose "Apr", "1st", "Sun", "0am" at Start part and choose "Sep", "2nd", "Sat", "6pm" at the End part. 3. Click the Save button to effect this function. Note: 1) This setting will be used for some time-based functions such as firewall functions. These time dependant functions will not work if time is not set. So, it is important to specify time settings as soon as you successfully login to the Device. 2) The time will be lost if the Device is turned off. 3) The Device will automatically obtain GMT from the Internet if it is configured accordingly. 4) In daylight saving configuration, start time and end time shall be within one year and start time shall be earlier than end time. 5) After you enable daylight saving function, it will take action in one minute. 59
-
 1
1 -
2
-
3
-
4
-
5
-
6
-
7
-
8
-
9
-
10
-
11
-
12
-
13
-
14
-
15
-
16
-
17
-
18
-
19
-
20
-
21
-
22
-
23
-
24
-
25
-
26
-
27
-
28
-
29
-
30
-
31
-
32
-
33
-
34
-
35
-
36
-
37
-
38
-
39
-
40
-
41
-
42
-
43
-
44
-
45
-
46
-
47
-
48
-
49
-
50
-
51
-
52
-
53
-
54
-
55
-
56
-
57
-
58
-
59
-
60
-
61
-
62
-
63
-
 64
64 -
 65
65 -
 66
66 -
 67
67 -
 68
68 -
 69
69 -
 70
70 -
 71
71 -
 72
72 -
 73
73 -
 74
74 -
75
-
76
-
77
-
78
-
79
-
80
-
81
-
82
-
83
-
84
-
85
-
86
-
87
-
88
-
89
-
90
-
91
-
92
-
93
-
94
-
95
-
96
-
97
-
98
-
99
-
100
-
101
-
102
-
103
-
104
-
105
-
106
-
107
-
108
-
109
-
110
-
111
-
112
-
113
-
114
-
115
-
116
-
117
-
118
-
119
-
120
-
121
-
122
-
123
-
124
-
125
-
126
-
127
-
128
-
129
-
130
-
131
-
132
-
133
-
134
-
135
-
136
-
137
-
138
-
139
-
140
-
141
-
142
-
143
-
144
-
145
-
146
-
147
-
148
-
149
-
150
 |
 |
