TP-Link TL-WA7210N User Guide - Page 142
TL-WA7210N, I want to build a Web Server on the LAN, what should I do?, Add New
 |
View all TP-Link TL-WA7210N manuals
Add to My Manuals
Save this manual to your list of manuals |
Page 142 highlights
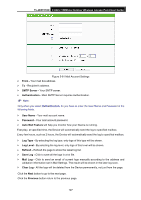
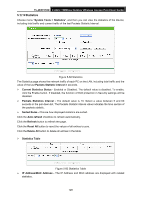
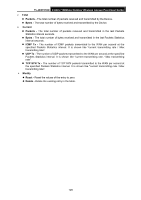
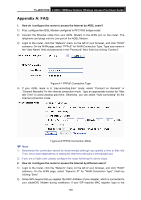
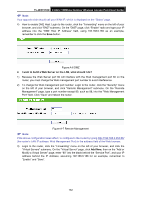
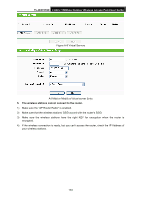
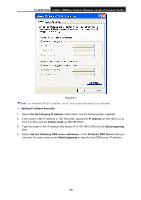
TL-WA7210N 2.4GHz 150Mbps Outdoor Wireless Access Point User Guide Note: Your opposite side should call your WAN IP, which is displayed on the "Status" page. 4) How to enable DMZ Host: Login to the router, click the "Forwarding" menu on the left of your browser, and click "DMZ" submenu. On the "DMZ" page, click "Enable" radio and type your IP address into the "DMZ Host IP Address" field, using 192.168.0.169 as an example, remember to click the Save button. Figure A-6 DMZ 4. I want to build a Web Server on the LAN, what should I do? 1) Because the Web Server port 80 will interfere with the Web management port 80 on the router, you must change the Web management port number to avoid interference. 2) To change the Web management port number: Login to the router, click the "Security" menu on the left of your browser, and click "Remote Management" submenu. On the "Remote Management" page, type a port number except 80, such as 88, into the "Web Management Port" field. Click "Save" and reboot the router. Figure A-7 Remote Management Note: If the above configuration takes effect, to configure to the router by typing http://192.168.0.254:88/ (the router's LAN IP address: Web Management Port) in the address field of the Web browser. 3) Login to the router, click the "Forwarding" menu on the left of your browser, and click the "Virtual Servers" submenu. On the "Virtual Server" page, click Add New, then on the "Add or Modify a Virtual Server" page, enter "80" into the blank behind the "Service Port", and your IP address behind the IP Address, assuming 192.168.0.188 for an example, remember to "Enable" and "Save". 132
-
 1
1 -
2
-
3
-
4
-
5
-
6
-
7
-
8
-
9
-
10
-
11
-
12
-
13
-
14
-
15
-
16
-
17
-
18
-
19
-
20
-
21
-
22
-
23
-
24
-
25
-
26
-
27
-
28
-
29
-
30
-
31
-
32
-
33
-
34
-
35
-
36
-
37
-
38
-
39
-
40
-
41
-
42
-
43
-
44
-
45
-
46
-
47
-
48
-
49
-
50
-
51
-
52
-
53
-
54
-
55
-
56
-
57
-
58
-
59
-
60
-
61
-
62
-
63
-
64
-
65
-
66
-
67
-
68
-
69
-
70
-
71
-
72
-
73
-
74
-
75
-
76
-
77
-
78
-
79
-
80
-
81
-
82
-
83
-
84
-
85
-
86
-
87
-
88
-
89
-
90
-
91
-
92
-
93
-
94
-
95
-
96
-
97
-
98
-
99
-
100
-
101
-
102
-
103
-
104
-
105
-
106
-
107
-
108
-
109
-
110
-
111
-
112
-
113
-
114
-
115
-
116
-
117
-
118
-
119
-
120
-
121
-
122
-
123
-
124
-
125
-
126
-
127
-
128
-
129
-
130
-
131
-
132
-
133
-
134
-
135
-
136
-
 137
137 -
 138
138 -
 139
139 -
 140
140 -
 141
141 -
 142
142 -
 143
143 -
 144
144 -
 145
145 -
 146
146 -
 147
147 -
148
-
149
-
150
 |
 |
