TP-Link TL-WA7210N User Guide - Page 19
Repeater and Universal Repeater, 3.6 Bridge with AP - signal
 |
View all TP-Link TL-WA7210N manuals
Add to My Manuals
Save this manual to your list of manuals |
Page 19 highlights
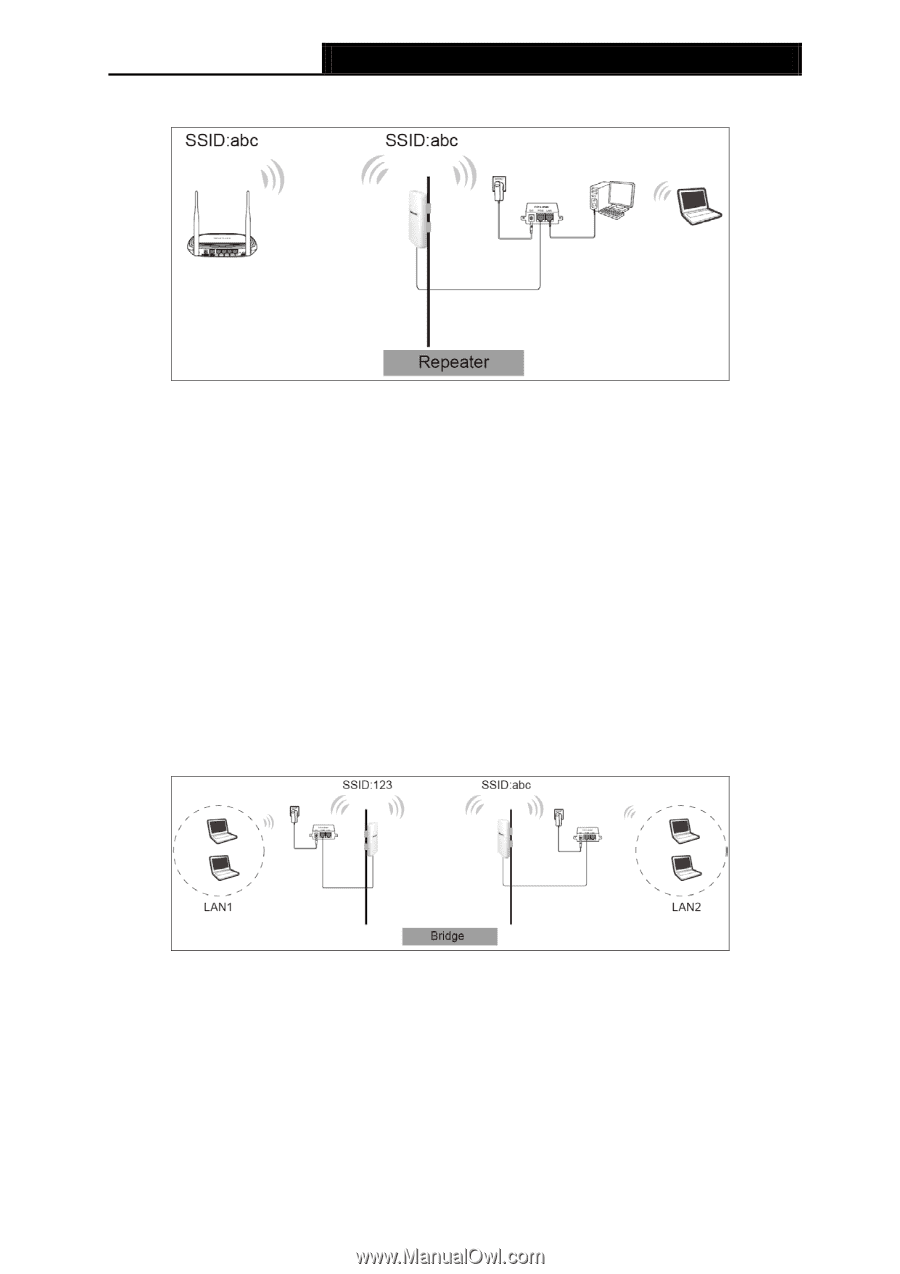
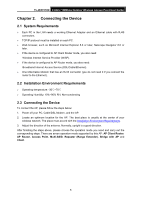
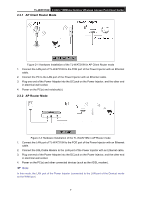
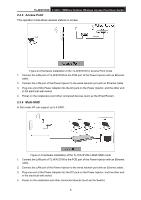
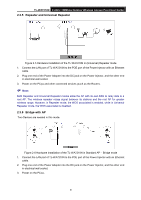
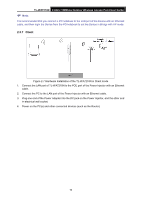
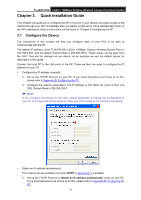
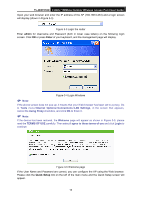
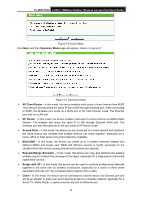
TL-WA7210N 2.4GHz 150Mbps Outdoor Wireless Access Point User Guide 2.3.5 Repeater and Universal Repeater Figure 2-5 Hardware Installation of the TL-WA7210N in (Universal) Repeater mode 1. Connect the LAN port of TL-WA7210N to the POE port of the Power Injector with an Ethernet cable. 2. Plug one end of the Power Adapter into the DC jack on the Power Injector, and the other end in electrical wall socket. 3. Power on the PC(s) and other connected devices (such as the Router). Note: Both Repeater and Universal Repeater modes allow the AP with its own BSS to relay data to a root AP. The wireless repeater relays signal between its stations and the root AP for greater wireless range. However, in Repeater mode, the WDS associated is enabled, while in Universal Repeater mode, the WDS associated is disabled. 2.3.6 Bridge with AP Two Devices are needed in this mode. Figure 2-6 Hardware Installation of the TL-WA7210N in Standard AP -- Bridge mode 1. Connect the LAN port of TL-WA7210N to the POE port of the Power Injector with an Ethernet cable. 2. Plug one end of the Power Adapter into the DC jack on the Power Injector, and the other end in electrical wall socket. 3. Power on the PC(s). 9
-
 1
1 -
2
-
3
-
4
-
5
-
6
-
7
-
8
-
9
-
10
-
11
-
12
-
13
-
 14
14 -
 15
15 -
 16
16 -
 17
17 -
 18
18 -
 19
19 -
 20
20 -
 21
21 -
 22
22 -
 23
23 -
 24
24 -
25
-
26
-
27
-
28
-
29
-
30
-
31
-
32
-
33
-
34
-
35
-
36
-
37
-
38
-
39
-
40
-
41
-
42
-
43
-
44
-
45
-
46
-
47
-
48
-
49
-
50
-
51
-
52
-
53
-
54
-
55
-
56
-
57
-
58
-
59
-
60
-
61
-
62
-
63
-
64
-
65
-
66
-
67
-
68
-
69
-
70
-
71
-
72
-
73
-
74
-
75
-
76
-
77
-
78
-
79
-
80
-
81
-
82
-
83
-
84
-
85
-
86
-
87
-
88
-
89
-
90
-
91
-
92
-
93
-
94
-
95
-
96
-
97
-
98
-
99
-
100
-
101
-
102
-
103
-
104
-
105
-
106
-
107
-
108
-
109
-
110
-
111
-
112
-
113
-
114
-
115
-
116
-
117
-
118
-
119
-
120
-
121
-
122
-
123
-
124
-
125
-
126
-
127
-
128
-
129
-
130
-
131
-
132
-
133
-
134
-
135
-
136
-
137
-
138
-
139
-
140
-
141
-
142
-
143
-
144
-
145
-
146
-
147
-
148
-
149
-
150
 |
 |