TP-Link TL-WA7210N User Guide - Page 27
Wireless Security Mode
 |
View all TP-Link TL-WA7210N manuals
Add to My Manuals
Save this manual to your list of manuals |
Page 27 highlights
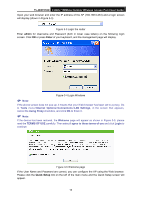
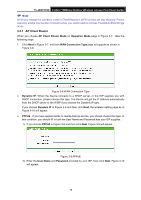
TL-WA7210N 2.4GHz 150Mbps Outdoor Wireless Access Point User Guide Wireless Security Mode - This option should be chosen according to the AP's security configuration. It is recommended that the security type is the same as your AP's security type. Wireless Password - If the AP your Device is going to connect needs password, you need to fill the password in this blank. Static IP - In this type, you should manually fill in the IP address, Subnet Mask, Default Gateway, and DNS IP address, which are specified by your ISP. 1) If you choose Static IP in Figure 3-8 and then click Next, Figure 3-11 will appear. Figure 3-11 Static IP IP Address - This is WAN IP address as seen by external users on the Internet (including your ISP). Enter the IP address into the field. Subnet Mask - It is used for the WAN IP address, which is usually 255.255.255.0. Default Gateway - Enter the default gateway in the blank if required. Primary DNS - Enter the DNS IP address in the blank if required. Secondary DNS - If your WISP provides another DNS IP address, enter it in this field. Note: The IP parameters should have been provided by your WISP. 2) After you have entered the above necessary parameters and then click Next, the wireless setting page as shown in Figure 3-10 will then appear. 2. Click Survey in Figure 3-10 to scan the wireless networks, then the AP List page will pop up as shown in , choose the target one, click Connect. You will then return to the previous page. If the AP your Device is going to connect needs password, you need to fill the password. Click Next. 17
-
 1
1 -
2
-
3
-
4
-
5
-
6
-
7
-
8
-
9
-
10
-
11
-
12
-
13
-
14
-
15
-
16
-
17
-
18
-
19
-
20
-
21
-
 22
22 -
 23
23 -
 24
24 -
 25
25 -
 26
26 -
 27
27 -
 28
28 -
 29
29 -
 30
30 -
 31
31 -
 32
32 -
33
-
34
-
35
-
36
-
37
-
38
-
39
-
40
-
41
-
42
-
43
-
44
-
45
-
46
-
47
-
48
-
49
-
50
-
51
-
52
-
53
-
54
-
55
-
56
-
57
-
58
-
59
-
60
-
61
-
62
-
63
-
64
-
65
-
66
-
67
-
68
-
69
-
70
-
71
-
72
-
73
-
74
-
75
-
76
-
77
-
78
-
79
-
80
-
81
-
82
-
83
-
84
-
85
-
86
-
87
-
88
-
89
-
90
-
91
-
92
-
93
-
94
-
95
-
96
-
97
-
98
-
99
-
100
-
101
-
102
-
103
-
104
-
105
-
106
-
107
-
108
-
109
-
110
-
111
-
112
-
113
-
114
-
115
-
116
-
117
-
118
-
119
-
120
-
121
-
122
-
123
-
124
-
125
-
126
-
127
-
128
-
129
-
130
-
131
-
132
-
133
-
134
-
135
-
136
-
137
-
138
-
139
-
140
-
141
-
142
-
143
-
144
-
145
-
146
-
147
-
148
-
149
-
150
 |
 |
