Toshiba Portege M400 PPM40C-TD30TEF Users Manual Canada; English - Page 80
Restarting the computer, Create Optical Recovery Discs, Data save in Hibernation Mode
 |
View all Toshiba Portege M400 PPM40C-TD30TEF manuals
Add to My Manuals
Save this manual to your list of manuals |
Page 80 highlights
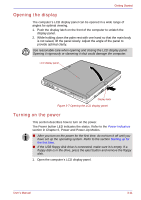
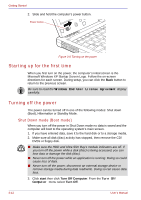
Getting Started Data save in Hibernation Mode When you turn off the power in Hibernation Mode, the computer takes a moment to save current memory data to the hard disk. During this time, the HDD indicator will light. After you turn off the computer, and the content of memory has been saved to the hard disk, turn off the power to any peripheral devices. Do not turn the computer or devices back on immediately. Wait a moment to let all capacitors fully discharge. Restarting the computer Certain conditions require that you reset the system. For example, if: ■ You change certain computer settings. ■ An error occurs and the computer does not respond to your keyboard commands. ■ There are three ways to reset the computer system: 1. Click start then click Turn off computer. From the Turn off computer menu select Restart. 2. Press Ctrl + Alt + Del to display the Windows Task Manager, then select Shut Down and Restart. 3. Slide the power button and hold it down for five seconds. Wait 10 to 15 seconds, then turn the power on again by sliding the power button. Create Optical Recovery Discs A recovery image of your computer is stored on the hard disk. You may use this image to create CD or DVD recovery discs using the following steps: 1. Select either blank CDs or DVD media. 2. The application will allow you to choose a type of media to create recovery CDs/DVD including: CD-R, CD-RW, DVD-R, DVD-RW, DVD+R and DVD+RW. Some media may not be compatible with the optical media drive of your computer. Please verify your optical media drive supports the blank media you choose. 3. Turn on your computer without a PC card storage device such as HDD to open Windows XP. 4. Insert the (first) blank media into the tray of the optical media drive. 5. Double click the Recovery Disc Creator Launcher icon on the Windows XP desktop, or Select the application from start Menu. 6. After Recovery Disc Creator starts, select the type of media and the title you wish to copy to the media then click the Burn button. If your optical media drive can only write to CDs, select "CD" as the "Type" on Recovery Disc Creator. If your optical media drive of your computer can write to either CD or DVDs, select the one you are using as the "Type" on Recovery Disc Creator. 3-16 User's Manual
-
 1
1 -
2
-
3
-
4
-
5
-
6
-
7
-
8
-
9
-
10
-
11
-
12
-
13
-
14
-
15
-
16
-
17
-
18
-
19
-
20
-
21
-
22
-
23
-
24
-
25
-
26
-
27
-
28
-
29
-
30
-
31
-
32
-
33
-
34
-
35
-
36
-
37
-
38
-
39
-
40
-
41
-
42
-
43
-
44
-
45
-
46
-
47
-
48
-
49
-
50
-
51
-
52
-
53
-
54
-
55
-
56
-
57
-
58
-
59
-
60
-
61
-
62
-
63
-
64
-
65
-
66
-
67
-
68
-
69
-
70
-
71
-
72
-
73
-
74
-
 75
75 -
 76
76 -
 77
77 -
 78
78 -
 79
79 -
 80
80 -
 81
81 -
 82
82 -
 83
83 -
 84
84 -
 85
85 -
86
-
87
-
88
-
89
-
90
-
91
-
92
-
93
-
94
-
95
-
96
-
97
-
98
-
99
-
100
-
101
-
102
-
103
-
104
-
105
-
106
-
107
-
108
-
109
-
110
-
111
-
112
-
113
-
114
-
115
-
116
-
117
-
118
-
119
-
120
-
121
-
122
-
123
-
124
-
125
-
126
-
127
-
128
-
129
-
130
-
131
-
132
-
133
-
134
-
135
-
136
-
137
-
138
-
139
-
140
-
141
-
142
-
143
-
144
-
145
-
146
-
147
-
148
-
149
-
150
-
151
-
152
-
153
-
154
-
155
-
156
-
157
-
158
-
159
-
160
-
161
-
162
-
163
-
164
-
165
-
166
-
167
-
168
-
169
-
170
-
171
-
172
-
173
-
174
-
175
-
176
-
177
-
178
-
179
-
180
-
181
-
182
-
183
-
184
-
185
-
186
-
187
-
188
-
189
-
190
-
191
-
192
-
193
-
194
-
195
-
196
-
197
-
198
-
199
-
200
-
201
-
202
-
203
-
204
-
205
-
206
-
207
-
208
-
209
-
210
-
211
-
212
-
213
-
214
-
215
-
216
-
217
-
218
-
219
-
220
-
221
-
222
-
223
-
224
-
225
-
226
-
227
-
228
-
229
-
230
-
231
-
232
-
233
-
234
-
235
-
236
-
237
-
238
-
239
-
240
-
241
-
242
-
243
-
244
-
245
-
246
-
247
-
248
-
249
-
250
-
251
-
252
-
253
-
254
-
255
-
256
-
257
-
258
-
259
-
260
-
261
-
262
-
263
-
264
-
265
-
266
-
267
-
268
-
269
-
270
-
271
-
272
-
273
-
274
-
275
-
276
-
277
-
278
-
279
-
280
-
281
-
282
-
283
-
284
-
285
-
286
-
287
-
288
-
289
-
290
-
291
-
292
-
293
-
294
-
295
-
296
-
297
-
298
-
299
-
300
-
301
-
302
-
303
-
304
-
305
-
306
 |
 |