ZyXEL Elite 2864 User Guide - Page 131
Auto-answer from Synchronous Mode, Manual Answer from Synchronous Mode, Change from Synchronous Mode
 |
View all ZyXEL Elite 2864 manuals
Add to My Manuals
Save this manual to your list of manuals |
Page 131 highlights
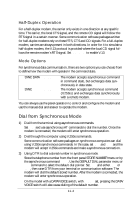
4) Dial from the panel. This is available only with an a LCD model's LCD panel. Set the modem to synchronous mode, then select DIAL MEMORY or DIAL NUMBER to dial out the number you want. After the modem is connected, the modem will enter synchronous operation. 5) Manual dial. Set the modem to synchronous mode (&M1 or &M3), then dial a number from a telephone set. When you hear the answer tone, type ATD (if &M1 is set) or press O in the IDLE SCREEN menu from the panel. With the ORG/ANS switch set to ORG on the non-LCD models, press the DATA/VOICE switch. The modem will go into synchronous operation after connection. Auto-answer from Synchronous Mode Set the modem to synchronous mode. Just as in the asynchronous setup, set the S-register S0 to equal the number of rings before auto-answer occurs. Set it from the terminal (if &M1 is set) using the asynchronous AT command, or select the STATUS REGISTER menu to change the S0 value. Manual Answer from Synchronous Mode Type ATA from the terminal (if &M1 is set) or press A on the IDLE SCREEN menu from the front panel. With the ORG/ANS switch set to ANS on the non-LCD model, press the DATA/VOICE switch. Change from Synchronous Mode into Asynchronous Mode Set the modem to asynchronous mode from the panel, or just reset from an asynchronous profile. On the non-LCD model, pressing the DATA/VOICE button while turning on the power will reset all profiles to their factory presets. The active setting is the factory default, which is asynchronous. If the modem is in &M1 mode, use the AT command AT&M0 to change back to asynchronous mode. If the modem is in V.25bis command mode, entering the RST command will change the modem to asynchronous AT command mode. 11-3
-
 1
1 -
2
-
3
-
4
-
5
-
6
-
7
-
8
-
9
-
10
-
11
-
12
-
13
-
14
-
15
-
16
-
17
-
18
-
19
-
20
-
21
-
22
-
23
-
24
-
25
-
26
-
27
-
28
-
29
-
30
-
31
-
32
-
33
-
34
-
35
-
36
-
37
-
38
-
39
-
40
-
41
-
42
-
43
-
44
-
45
-
46
-
47
-
48
-
49
-
50
-
51
-
52
-
53
-
54
-
55
-
56
-
57
-
58
-
59
-
60
-
61
-
62
-
63
-
64
-
65
-
66
-
67
-
68
-
69
-
70
-
71
-
72
-
73
-
74
-
75
-
76
-
77
-
78
-
79
-
80
-
81
-
82
-
83
-
84
-
85
-
86
-
87
-
88
-
89
-
90
-
91
-
92
-
93
-
94
-
95
-
96
-
97
-
98
-
99
-
100
-
101
-
102
-
103
-
104
-
105
-
106
-
107
-
108
-
109
-
110
-
111
-
112
-
113
-
114
-
115
-
116
-
117
-
118
-
119
-
120
-
121
-
122
-
123
-
124
-
125
-
 126
126 -
 127
127 -
 128
128 -
 129
129 -
 130
130 -
 131
131 -
 132
132 -
 133
133 -
 134
134 -
 135
135 -
 136
136 -
137
-
138
-
139
-
140
-
141
-
142
-
143
-
144
-
145
-
146
-
147
-
148
-
149
-
150
-
151
-
152
-
153
-
154
-
155
-
156
-
157
-
158
-
159
-
160
-
161
-
162
-
163
-
164
-
165
-
166
-
167
-
168
-
169
-
170
-
171
-
172
-
173
-
174
-
175
-
176
-
177
-
178
-
179
-
180
-
181
-
182
-
183
-
184
-
185
-
186
-
187
-
188
-
189
-
190
-
191
-
192
-
193
-
194
-
195
-
196
-
197
-
198
-
199
-
200
-
201
-
202
-
203
-
204
-
205
-
206
-
207
-
208
-
209
-
210
-
211
-
212
-
213
-
214
-
215
-
216
-
217
-
218
-
219
-
220
-
221
-
222
-
223
-
224
-
225
-
226
-
227
-
228
-
229
-
230
-
231
-
232
-
233
-
234
-
235
-
236
-
237
-
238
-
239
-
240
-
241
-
242
-
243
-
244
-
245
-
246
-
247
-
248
-
249
-
250
-
251
-
252
-
253
-
254
-
255
-
256
-
257
-
258
-
259
-
260
-
261
-
262
-
263
-
264
-
265
-
266
-
267
 |
 |
