Apple M9032LL User Guide
Apple M9032LL - Power Mac G5 Desktop Manual
 |
UPC - 718908487402
View all Apple M9032LL manuals
Add to My Manuals
Save this manual to your list of manuals |
Apple M9032LL manual content summary:
- Apple M9032LL | User Guide - Page 1
Power Mac G5 User's Guide Includes setup, expansion, and troubleshooting information for your Power Mac G5 computer - Apple M9032LL | User Guide - Page 2
Power Mac are trademarks of Apple Computer, Inc., registered in the U.S. and other countries. AirPort Express, Exposé, FileVault, Finder, the FireWire logo, iSight, Safari, Spotlight, SuperDrive, and Tiger are trademarks of Apple Computer, Inc. AppleCare and Apple Store are service marks of Apple - Apple M9032LL | User Guide - Page 3
to a Printer 25 Using Your Power Mac G5 26 Using Your Apple Keyboard 27 Using Your Mighty Mouse 28 Connecting Displays, Televisions, and Video Devices 30 Using Universal Serial Bus (USB) 32 Connecting With FireWire 34 Connecting Audio Devices 35 Using Your Optical Drive 37 Connecting to an Ethernet - Apple M9032LL | User Guide - Page 4
Backup Battery Chapter 5 69 Troubleshooting 71 Problems With Software 72 Problems With Your Display 74 Using Apple Hardware Test 74 Reinstalling the Software That Came With Your Computer 75 Maximizing Ethernet Performance 76 Locating Your Product Serial Number Appendix A 77 Specifications - Apple M9032LL | User Guide - Page 5
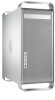
highperformance Power Mac G5 computer. This chapter contains instructions for setting up your computer and display. Your Power Mac G5 features the latest computer technology, including advanced 64-bit dual core processor technology, high-speed DDR2 memory, PCI Express graphics and expansion cards - Apple M9032LL | User Guide - Page 6
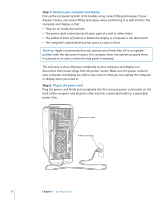
airflow in front of, behind, or below the display or computer is not obstructed  The computer's optical drive tray has space to open in front Warning: Apple recommends that you operate your Power Mac G5 in an upright position with the side panel in place. The computer does not operate properly when - Apple M9032LL | User Guide - Page 7
also connect displays that have an Apple Display Connector (ADC) or a video graphics array (VGA) connector, or you can connect a video device using one of the following display adapters: Â To connect a VGA display, use a DVI to VGA Adapter (included with your Power Mac G5) to connect the display to - Apple M9032LL | User Guide - Page 8
ADC Adapter or a DVI to Video Adapter, contact an Apple Authorized Reseller, visit an Apple Store retail location, or go online to the Apple Store at www.apple.com/store. For more information about connecting a display, see the guidelines in Chapter 3, "Using Your Power Mac G5." Step 4: Connect an - Apple M9032LL | User Guide - Page 9
Keyboard and Mouse If you purchased an Apple Wireless Keyboard and an Apple Wireless Mouse with your Power Mac G5, follow the instructions that came with the keyboard and mouse to set them up with your computer. Step 6: Turn on your Power Mac G5 Press the power button (®) on the front of the - Apple M9032LL | User Guide - Page 10
takes you through the process of transferring your information-just follow the onscreen instructions. Transferring information to your Power Mac G5 does not affect the information on your other Mac. You can transfer:  User accounts, including preferences and email  Network settings so that - Apple M9032LL | User Guide - Page 11
learn about... See... Using a specific hardware feature of your Power Mac G5 Chapter 3, "Using Your Power Mac G5," on page 25. Installing additional drives, Chapter 4, "Working Inside Your Computer," on page 45. memory, and cards, or changing the battery Troubleshooting your computer Chapter - Apple M9032LL | User Guide - Page 12
the mouse. Shutting Down Your Power Mac G5 If you will not be using your Power Mac G5 for a day or two, you should turn it off. To turn off your Power Mac G5, choose Apple () > Shut Down. Warning: Do not turn off the Power Mac G5 by turning off the switch on a power strip or by pulling out the - Apple M9032LL | User Guide - Page 13
www.apple.com, links you to the latest Apple news, free downloads, and online catalogs of software and hardware for your Power Mac G5. You can also find the manuals for many Apple products and technical support for all of Apple's products on the Service and Support website at www.apple.com/support - Apple M9032LL | User Guide - Page 14
Basic Features of Your Power Mac G5 Optical drive Status light ® Power button FireWire 400 port f Headphone jack USB 2.0 port 14 Chapter 2 Getting to Know Your Power Mac G5 - Apple M9032LL | User Guide - Page 15
(DL) discs. To open the optical drive, press the Media Eject (C) key on your Apple Keyboard. Status light A white light indicates that the computer is on; a pulsing light indicates the computer is in sleep. ® Power button Press this button to turn on your Power Mac G5, put it to sleep, or wake it - Apple M9032LL | User Guide - Page 16
Ports and Connectors on Your Power Mac G5 Latch DVI display port 2 Integrated Bluetooth and AirPort antenna FireWire 800 port FireWire 400 port - Audio line-out port , Audio line-in port Access covers for PCI Express expansion slots DVI display port 1 G Gigabit Ethernet ports (2) Optical digital - Apple M9032LL | User Guide - Page 17
30-inch Apple Cinema Display, to DVI display port 1. You can also connect displays that use a video graphics array (VGA) connector with the DVI to VGA Adapter that came with your Power Mac G5. Z Integrated Bluetooth and AirPort Extreme antenna ◊ If your Power Mac G5 has the optional Bluetooth® and - Apple M9032LL | User Guide - Page 18
Internal Expansion Options Optical drive DDR2 SDRAM slots Battery Top hard disk drive bay Bottom hard disk drive bay Slots 2-4: PCI Express Slot 1: PCI Express graphics (graphics card installed) 18 Chapter 2 Getting to Know Your Power Mac G5 - Apple M9032LL | User Guide - Page 19
"Installing Memory" on page 51. Battery Your Power Mac G5 uses a battery. If your computer has trouble starting up, or the system date and time are frequently incorrect, you may need to replace the battery. For more information, see "Replacing the Internal Backup Battery" on page 68. Hard disk drive - Apple M9032LL | User Guide - Page 20
that came with your Power Mac G5. Also open Mac Help and browse the information there. You can find information for new users, experienced users, and users switching to the Mac. If you have problems using Mac OS X, see Chapter 5, "Troubleshooting," on page 69 or choose Help > Mac Help from the menu - Apple M9032LL | User Guide - Page 21
System Preferences, your command center for most settings on your Power Mac G5. For more information, open Mac Help and search for "System Preferences" or for the specific preference pane you want to change. Note: Because Apple frequently releases new versions and updates to its system software - Apple M9032LL | User Guide - Page 22
force the Classic environment to quit, which closes all Classic applications. You can also restart the Finder from this dialog. If you're experiencing other problems with an application, see Chapter 5, "Troubleshooting," on page 69. 22 Chapter 2 Getting to Know Your Power Mac G5 - Apple M9032LL | User Guide - Page 23
search for "Software Update" in Mac Help. Â For the latest information about Mac OS X, go to the Mac OS X website at www.apple.com/macosx. Connecting to a Printer Follow the instructions that came with your printer to before you can print to them. Chapter 2 Getting to Know Your Power Mac G5 23 - Apple M9032LL | User Guide - Page 24
Dock to open the printer window. You can now see the print jobs in the print queue and work with them. For more information, open Mac Help and search for "printing." 24 Chapter 2 Getting to Know Your Power Mac G5 - Apple M9032LL | User Guide - Page 25
Mac G5 3 3 This chapter provides instructions for using the features of your Power Mac G5 computer, including your keyboard; mouse; audio and networking features; and USB, FireWire, AirPort and Bluetooth technologies. Look for important information in the following sections: Â "Using Your Apple - Apple M9032LL | User Guide - Page 26
drive. Press the Volume Up or Volume Down keys to adjust the sound level or press the Mute key to turn sound on or off. Use the Brightness Up and Brightness Down keys to adjust the level of brightness on an Apple an Apple Wireless Keyboard with your Power Mac G5, follow the instructions that - Apple M9032LL | User Guide - Page 27
Using Your Mighty Mouse Your Power Mac G5 comes with Mighty Mouse, which features a 360-degree clickable Keyboard & Mouse preferences. To open Keyboard & Mouse preferences: 1 Choose Apple (K) > System Preferences. 2 Click Keyboard & Mouse, and then click Mouse. Chapter 3 Using Your Power Mac G5 27 - Apple M9032LL | User Guide - Page 28
computer. To adjust the displays, choose Apple () > System Preferences and click Displays. By default, your computer starts up in extended desktop mode. To work in mirroring mode, choose Apple () > System Preferences, click Displays, and choose Mirroring. 28 Chapter 3 Using Your Power Mac G5 - Apple M9032LL | User Guide - Page 29
Apple () > System Preferences and click Displays  Connecting your display, see the setup instructions on page 7  Troubleshooting your display, see "Problems With Your Display" on page 72  Maintaining your display, see "Maintaining Your Display" on page 86 Chapter 3 Using Your Power Mac G5 - Apple M9032LL | User Guide - Page 30
Bus (USB) Your Power Mac G5 comes with three USB 2.0 ports; one on the front and two on the back. Your Apple Keyboard also has two USB 1.1 ports. You can use USB ports to connect to many types of external devices, including printers, scanners, digital cameras, microphones, game pads, joysticks - Apple M9032LL | User Guide - Page 31
in Mac Help. Choose Help > Mac Help and search for "USB." You can also find information on the Apple USB website at www.apple.com/usb. For information about USB devices available for your computer, go to the Macintosh Products Guide at www.apple.com/guide. Chapter 3 Using Your Power Mac G5 31 - Apple M9032LL | User Guide - Page 32
800 port on the back supports a maximum data rate of up to 800 megabits per second (Mbps). This port has a 9-pin connector and can be connected to 4-pin, 6-pin, or 9-pin FireWire devices. FireWire 400 (6-pin) FireWire 400 (4-pin) FireWire 800 (9-pin) 32 Chapter 3 Using Your Power Mac G5 - Apple M9032LL | User Guide - Page 33
with the FireWire icon appears on your desktop after you connect the hard disk drive to your Power Mac G5. Some FireWire hard disk drives get their power through the FireWire cable, so you don't need to connect to an external power supply. Â If you have a problem with your computer that prevents you - Apple M9032LL | User Guide - Page 34
3 Start up your Power Mac G5 and immediately hold down the T key. Your Power Mac G5 display shows the FireWire disk mode indicator, and the Power Mac G5 internal hard disk icon appears on the other computer's desktop. 4 Drag the Power Mac G5 hard disk icon to the Trash on the other computer when you - Apple M9032LL | User Guide - Page 35
see if the software is available on a CD, or purchase an external USB floppy disk drive for an Power Mac G5 from an Apple Authorized Reseller, an Apple Store retail location, or online from the Apple Store at www.apple.com/store. Inserting a Disc To install or use programs from a CD or DVD: 1 With - Apple M9032LL | User Guide - Page 36
your application for specific information about drive. 2 In the dialog that appears, enter a name for the disc and select the format you want to create. An icon for the DVD appears on the desktop. 3 Double-click the DVD icon and drag files and folders to it. 36 Chapter 3 Using Your Power Mac G5 - Apple M9032LL | User Guide - Page 37
Ethernet Network Your computer comes with two built-in Gigabit Ethernet ports with jumbo frame support. You can use either port to connect to a network or to a cable ). Visit an Apple Authorized Reseller for more information about Ethernet media adapters. Chapter 3 Using Your Power Mac G5 37 - Apple M9032LL | User Guide - Page 38
you start up your Power Mac G5, configure the software for your network connection. Your network administrator can provide the necessary information. You can also find information in Mac Help (choose Help > Mac Help). To configure your network settings: 1 Choose Apple () > System Preferences and - Apple M9032LL | User Guide - Page 39
information about connecting your Power Mac G5 to a network, go to the Service & Support website at www.apple.com/support. For information about networking products you can use with your Power Mac G5, go to the Macintosh Products Guide at www.apple.com/guide. Understanding AirPort Extreme Wireless - Apple M9032LL | User Guide - Page 40
near the computer can cause interference. See the instructions that came with your AirPort Express or AirPort Extreme Base Station to learn about avoiding interference. For more information, go to the Service & Support website at www.apple.com/support. More Information About AirPort To purchase an - Apple M9032LL | User Guide - Page 41
, or from the online Apple Store at www.apple.com/store). If you ordered Bluetooth technology when you purchased your Power Mac G5, it is already installed. Note: If your Power Mac G5 doesn't include Bluetooth technology, you can have it installed by an Apple Authorized Service Provider or at an - Apple M9032LL | User Guide - Page 42
Help. You can also find information on the Apple website at www.apple.com/bluetooth. Note: If you did not order Bluetooth technology with your Power Mac G5, you can have it installed by an Apple Authorized Service Provider or at an Apple Store retail location. You can also purchase an external - Apple M9032LL | User Guide - Page 43
from an Apple Authorized Reseller. Bluetooth wireless networks, search for "AirPort" or "Bluetooth" in Mac Mac Help. If you have an Internet connection, you can transfer files via the Internet to your .Mac iDisk, where you or another. Mac user can download the files. Chapter 3 Using Your Power Mac G5 - Apple M9032LL | User Guide - Page 44
- Apple M9032LL | User Guide - Page 45
"Replacing the Internal Backup Battery" on page 68 Warning: Apple recommends that you have an Apple-certified technician install memory, PCI Express cards, and internal storage devices. Consult the service and support information that came with your computer for instructions about how to contact an - Apple M9032LL | User Guide - Page 46
of the Power Mac G5 to discharge any static electricity from your body. Important: Always discharge static before you touch any parts or install any components inside the computer. To avoid generating static electricity, do not walk around the room until you finish installing the cards, memory, or - Apple M9032LL | User Guide - Page 47
cord from the computer. · Warning: To avoid damaging its internal components or the components you want to install, always unplug your Power Mac G5. Do not attempt to install items inside the computer while it is plugged in. 5 Hold the side panel and lift the latch on the back - Apple M9032LL | User Guide - Page 48
6 Remove the side panel. Pull the top of the side panel away from the computer, and then lift it up and remove it from the computer. Important: When you remove the side panel, hold it securely. 48 Chapter 4 Working Inside Your Computer - Apple M9032LL | User Guide - Page 49
7 Remove the air deflector and place it on a soft, clean cloth. Important: Always remember to replace the air deflector after you finish working inside your computer. Your computer does not function properly without the air deflector in place. Using this finger hold, pull the air deflector away from - Apple M9032LL | User Guide - Page 50
the fan assembly completely out of the computer. Note: You do not need to remove the front fan assembly to replace or install optical or hard disk drives or PCI Express cards. 50 Chapter 4 Working Inside Your Computer - Apple M9032LL | User Guide - Page 51
do not fit in your Power Mac G5. Note: When purchasing DIMMs for use in Macintosh computers, make sure that the memory vendor conforms to the Joint Electron Device Engineering Council (JEDEC) specification. Check with your memory vendor to ensure that the DIMMs support the correct timing modes and - Apple M9032LL | User Guide - Page 52
installed in these two slots. If slots are available, and you want to install more memory, install additional DIMMs in a similar fashion: In pairs, one per bank, from the DIMMs in pairs of equal size and specification, and in the order described in the illustration above. 52 Chapter 4 Working Inside - Apple M9032LL | User Guide - Page 53
the back of the computer for support, align the first DIMM in the slot and push both ends of the DIMM down until the tabs are vertical and the ejectors snap into place. Note: If it is easier, you can lay your Power Mac G5 down to install memory. Place a soft, clean cloth on the - Apple M9032LL | User Guide - Page 54
6 Replace the front fan assembly by firmly pushing it back into the computer by the handle until it connects. Important: Make sure the fan assembly slides into the sheet metal divider at the top and engages the connector, as shown in the illustration, or your computer will not operate properly. - Apple M9032LL | User Guide - Page 55
7 Replace the air deflector. Slide the three tabs on the air deflector into the slots in the computer and then push the air deflector closed. Important: Always remember to replace the air deflector. Your computer does not function properly when the air deflector is not in place. Chapter 4 Working - Apple M9032LL | User Guide - Page 56
8 Replace the side panel. Important: Always replace the side panel before you start up your computer. Your computer does not function properly when the side panel is not in place. Place the side panel into the slot in the computer and then push the side panel closed. 56 Chapter 4 Working Inside - Apple M9032LL | User Guide - Page 57
requirements and devices supported, visit an Apple Authorized Reseller or the Service & Support website at www.apple.com/support. Important: Use the original Apple cables that came with your Power Mac G5 when you install or replace optical drives or Serial ATA hard disk drives. Chapter 4 Working - Apple M9032LL | User Guide - Page 58
, use holes that are closest to the corners of the drive. The four drive guides are stored in the plastic divider next to the hard drive bays. Your drive will need to have these blade-type connectors to attach the power and data cables. Some drives may have these pin-type connectors, too, but you - Apple M9032LL | User Guide - Page 59
and push the drive in. Engage the rear drive guides in the top track as the drive moves upward into the bay. Slide the drive in until it stops and secure it with the top drive bay tab. Drive guides Connect the power cable and the smaller data cable to the hard disk drive. Chapter 4 Working Inside - Apple M9032LL | User Guide - Page 60
disk and pull the cable down to expose the middle power cable connector. Connect the middle power cable connector to the top drive, and the bottom cable connector to the bottom drive. Connect the data cable to the hard disk drive. 7 Replace the side panel, following the directions that begin on - Apple M9032LL | User Guide - Page 61
2 Disconnect the optical drive ribbon cable from the logic board. Disconnect this cable from the main logic board in preparation for removing the optical drive. 3 Push the optical drive release levers out to release the drive. Swing open the two optical drive release levers. Chapter 4 Working - Apple M9032LL | User Guide - Page 62
divider inside the computer. Remove the metal shield from the optical drive. Remove the four metal optical drive guide pins from the bottom of the drive. Remove the power cable from the back of the optical drive. Remove the drive from the bay by inserting a couple of fingers through the ribbon - Apple M9032LL | User Guide - Page 63
down through the opening in the sheet metal divider inside the computer. Install the metal shield on the optical drive. Install the four metal optical drive guide pins into the bottom of the drive. Attach the power cable to the back of the optical drive. Chapter 4 Working Inside Your Computer 63 - Apple M9032LL | User Guide - Page 64
into the computer so that the guide pins on the bottom of the drive engage the four slots inside the computer. Close the optical drive release levers completely when the drive is properly seated. 15 Attach the optical drive ribbon cable to its connector on the logic board. Reattach this cable to the - Apple M9032LL | User Guide - Page 65
Before installing a card, check the specifications to make sure it can operate in your Power Mac G5. Important: Combined maximum power consumption for all four PCI Express slots must not exceed 200 watts (W). The total combined maximum video random access memory (VRAM) for all graphics cards is 1 GB - Apple M9032LL | User Guide - Page 66
1 through 4. Note: If it is easier, you can lay your Power Mac G5 down to install PCI Express cards. Place a soft, clean cloth on the desk or work surface to avoid scratching the work surface or your Power Mac G5. To install a PCI Express card: 1 Open the computer and remove the side panel and air - Apple M9032LL | User Guide - Page 67
all the way into the slot. If you're installing a 12-inch card, make sure the card engages the appropriate guide. Reinstall the screw to secure the card in place. Port access opening PCI Express slot If the PCI Express card you are installing is full-length (12 inches), make sure it fits in - Apple M9032LL | User Guide - Page 68
the computer is off. If you notice intermittent problems when your Power Mac G5 starts up or changes in the date and time settings, you may need to replace the battery. Your Power Mac G5 uses a CR 2032 Lithium coin cell battery. Important: Because batteries contain chemicals, which may be harmful to - Apple M9032LL | User Guide - Page 69
your Power Mac G5 by choosing Apple () > Restart to be sure the problem is entirely cleared up. You can also restart by pressing the power button (®) for about 5 seconds until your Power Mac G5 shuts down. Press the power button (®) again to start up your Power Mac G5. Â If the problem occurs - Apple M9032LL | User Guide - Page 70
you recently installed additional memory, a PCI expansion card, or another internal problem:  2 flashes: no RAM installed  3 flashes: incompatible RAM installed  4 flashes: no good DIMM banks  5 or 6 flashes: contact Apple or an Apple Authorized Service Provider 70 Chapter 5 Troubleshooting - Apple M9032LL | User Guide - Page 71
4-Trickle: yellow-Power Mac G5 is plugged into the wall correctly  LED 5-Open Firmware good: green-no problem  LED 6-CPU B: red-contact Apple or an Apple Authorized Service Provider  LED 7-Checkstop: red-contact Apple or an Apple Authorized Service Provider Edge of main logic board LED #1 LED - Apple M9032LL | User Guide - Page 72
problem using your computer or working with Mac OS X. Â Look in Mac OS Help (in the Help menu) for instructions and troubleshooting information. Â Go to the Apple Support website on the Internet for the latest troubleshooting information and software updates: www.apple.com/support. You have trouble - Apple M9032LL | User Guide - Page 73
display software, if your display came with installation software. Â If you see a sequence of two short flashes and a long flash, the display is detecting a problem with a backlighting lamp. Contact an Apple Authorized Reseller or Apple Authorized Service Provider. Chapter 5 Troubleshooting 73 - Apple M9032LL | User Guide - Page 74
the right arrow. 5 Follow the onscreen instructions when the Apple Hardware Test main screen appears (after about 45 seconds). 6 Make a note of the error code before pursuing support options. If Apple Hardware Test detects a problem, it displays an error code. If Apple Hardware Test does not detect - Apple M9032LL | User Guide - Page 75
-click "Install Mac OS 9 System Support." 4 Follow the onscreen instructions. 5 Select the destination disk for installation and continue following the onscreen instructions. Maximizing Ethernet Performance , see the documentation that came with the Ethernet switch. Chapter 5 Troubleshooting 75 - Apple M9032LL | User Guide - Page 76
the serial number of your computer. Open System Profiler (in Applications/Utilities) and click the System Profile tab. The serial number of your Power Mac G5 is also on the configuration label, which is located inside the side panel, directly below the air deflector. 76 Chapter 5 Troubleshooting - Apple M9032LL | User Guide - Page 77
Processor and Memory Specifications Processor  PowerPC G5 dual core processor  1 megabyte (MB) of on-chip L2 cache per processor Random-access memory (RAM)  Double-Data-Rate 2 (DDR2) synchronous dynamic random-access memory (SDRAM)  All DDR2 SDRAM supplied in removable dual inline memory modules - Apple M9032LL | User Guide - Page 78
at www.apple.com/displays.  Non-Apple displays: Go to www.apple.com/guide. SuperDrive (DVD+R DL/DVD±RW/CD-RW) Specifications  Disc diameters supported: 12 cm and 8 cm Data formats  CD-ROM  CD-Audio  CD-R  CD-RW  CD-I  CD-I Bridge  CD Extended  CD Mixed Mode  Photo CD  Video CD  Enhanced - Apple M9032LL | User Guide - Page 79
Channel speeds: IEEE Auto Negotiation of 10Base-T, 100Base-TX, and 1000Base-T Bluetooth Specifications (Optional)  Wireless data rate: Up to 3 Mbps  Range conditions)  Frequency band: 2.4 gigahertz (GHz)  Radio output power: 15 dBm (nominal) Compatibility  802.11 Direct Sequence Spread Spectrum - Apple M9032LL | User Guide - Page 80
clock mode, 16 kHz < Fsi < 96 kHz): Less than -112 dB (0.0003%) Analog Audio Specifications  Sample rate: 32 kHz, 44.1 kHz, 48 kHz, 64 kHz, 88.2 kHz, or 96 mean square) (Vrms) (+4 dBµ)  Output impedance: 24 ohms  Output power: 90 milliwatts (mW)  Signal-to-noise ratio: Greater than 90 dB  - Apple M9032LL | User Guide - Page 81
) or 6 A (high voltage range) Â Frequency: 50-60 Hz DC display output Dependent on video card Power Requirements for Devices You Can Connect Expansion cards Combined maximum power consumption for all four PCI Express slots should not exceed 200 watts (W). USB devices Each of the computer's built-in - Apple M9032LL | User Guide - Page 82
° to 95° F) Â Storage temperature: -40° to 47° C (-40° to 116° F) Â Relative humidity: 5% to 95% (noncondensing) Â Altitude: 0 to 3048 meters (0 to 10,000 feet) 82 Appendix A Specifications - Apple M9032LL | User Guide - Page 83
been dropped or the case has been otherwise damaged  You suspect that your computer or display needs service or repair  You want to clean the computer or display case or screen  You notice a coolant leak in or from your computer (for Power Mac G5 models equipped with a liquid cooling system) 83 - Apple M9032LL | User Guide - Page 84
them to handle any cables. Liquid Cooling System Some Power Mac G5 models use a liquid cooling system to manage the temperature in the computer. The liquid cooling system is sealed and is designed to be opened only by an Apple Authorized Service Provider (AASP). · Warning: Do not attempt to open - Apple M9032LL | User Guide - Page 85
.com/environment/resources/msds.html. For service or questions about your warranty, contact an Apple Authorized Service Provider or Apple. Service and support information is included with your computer's documentation. Apple and the Environment At Apple, we recognize our responsibility to minimize - Apple M9032LL | User Guide - Page 86
drive tray when it is open. Â Do not touch the optical drive lens with your fingers. Do not wipe the lens with a paper towel or other abrasive surface. If you need to clean the lens, see an Apple Authorized Service support your lower back (lumbar region). Follow the manufacturer's instructions desktop - Apple M9032LL | User Guide - Page 87
your work surface.) Forearms level or tilted slightly Lower back supported Screen positioned to avoid reflected glare Clearance under work surface Thighs health, safety, and maintenance, go to the Apple ergonomic website at www.apple.com/about/ergonomics. Avoid Hearing Damage Warning: Permanent - Apple M9032LL | User Guide - Page 88
- Apple M9032LL | User Guide - Page 89
guide to connect to the Internet. When you first start up Mac this appendix to set up your connection manually. There are four kinds of Internet phone directory. Look under "Internet access,""Internet service," or "online." Note: If you application and follow the onscreen instructions to set up AOL. - Apple M9032LL | User Guide - Page 90
your configuration. To find the settings on a Mac OS 9 computer: Â Open the TCP/IP a DSL or cable modem, follow the instructions that came with the modem to connect it your Internet connection, choose Apple () > System Preferences you get from your Internet service provider (ISP), your network - Apple M9032LL | User Guide - Page 91
the network supplies most of the required information for you automatically. If you selected "Manually" or "Using DHCP with a manual address," gather for PPPoE connections), gather the following:  Service provider  Account name  Password  PPPoE service name The information below is optional. Ask - Apple M9032LL | User Guide - Page 92
specific setup information from your ISP or network administrator, you can click the "Assist me" button in the Network preferences pane to open Network Setup Assistant, or you can enter the information manually. To enter your information manually Apple () > System Preferences from the menu - Apple M9032LL | User Guide - Page 93
3 Choose Network Port Configurations from the Show pop-up menu and select the On checkbox next to External Modem. 4 Drag External Modem to the top of the Port Configurations list to make it the preferred, or primary, network interface. 5 Choose External Modem from the Show pop-up menu and click PPP. - Apple M9032LL | User Guide - Page 94
a DSL or cable modem or Ethernet LAN, ask your ISP or network administrator how you should configure your Internet connection: Â Manually: With a manual configuration, your ISP or network administrator provides a static IP address and other information that you enter in Network preferences. Â Using - Apple M9032LL | User Guide - Page 95
To set up Network preferences for the built-in Ethernet port: 1 Choose Apple () > System Preferences from the menu bar. 2 Click Network. 3 the instructions to configure your network manually, using DHCP, or using PPPoE, as instructed by your ISP or network administrator. Manual Configuration - Apple M9032LL | User Guide - Page 96
3 Choose Manually from the Configure IPv4 pop-up menu. 4 Type the other information into the corresponding fields. 5 Click Apply Now. Once you configure your network, your connection - Apple M9032LL | User Guide - Page 97
IPv4 pop-up menu. 4 Click Apply Now. Open your web browser (or another TCP/IP application) to test your Internet connection. Note: Unless your ISP instructs you to do otherwise, ignore the DHCP Client ID field and the Search Domains field. PPPoE Configuration Some DSL-based ISPs use Point-to-Point - Apple M9032LL | User Guide - Page 98
2 Click PPPoE and select "Connect using PPPoE." 3 Type the information into the corresponding fields. If you want all users of your computer to use the same connection method, select "Save password." Note: To connect automatically when you start a TCP/IP application, such as a web browser or email, - Apple M9032LL | User Guide - Page 99
Manually from the Configure IPv4 pop-up menu, as instructed by your ISP. If you have a static IP address from your ISP, choose Manually AirPort Wireless Connection If your Power Mac G5 has AirPort Extreme installed, you , see the AirPort Base Station Setup Guide that came with your base station. - Apple M9032LL | User Guide - Page 100
required.  Domain name server (DNS) addresses, if necessary  DHCP or manual IP address configuration  IP address  Router address  Subnet mask  preferences. To set up Network preferences for an AirPort connection: 1 Choose Apple () > System Preferences from the menu bar. 2 Click Network. 3 - Apple M9032LL | User Guide - Page 101
4 Select the On checkbox next to AirPort. Next, follow the instructions to configure your network either manually or using DHCP, as instructed by your ISP or network administrator. If you're setting up your network yourself, it may be easier to configure the network using DHCP, because - Apple M9032LL | User Guide - Page 102
, there may be a problem with the Internet service provider (ISP) you are trying to connect to, with an external device you are using to connect to your ISP, or with the server you are trying to access. You can also try the following steps: Check the cables and power supplies Make sure all modem - Apple M9032LL | User Guide - Page 103
one IP address among multiple computers. For information on using the AirPort Extreme Base Station, check the onscreen help or visit the Apple AirPort website at www.apple.com/airport. If you cannot resolve the issue using these steps, contact your ISP. Appendix C Connecting to the Internet 103 - Apple M9032LL | User Guide - Page 104
- Apple M9032LL | User Guide - Page 105
with the instructions, may cause Apple Authorized Service Provider or Apple. See the service and support information that came with your Apple Bluetooth Europe-EU Declaration of Conformity This wireless device complies with the specifications specified in your equipment's manual may result in hazardous - Apple M9032LL | User Guide - Page 106
a user-accessible area, indicates that the drive meets minimum safety requirements. A service warning label is located in a serviceaccessible area Power Mac G5 and its battery according to your local environmental laws and guidelines. For information about Apple's recycling program, go to www.apple - Apple M9032LL | User Guide - Page 107
49 AirPort Extreme 79 antenna 17 base station 40 card 39 connection 92 setting up 99 setting up a connection 91 wireless networking 39 analog audio 35, 80 line-in 17, 80 line-out 17, 80 applications freeze 22 B battery 19 replacing 68 Bluetooth 41, 43, 79 antenna 17 file exchange 42 keyboard - Apple M9032LL | User Guide - Page 108
75 battery 68 Classic support 75 Mac OS 9 75 Mac OS X 75 memory 51 PCI Express cards 66 PCI Express graphics card 65 Serial ATA drives 58 SuperDrive 60 Internet configuration 94 connecting to 11, 99 problems connecting 102 Internet service provider 89 ISP 89 iTunes 36 J JEDEC specification 51 - Apple M9032LL | User Guide - Page 109
stopping an application 22 SuperDrive 15, 19 System Preferences customizing the desktop 20 Print & Fax 24 Software Update 23 T telephone dial-up connection 90 testing your Internet configuration 94 U unable to eject a disc 70 updating software 23 - Apple M9032LL | User Guide - Page 110
- Apple M9032LL | User Guide - Page 111
- Apple M9032LL | User Guide - Page 112
-
 1
1 -
 2
2 -
 3
3 -
 4
4 -
 5
5 -
 6
6 -
 7
7 -
8
-
9
-
10
-
11
-
12
-
13
-
14
-
15
-
16
-
17
-
18
-
19
-
20
-
21
-
22
-
23
-
24
-
25
-
26
-
27
-
28
-
29
-
30
-
31
-
32
-
33
-
34
-
35
-
36
-
37
-
38
-
39
-
40
-
41
-
42
-
43
-
44
-
45
-
46
-
47
-
48
-
49
-
50
-
51
-
52
-
53
-
54
-
55
-
56
-
57
-
58
-
59
-
60
-
61
-
62
-
63
-
64
-
65
-
66
-
67
-
68
-
69
-
70
-
71
-
72
-
73
-
74
-
75
-
76
-
77
-
78
-
79
-
80
-
81
-
82
-
83
-
84
-
85
-
86
-
87
-
88
-
89
-
90
-
91
-
92
-
93
-
94
-
95
-
96
-
97
-
98
-
99
-
100
-
101
-
102
-
103
-
104
-
105
-
106
-
107
-
108
-
109
-
110
-
111
-
112
 |
 |

Power Mac G5
User’s Guide
Includes setup, expansion, and
troubleshooting information for
your Power Mac G5 computer