Apple M9032LL User Guide - Page 62
Remove the power cable from the drive.
 |
UPC - 718908487402
View all Apple M9032LL manuals
Add to My Manuals
Save this manual to your list of manuals |
Page 62 highlights
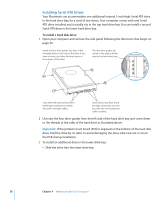
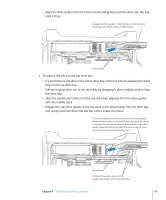
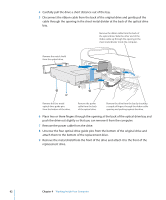
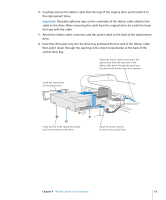
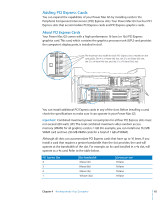
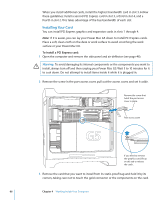
4 Carefully pull the drive a short distance out of the bay. 5 Disconnect the ribbon cable from the back of the original drive and gently pull the cable through the opening in the sheet metal divider at the back of the optical drive bay. Remove the ribbon cable from the back of the optical drive. Slide the other end of the ribbon cable up through the opening in the sheet metal divider inside the computer. Remove the metal shield from the optical drive. Remove the four metal optical drive guide pins from the bottom of the drive. Remove the power cable from the back of the optical drive. Remove the drive from the bay by inserting a couple of fingers through the ribbon cable opening and pushing against the drive. 6 Place two or three fingers through the opening at the back of the optical drive bay and push the drive out slightly so that you can remove it from the computer. 7 Remove the power cable from the drive. 8 Unscrew the four optical drive guide pins from the bottom of the original drive and attach them to the bottom of the replacement drive. 9 Remove the metal shield from the front of the drive and attach it to the front of the replacement drive. 62 Chapter 4 Working Inside Your Computer
-
 1
1 -
2
-
3
-
4
-
5
-
6
-
7
-
8
-
9
-
10
-
11
-
12
-
13
-
14
-
15
-
16
-
17
-
18
-
19
-
20
-
21
-
22
-
23
-
24
-
25
-
26
-
27
-
28
-
29
-
30
-
31
-
32
-
33
-
34
-
35
-
36
-
37
-
38
-
39
-
40
-
41
-
42
-
43
-
44
-
45
-
46
-
47
-
48
-
49
-
50
-
51
-
52
-
53
-
54
-
55
-
56
-
 57
57 -
 58
58 -
 59
59 -
 60
60 -
 61
61 -
 62
62 -
 63
63 -
 64
64 -
 65
65 -
 66
66 -
 67
67 -
68
-
69
-
70
-
71
-
72
-
73
-
74
-
75
-
76
-
77
-
78
-
79
-
80
-
81
-
82
-
83
-
84
-
85
-
86
-
87
-
88
-
89
-
90
-
91
-
92
-
93
-
94
-
95
-
96
-
97
-
98
-
99
-
100
-
101
-
102
-
103
-
104
-
105
-
106
-
107
-
108
-
109
-
110
-
111
-
112
 |
 |
