Apple M9032LL User Guide - Page 58
Installing Serial ATA Drives, To install a hard disk drive
 |
UPC - 718908487402
View all Apple M9032LL manuals
Add to My Manuals
Save this manual to your list of manuals |
Page 58 highlights
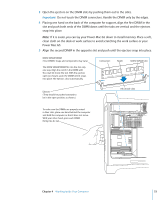
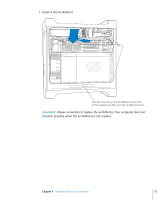
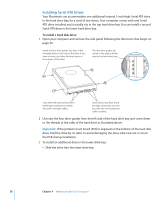
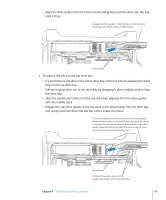
Installing Serial ATA Drives Your Macintosh can accommodate one additional internal 1-inch-high Serial ATA drive in the hard drive bay, for a total of two drives. Your computer comes with one Serial ATA drive installed, and it usually sits in the top hard drive bay. You can install a second Serial ATA drive in the lower hard drive bay. To install a hard disk drive: 1 Open your computer and remove the side panel following the directions that begin on page 46. Install the four drive guides into four of the threaded holes on the side of the drive. If you have a choice, use holes that are closest to the corners of the drive. The four drive guides are stored in the plastic divider next to the hard drive bays. Your drive will need to have these blade-type connectors to attach the power and data cables. Some drives may have these pin-type connectors, too, but you won't be connecting any cables to them. 2 Unscrew the four drive guides from the left side of the hard drive bay and screw them to the threads at the sides of the hard drive as illustrated above. Important: If the printed circuit board (PCB) is exposed on the bottom of the hard disk drive, hold the drive by its sides. To avoid damaging the drive, take care not to touch the PCB during installation. 3 To install an additional drive in the lower drive bay: Â Slide the drive into the lower drive bay 58 Chapter 4 Working Inside Your Computer
-
 1
1 -
2
-
3
-
4
-
5
-
6
-
7
-
8
-
9
-
10
-
11
-
12
-
13
-
14
-
15
-
16
-
17
-
18
-
19
-
20
-
21
-
22
-
23
-
24
-
25
-
26
-
27
-
28
-
29
-
30
-
31
-
32
-
33
-
34
-
35
-
36
-
37
-
38
-
39
-
40
-
41
-
42
-
43
-
44
-
45
-
46
-
47
-
48
-
49
-
50
-
51
-
52
-
 53
53 -
 54
54 -
 55
55 -
 56
56 -
 57
57 -
 58
58 -
 59
59 -
 60
60 -
 61
61 -
 62
62 -
 63
63 -
64
-
65
-
66
-
67
-
68
-
69
-
70
-
71
-
72
-
73
-
74
-
75
-
76
-
77
-
78
-
79
-
80
-
81
-
82
-
83
-
84
-
85
-
86
-
87
-
88
-
89
-
90
-
91
-
92
-
93
-
94
-
95
-
96
-
97
-
98
-
99
-
100
-
101
-
102
-
103
-
104
-
105
-
106
-
107
-
108
-
109
-
110
-
111
-
112
 |
 |
