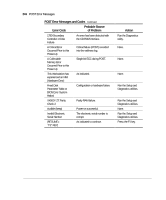
Compaq AP500 Reference Guide - Page 128
Run Computer Setup to recon the system., Turn on the workstation.
 |
UPC - 743172574732
View all Compaq AP500 manuals
Add to My Manuals
Save this manual to your list of manuals |
Page 128 highlights
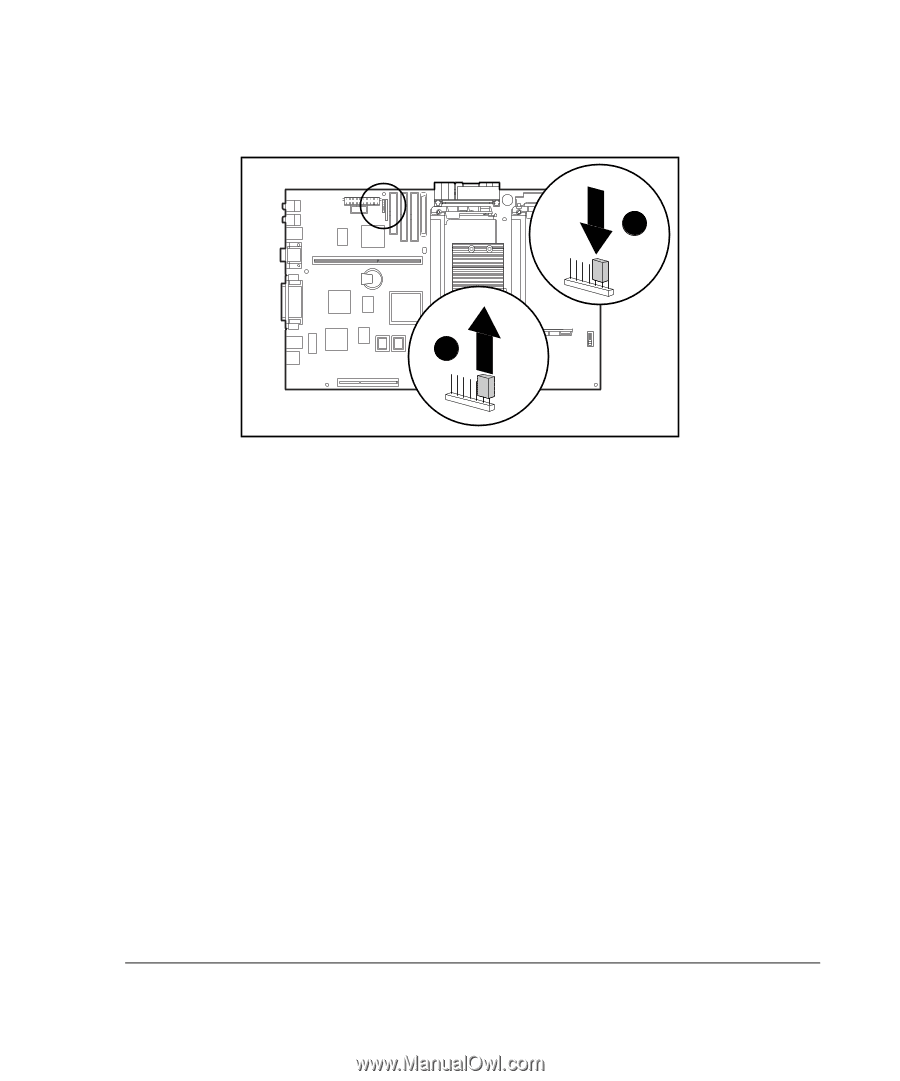
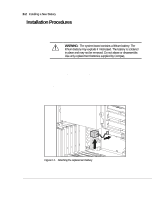
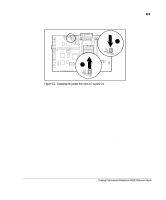
E-3 5. Change the jumper from pins 6-7 – to pins 5-6 —. 2 1 Figure E-2. Changing the jumper from pins 6-7 to pins 5-6 6. Place the pale blue sticker included with the battery kit above the power connector on the back of the workstation. 7. Replace the expansion board assembly and the side access panel. 8. Plug the power cord into a grounded AC outlet. 9. Turn on the workstation. 10. Run Computer Setup to reconfigure the system. 11. If the workstation has a Compaq hard drive, you have now successfully completed the installation. If the workstation has a third-party hard drive, you must reconfigure the hard drive using the parameters you recorded before you began the installation procedure. Compaq Professional Workstation AP500 Reference Guide
-
 1
1 -
2
-
3
-
4
-
5
-
6
-
7
-
8
-
9
-
10
-
11
-
12
-
13
-
14
-
15
-
16
-
17
-
18
-
19
-
20
-
21
-
22
-
23
-
24
-
25
-
26
-
27
-
28
-
29
-
30
-
31
-
32
-
33
-
34
-
35
-
36
-
37
-
38
-
39
-
40
-
41
-
42
-
43
-
44
-
45
-
46
-
47
-
48
-
49
-
50
-
51
-
52
-
53
-
54
-
55
-
56
-
57
-
58
-
59
-
60
-
61
-
62
-
63
-
64
-
65
-
66
-
67
-
68
-
69
-
70
-
71
-
72
-
73
-
74
-
75
-
76
-
77
-
78
-
79
-
80
-
81
-
82
-
83
-
84
-
85
-
86
-
87
-
88
-
89
-
90
-
91
-
92
-
93
-
94
-
95
-
96
-
97
-
98
-
99
-
100
-
101
-
102
-
103
-
104
-
105
-
106
-
107
-
108
-
109
-
110
-
111
-
112
-
113
-
114
-
115
-
116
-
117
-
118
-
119
-
120
-
121
-
122
-
 123
123 -
 124
124 -
 125
125 -
 126
126 -
 127
127 -
 128
128 -
 129
129 -
 130
130 -
 131
131 -
 132
132 -
 133
133 -
134
-
135
-
136
-
137
-
138
-
139
-
140
 |
 |