Compaq AP500 Reference Guide - Page 74
Removing a Cooling Shield for a Hard, Drive Installation
 |
UPC - 743172574732
View all Compaq AP500 manuals
Add to My Manuals
Save this manual to your list of manuals |
Page 74 highlights
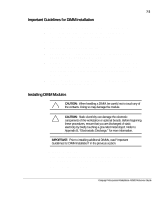
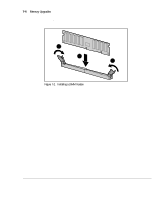
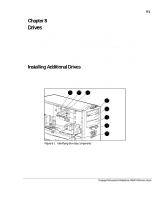
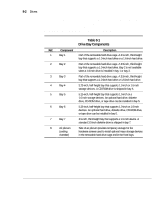
8-4 Drives Removing a Cooling Shield for a Hard Drive Installation A cooling shield covers bays 5 and 6 to provide proper cooling and EMI protection. To remove a cooling shield: 1. Turn off the workstation and disconnect the power cord from the grounded AC outlet and the back of the workstation. 2. Remove the side access panel and front bezel. 3. Refer to the following illustration to remove a cooling shield. COMPACT Figure 8-3. Removing a cooling shield IMPORTANT: You will also need to replace the shield after the drive is installed in the bay. To replace the cooling shield, reinsert the two screws.
-
 1
1 -
2
-
3
-
4
-
5
-
6
-
7
-
8
-
9
-
10
-
11
-
12
-
13
-
14
-
15
-
16
-
17
-
18
-
19
-
20
-
21
-
22
-
23
-
24
-
25
-
26
-
27
-
28
-
29
-
30
-
31
-
32
-
33
-
34
-
35
-
36
-
37
-
38
-
39
-
40
-
41
-
42
-
43
-
44
-
45
-
46
-
47
-
48
-
49
-
50
-
51
-
52
-
53
-
54
-
55
-
56
-
57
-
58
-
59
-
60
-
61
-
62
-
63
-
64
-
65
-
66
-
67
-
68
-
 69
69 -
 70
70 -
 71
71 -
 72
72 -
 73
73 -
 74
74 -
 75
75 -
 76
76 -
 77
77 -
 78
78 -
 79
79 -
80
-
81
-
82
-
83
-
84
-
85
-
86
-
87
-
88
-
89
-
90
-
91
-
92
-
93
-
94
-
95
-
96
-
97
-
98
-
99
-
100
-
101
-
102
-
103
-
104
-
105
-
106
-
107
-
108
-
109
-
110
-
111
-
112
-
113
-
114
-
115
-
116
-
117
-
118
-
119
-
120
-
121
-
122
-
123
-
124
-
125
-
126
-
127
-
128
-
129
-
130
-
131
-
132
-
133
-
134
-
135
-
136
-
137
-
138
-
139
-
140
 |
 |

8-4
Drives
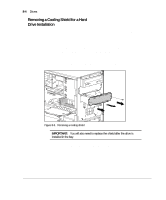
Removing a Cooling Shield for a Hard
Drive Installation
A cooling shield covers bays 5 and 6 to provide proper cooling and EMI
protection.
To remove a cooling shield:
1.
Turn off the workstation and disconnect the power cord from the
grounded AC outlet and the back of the workstation.
2.
Remove the side access panel and front bezel.
3.
Refer to the following illustration to remove a cooling shield.
Figure 8-3.
Removing a cooling shield
IMPORTANT:
You will also need to replace the shield after the drive is
installed in the bay.
To replace the cooling shield, reinsert the two screws.