Compaq AP500 Reference Guide - Page 69
Important Guidelines for DIMM Installation, Installing DIMM Modules
 |
UPC - 743172574732
View all Compaq AP500 manuals
Add to My Manuals
Save this manual to your list of manuals |
Page 69 highlights
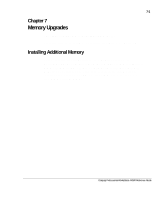
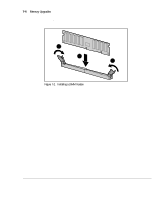
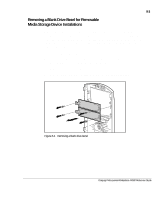
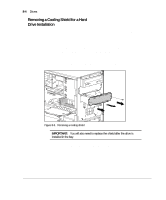
7-3 Important Guidelines for DIMM Installation When installing DIMMs, you MUST follow the following guidelines: s Use only 32-, 64-, 128-, or 256-MB, Registered 100-MHz Error Checking and Correcting (ECC) SDRAM DIMMs. s Registered DIMMs must be used. s DIMMs must have a 4 KHz refresh rate. s DO NOT INSTALL DIMMS THAT DO NOT SUPPORT ERROR CHECKING AND CORRECTING (ECC). s A DIMM can be installed one way only. Be sure to match the two key slots on the DIMM with the tab on the DIMM socket. Push the DIMM down into the DIMM socket, ensuring that it is fully inserted and properly seated. s When upgrading, do not exceed 1 GB total. Upgrades exceeding 1 GB will cause the system to halt. Installing DIMM Modules CAUTION: When handling a DIMM, be careful not to touch any of the contacts. Doing so may damage the module. CAUTION: Static electricity can damage the electronic components of the workstation or optional boards. Before beginning these procedures, ensure that you are discharged of static electricity by briefly touching a grounded metal object. Refer to Appendix B, "Electrostatic Discharge," for more information. IMPORTANT: Prior to installing additional DIMMs, read "Important Guidelines for DIMM Installation" in the previous section. To install a memory module: 1. Turn off the workstation and disconnect the power cord from the grounded AC outlet and the back of the workstation. 2. Remove the side access panel. Compaq Professional Workstation AP500 Reference Guide
-
 1
1 -
2
-
3
-
4
-
5
-
6
-
7
-
8
-
9
-
10
-
11
-
12
-
13
-
14
-
15
-
16
-
17
-
18
-
19
-
20
-
21
-
22
-
23
-
24
-
25
-
26
-
27
-
28
-
29
-
30
-
31
-
32
-
33
-
34
-
35
-
36
-
37
-
38
-
39
-
40
-
41
-
42
-
43
-
44
-
45
-
46
-
47
-
48
-
49
-
50
-
51
-
52
-
53
-
54
-
55
-
56
-
57
-
58
-
59
-
60
-
61
-
62
-
63
-
 64
64 -
 65
65 -
 66
66 -
 67
67 -
 68
68 -
 69
69 -
 70
70 -
 71
71 -
 72
72 -
 73
73 -
 74
74 -
75
-
76
-
77
-
78
-
79
-
80
-
81
-
82
-
83
-
84
-
85
-
86
-
87
-
88
-
89
-
90
-
91
-
92
-
93
-
94
-
95
-
96
-
97
-
98
-
99
-
100
-
101
-
102
-
103
-
104
-
105
-
106
-
107
-
108
-
109
-
110
-
111
-
112
-
113
-
114
-
115
-
116
-
117
-
118
-
119
-
120
-
121
-
122
-
123
-
124
-
125
-
126
-
127
-
128
-
129
-
130
-
131
-
132
-
133
-
134
-
135
-
136
-
137
-
138
-
139
-
140
 |
 |