Compaq AP500 Reference Guide - Page 56
Installation Sequence, WARNING, CAUTION
 |
UPC - 743172574732
View all Compaq AP500 manuals
Add to My Manuals
Save this manual to your list of manuals |
Page 56 highlights
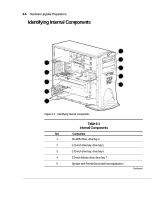
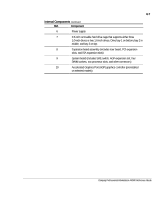
6-2 Hardware Upgrade Preparations Installation Sequence This chapter begins with an overview of the installation and configuration sequence. Follow this sequence of steps to ensure the proper installation of any optional equipment. Before you begin, observe the following precautions: WARNING: To reduce the risk of personal injury from hot surfaces, allow the internal system components to cool before touching. CAUTION: Static electricity can damage the electronic components of the workstation or optional equipment. Before beginning these procedures, ensure that you are discharged of static electricity by briefly touching a grounded metal object. Refer to Appendix B for more information. 1. Turn off the workstation and disconnect the power cord from the grounded AC outlet and the back of the workstation. 2. If you are installing or removing drives in the front bays, refer to the section "Removing the Front Bezel" in this chapter for instructions. 3. Open the workstation by removing its outside side access panel. Refer to the section "Removing the Side Access Panel" in this chapter for instructions. 4. Install any optional equipment: ISA or PCI expansion board, Accelerated Graphic Port (AGP) graphics controller, processor upgrade, memory, or drive. Refer to the applicable chapters in this manual or the documentation provided with the optional equipment for instructions. 5. Replace the front bezel, if necessary, and the side access panel. 6. Reconnect the power cord to the back of the workstation and plug in the power cord to a grounded AC outlet. 7. Turn on the monitor, workstation, and any devices you installed. 8. Reconfigure the workstation, if necessary. See Chapter 2 for instructions. 9. Test the workstation (optional) using the TEST utility.
-
 1
1 -
2
-
3
-
4
-
5
-
6
-
7
-
8
-
9
-
10
-
11
-
12
-
13
-
14
-
15
-
16
-
17
-
18
-
19
-
20
-
21
-
22
-
23
-
24
-
25
-
26
-
27
-
28
-
29
-
30
-
31
-
32
-
33
-
34
-
35
-
36
-
37
-
38
-
39
-
40
-
41
-
42
-
43
-
44
-
45
-
46
-
47
-
48
-
49
-
50
-
 51
51 -
 52
52 -
 53
53 -
 54
54 -
 55
55 -
 56
56 -
 57
57 -
 58
58 -
 59
59 -
 60
60 -
 61
61 -
62
-
63
-
64
-
65
-
66
-
67
-
68
-
69
-
70
-
71
-
72
-
73
-
74
-
75
-
76
-
77
-
78
-
79
-
80
-
81
-
82
-
83
-
84
-
85
-
86
-
87
-
88
-
89
-
90
-
91
-
92
-
93
-
94
-
95
-
96
-
97
-
98
-
99
-
100
-
101
-
102
-
103
-
104
-
105
-
106
-
107
-
108
-
109
-
110
-
111
-
112
-
113
-
114
-
115
-
116
-
117
-
118
-
119
-
120
-
121
-
122
-
123
-
124
-
125
-
126
-
127
-
128
-
129
-
130
-
131
-
132
-
133
-
134
-
135
-
136
-
137
-
138
-
139
-
140
 |
 |
