Compaq AP500 Reference Guide - Page 29
Using Computer Setup, Table 2-1, Computer Setup Features, Computer Setup Selection - manual
 |
UPC - 743172574732
View all Compaq AP500 manuals
Add to My Manuals
Save this manual to your list of manuals |
Page 29 highlights
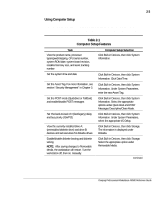
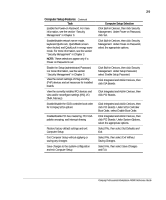
2-3 Using Computer Setup To use Computer Setup, select Computer Setup from the Compaq Utilities menu. The following table describes the features available in Computer Setup. Table 2-1 Computer Setup Features Task View the product name, processor type/speed/stepping, CPU serial number, system ROM date, system board revision, installed memory size, and asset tracking number Computer Setup Selection Click Built-in Devices, then click System Information. Set the system time and date Click Built-in Devices, then click System Information. Click Date/Time. Set the Asset Tag. For more information, see section "Security Management" in Chapter 3. Click Built-in Devices, then click System Information. Under System Parameters, enter the new Asset Tag. Set the POST mode (QuickBoot or FullBoot) and enable/disable POST messages Click Built-in Devices, then click System Information. Select the appropriate options under Quick Boot and POST Messages Descriptive/Clean Mode. Set ISA back-to-back I/O (fast/legacy) delay and bus priority (ISA/PCI) Click Built-in Devices, then click System Information. Under System Parameters, select the appropriate I/O Delay. View the currently installed drive A: (preinstalled diskette drive) and drive B: devices and set resources for diskette drives Click Built-in Devices, then click Storage. The information is displayed under Diskette. Enable/disable diskette booting and diskette writing NOTE: After saving changes to Removable Media, the workstation will restart. Turn the workstation off, then on, manually. Click Built-in Devices, then click Storage. Select the appropriate option under Removable Media. Continued Compaq Professional Workstation AP500 Reference Guide
-
 1
1 -
2
-
3
-
4
-
5
-
6
-
7
-
8
-
9
-
10
-
11
-
12
-
13
-
14
-
15
-
16
-
17
-
18
-
19
-
20
-
21
-
22
-
23
-
 24
24 -
 25
25 -
 26
26 -
 27
27 -
 28
28 -
 29
29 -
 30
30 -
 31
31 -
 32
32 -
 33
33 -
 34
34 -
35
-
36
-
37
-
38
-
39
-
40
-
41
-
42
-
43
-
44
-
45
-
46
-
47
-
48
-
49
-
50
-
51
-
52
-
53
-
54
-
55
-
56
-
57
-
58
-
59
-
60
-
61
-
62
-
63
-
64
-
65
-
66
-
67
-
68
-
69
-
70
-
71
-
72
-
73
-
74
-
75
-
76
-
77
-
78
-
79
-
80
-
81
-
82
-
83
-
84
-
85
-
86
-
87
-
88
-
89
-
90
-
91
-
92
-
93
-
94
-
95
-
96
-
97
-
98
-
99
-
100
-
101
-
102
-
103
-
104
-
105
-
106
-
107
-
108
-
109
-
110
-
111
-
112
-
113
-
114
-
115
-
116
-
117
-
118
-
119
-
120
-
121
-
122
-
123
-
124
-
125
-
126
-
127
-
128
-
129
-
130
-
131
-
132
-
133
-
134
-
135
-
136
-
137
-
138
-
139
-
140
 |
 |
