Epson Perfection 1640SU Office Scanner Basics - Page 13
Scsi
 |
View all Epson Perfection 1640SU Office manuals
Add to My Manuals
Save this manual to your list of manuals |
Page 13 highlights
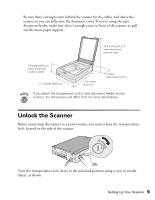
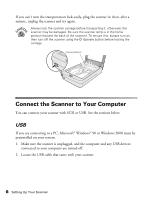
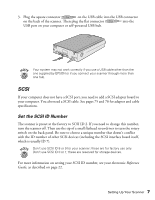
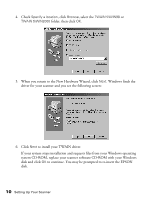
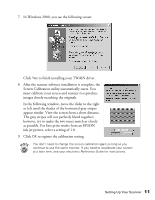
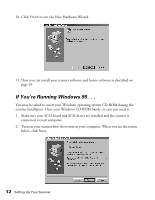
3. Plug the square connector on the USB cable into the USB connector on the back of the scanner. Then plug the flat connector into the USB port on your computer or self-powered USB hub. Your system may not work correctly if you use a USB cable other than the one supplied by EPSON or if you connect your scanner through more than one hub. SCSI If your computer does not have a SCSI port, you need to add a SCSI adapter board to your computer. You also need a SCSI cable. See pages 75 and 76 for adapter and cable specifications. Set the SCSI ID Number The scanner is preset at the factory to SCSI ID 2. If you need to change this number, turn the scanner off. Then use the tip of a small flathead screwdriver to turn the rotary switch on the back panel. Be sure to choose a unique number that doesn't conflict with the ID number of other SCSI devices (including the SCSI interface board itself, which is usually ID 7). Don't use SCSI ID 8 or 9 for your scanner; these are for factory use only. Don't use SCSI ID 0 or 1; these are reserved for storage devices. For more information on setting your SCSI ID number, see your electronic Reference Guide, as described on page 22. Setting Up Your Scanner 7
-
 1
1 -
2
-
3
-
4
-
5
-
6
-
7
-
 8
8 -
 9
9 -
 10
10 -
 11
11 -
 12
12 -
 13
13 -
 14
14 -
 15
15 -
 16
16 -
 17
17 -
 18
18 -
19
-
20
-
21
-
22
-
23
-
24
-
25
-
26
-
27
-
28
-
29
-
30
-
31
-
32
-
33
-
34
-
35
-
36
-
37
-
38
-
39
-
40
-
41
-
42
-
43
-
44
-
45
-
46
-
47
-
48
-
49
-
50
-
51
-
52
-
53
-
54
-
55
-
56
-
57
-
58
-
59
-
60
-
61
-
62
-
63
-
64
-
65
-
66
-
67
-
68
-
69
-
70
-
71
-
72
-
73
-
74
-
75
-
76
-
77
-
78
-
79
-
80
-
81
-
82
-
83
-
84
-
85
-
86
-
87
-
88
-
89
-
90
-
91
-
92
 |
 |
