Epson Perfection 1640SU Office Scanner Basics - Page 50
Selecting Resolution, Scaling (Resizing) Images, Keep in mind when you enlarge a small photo
 |
View all Epson Perfection 1640SU Office manuals
Add to My Manuals
Save this manual to your list of manuals |
Page 50 highlights
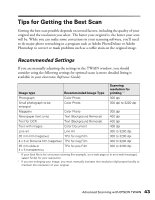
Selecting Resolution Resolution refers to how many dots per inch (dpi) or dots per centimeter (dpcm) your image contains. The best resolution for a scanned image depends on the type of image you're scanning and your final output device. For most images except line art, use a scanning resolution that is approximately one third of your output resolution. For example, use a scanning resolution up to 100 dpi with a 300 dpi laser printer, and up to 200 dpi with a 600 dpi laser printer. For 1440 dpi ink jet printers, such as the EPSON Stylus Color or Photo series, use a scanning resolution of approximately 300 dpi. For on-screen viewing, you can scan at 72 dpi. Keep the following in mind when you choose a resolution: s Higher resolution settings result in larger file sizes. For example, an 8.5 × 11-inch original scanned at 300 dpi can produce a 24MB file. The same original scanned at 72 dpi creates only a 1.3MB file. Large files take longer to process and print, so consider the practical limitations of your computer system when selecting a resolution. To keep your file size manageable, select the lowest possible resolution that gives acceptable quality. s When scanning at a higher resolution, reduce the file size by scanning only part of the image. Scaling (Resizing) Images If you plan to enlarge your image, it is better to enlarge it when you're scanning rather than in your application. Each time you modify an image, you lose some quality. Keep in mind when you enlarge a small photo, such as a 35 mm slide or wallet-size photo, you'll need to scan at a high enough resolution to retain your image quality, but not so high that your file size is too large to be efficient. You must manually adjust the resolution (dpi) to maintain the same image quality when you resize your image. For example, if you have a 300 dpi 2 × 2-inch image that you want to enlarge to 4 × 4 (a factor of 200%), increase the Scale setting to 200% and change the resolution to 600 dpi. 44 Advanced Scanning with EPSON TWAIN
-
 1
1 -
2
-
3
-
4
-
5
-
6
-
7
-
8
-
9
-
10
-
11
-
12
-
13
-
14
-
15
-
16
-
17
-
18
-
19
-
20
-
21
-
22
-
23
-
24
-
25
-
26
-
27
-
28
-
29
-
30
-
31
-
32
-
33
-
34
-
35
-
36
-
37
-
38
-
39
-
40
-
41
-
42
-
43
-
44
-
 45
45 -
 46
46 -
 47
47 -
 48
48 -
 49
49 -
 50
50 -
 51
51 -
 52
52 -
 53
53 -
 54
54 -
 55
55 -
56
-
57
-
58
-
59
-
60
-
61
-
62
-
63
-
64
-
65
-
66
-
67
-
68
-
69
-
70
-
71
-
72
-
73
-
74
-
75
-
76
-
77
-
78
-
79
-
80
-
81
-
82
-
83
-
84
-
85
-
86
-
87
-
88
-
89
-
90
-
91
-
92
 |
 |