Epson Perfection 1640SU Office Scanner Basics - Page 58
Scanning Reflective (Non-Transparent) Documents or Photographs, Removing the Transparency Unit
 |
View all Epson Perfection 1640SU Office manuals
Add to My Manuals
Save this manual to your list of manuals |
Page 58 highlights
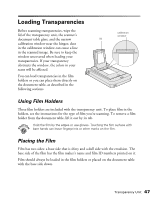
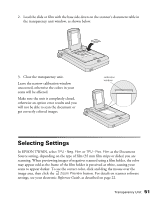
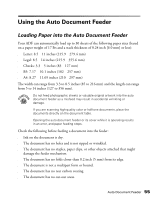
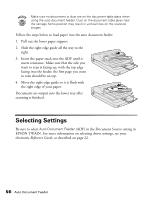
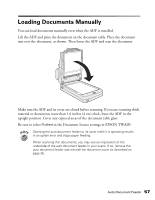
Scanning Reflective (Non-Transparent) Documents or Photographs When you return to scanning normal reflective documents (such as memos or photographs), you can turn off the transparency unit, then place documents between it and the document table. Remember to change the Document Source setting to Flatbed in EPSON TWAIN. Be aware that the entire document table will be scanned so you will scan not only your document, but also the underside of the transparency unit. To prevent scanning the underside of the transparency unit, you can place a white piece of paper between your document and the transparency unit. When scanning thin documents, you may see an impression of the underside of the transparency unit in your scans. If so, remove the transparency unit and reinstall the document cover as described below. If you don't plan to scan transparencies for a while, you can remove the transparency unit and reinstall the document cover as described in the next section. Removing the Transparency Unit Follow these steps to remove the transparency unit: 1. Turn off the transparency unit and the scanner. 2. Remove any film holders or film from the document table. 3. Unplug the transparency unit connector from the scanner's option interface. 4. Store the transparency unit and film holders in their original packaging. 5. Reattach the document cover as described on page 36. 52 Transparency Unit
-
 1
1 -
2
-
3
-
4
-
5
-
6
-
7
-
8
-
9
-
10
-
11
-
12
-
13
-
14
-
15
-
16
-
17
-
18
-
19
-
20
-
21
-
22
-
23
-
24
-
25
-
26
-
27
-
28
-
29
-
30
-
31
-
32
-
33
-
34
-
35
-
36
-
37
-
38
-
39
-
40
-
41
-
42
-
43
-
44
-
45
-
46
-
47
-
48
-
49
-
50
-
51
-
52
-
 53
53 -
 54
54 -
 55
55 -
 56
56 -
 57
57 -
 58
58 -
 59
59 -
 60
60 -
 61
61 -
 62
62 -
 63
63 -
64
-
65
-
66
-
67
-
68
-
69
-
70
-
71
-
72
-
73
-
74
-
75
-
76
-
77
-
78
-
79
-
80
-
81
-
82
-
83
-
84
-
85
-
86
-
87
-
88
-
89
-
90
-
91
-
92
 |
 |