Epson Perfection 1640SU Office Scanner Basics - Page 49
Tips for Getting the Best Scan, Recommended Settings
 |
View all Epson Perfection 1640SU Office manuals
Add to My Manuals
Save this manual to your list of manuals |
Page 49 highlights
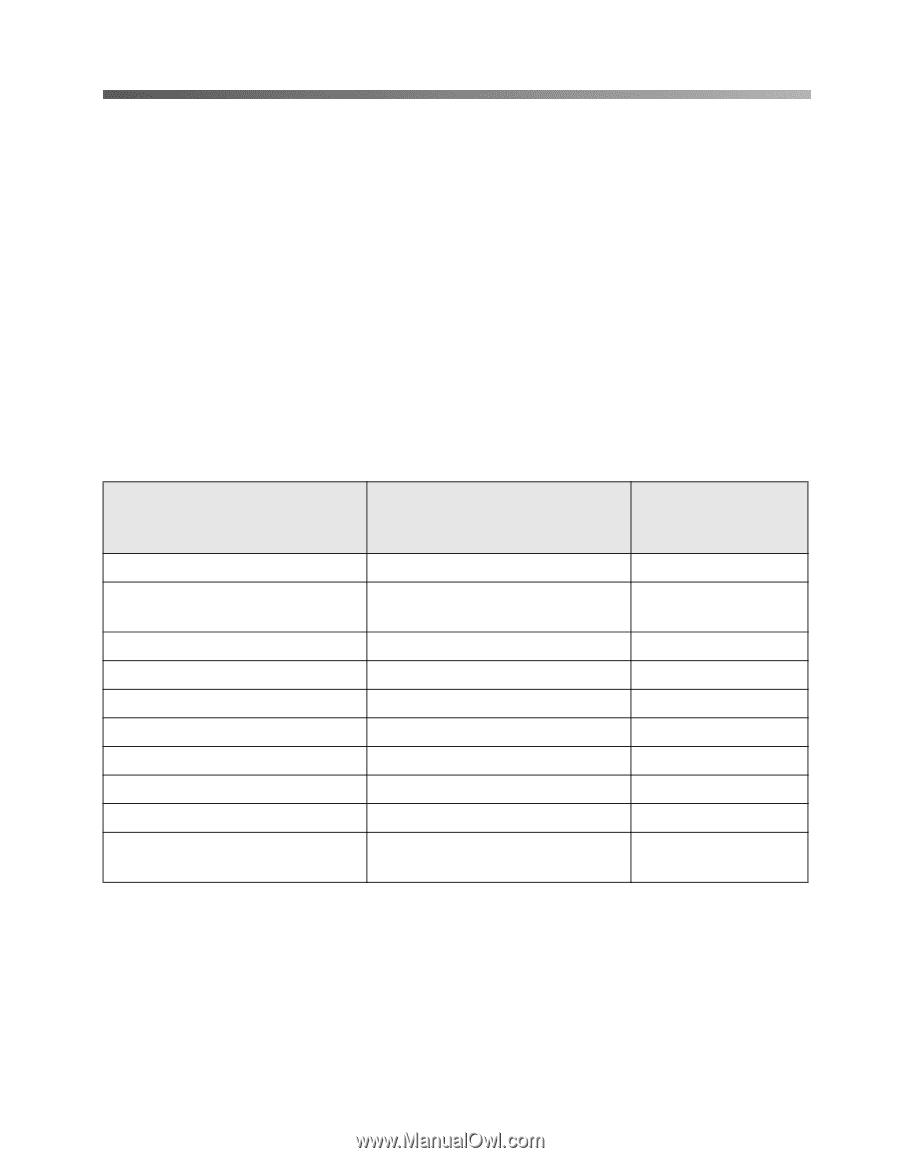
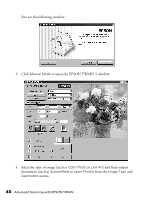
Tips for Getting the Best Scan Getting the best scan possible depends on several factors, including the quality of your original and the resolution you select. The better your original is, the better your scan will be. While you can make some corrections in your scanning software, you'll need to do major photo retouching in a program such as Adobe PhotoDeluxe or Adobe Photoshop to correct or mask problems such as a coffee stain on the original image. Recommended Settings If you are manually adjusting the settings in the TWAIN window, you should consider using the following settings for optimal scans (a more detailed listing is available in your electronic Reference Guide): Image type Recommended Image Type Scanning resolution for printing 1, 2 Photograph Color Photo 300 dpi Small photograph to be enlarged Color Photo 300 dpi to 3200 dpi Magazine Color Photo 300 dpi Newspaper (text only) Text (Background Removal) 400 dpi Text for OCR Text (Background Removal) 400 dpi Text with images Color Document 400 dpi Line art Line Art 300 to 3200 dpi 35 mm film (negative) TPU for neg.Film 300 to 3200 dpi 4 x 5 or Brownie film (negative) TPU for neg.Film 300 to 3200 dpi 35 mm slide or 4 x 5 transparency TPU for pos.Film 300 to 3200 dpi 1 If your final file is for on-screen viewing (for example, on a web page or in an e-mail message), select 72 dpi for your resolution. 2 If you are enlarging your image, you must manually increase the resolution (dpi) proportionally to maintain the resolution of your original. Advanced Scanning with EPSON TWAIN 43
-
 1
1 -
2
-
3
-
4
-
5
-
6
-
7
-
8
-
9
-
10
-
11
-
12
-
13
-
14
-
15
-
16
-
17
-
18
-
19
-
20
-
21
-
22
-
23
-
24
-
25
-
26
-
27
-
28
-
29
-
30
-
31
-
32
-
33
-
34
-
35
-
36
-
37
-
38
-
39
-
40
-
41
-
42
-
43
-
 44
44 -
 45
45 -
 46
46 -
 47
47 -
 48
48 -
 49
49 -
 50
50 -
 51
51 -
 52
52 -
 53
53 -
 54
54 -
55
-
56
-
57
-
58
-
59
-
60
-
61
-
62
-
63
-
64
-
65
-
66
-
67
-
68
-
69
-
70
-
71
-
72
-
73
-
74
-
75
-
76
-
77
-
78
-
79
-
80
-
81
-
82
-
83
-
84
-
85
-
86
-
87
-
88
-
89
-
90
-
91
-
92
 |
 |