HP 2500 Service Manual - Page 121
Density sensor and top-of- sensor,
 |
View all HP 2500 manuals
Add to My Manuals
Save this manual to your list of manuals |
Page 121 highlights
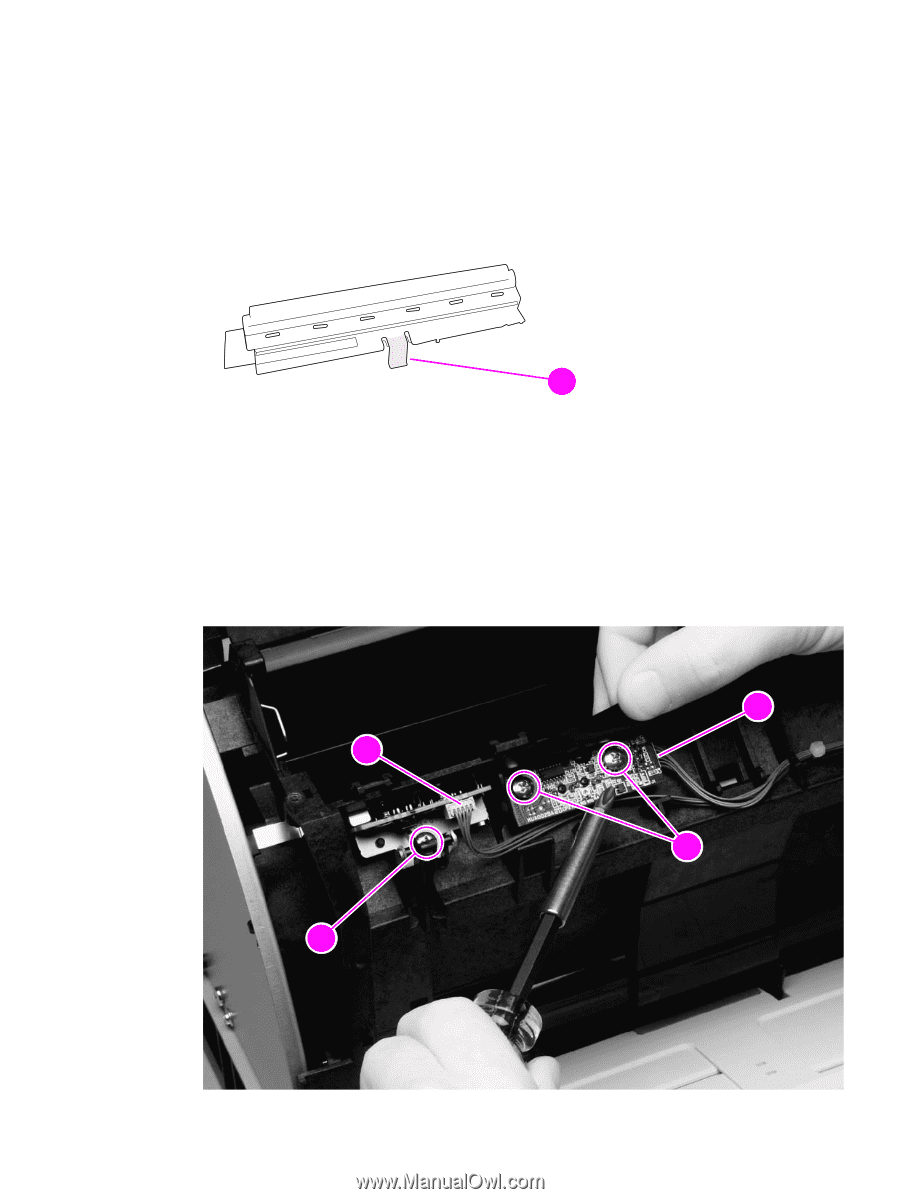
Density sensor and top-of-page sensor 1 Remove the following covers: • right- and left-side covers (see page 93) • front cover (see page 118) 2 Press the tab (callout 1) on the sensor cover to release the cover, and then lift the cover up and away from the printer. Figure 66. 12 Removing the density sensor cover 3 Unplug one connector (callout 2). 4 Remove the two screws (callout 3). 5 Lift the density sensor straight up to remove it from the printer. 6 Unplug one connector (callout 4) from the top-of-page sensor. 7 Remove one screw (callout 5) and then lift the top-of-page sensor straight up and away from the printer. 42 52 2 32 Figure 67. EN Removing the density sensor 5 Removal and replacement 119
-
 1
1 -
2
-
3
-
4
-
5
-
6
-
7
-
8
-
9
-
10
-
11
-
12
-
13
-
14
-
15
-
16
-
17
-
18
-
19
-
20
-
21
-
22
-
23
-
24
-
25
-
26
-
27
-
28
-
29
-
30
-
31
-
32
-
33
-
34
-
35
-
36
-
37
-
38
-
39
-
40
-
41
-
42
-
43
-
44
-
45
-
46
-
47
-
48
-
49
-
50
-
51
-
52
-
53
-
54
-
55
-
56
-
57
-
58
-
59
-
60
-
61
-
62
-
63
-
64
-
65
-
66
-
67
-
68
-
69
-
70
-
71
-
72
-
73
-
74
-
75
-
76
-
77
-
78
-
79
-
80
-
81
-
82
-
83
-
84
-
85
-
86
-
87
-
88
-
89
-
90
-
91
-
92
-
93
-
94
-
95
-
96
-
97
-
98
-
99
-
100
-
101
-
102
-
103
-
104
-
105
-
106
-
107
-
108
-
109
-
110
-
111
-
112
-
113
-
114
-
115
-
 116
116 -
 117
117 -
 118
118 -
 119
119 -
 120
120 -
 121
121 -
 122
122 -
 123
123 -
 124
124 -
 125
125 -
 126
126 -
127
-
128
-
129
-
130
-
131
-
132
-
133
-
134
-
135
-
136
-
137
-
138
-
139
-
140
-
141
-
142
-
143
-
144
-
145
-
146
-
147
-
148
-
149
-
150
-
151
-
152
-
153
-
154
-
155
-
156
-
157
-
158
-
159
-
160
-
161
-
162
-
163
-
164
-
165
-
166
-
167
-
168
-
169
-
170
-
171
-
172
-
173
-
174
-
175
-
176
-
177
-
178
-
179
-
180
-
181
-
182
-
183
-
184
-
185
-
186
-
187
-
188
-
189
-
190
-
191
-
192
-
193
-
194
-
195
-
196
-
197
-
198
-
199
-
200
-
201
-
202
-
203
-
204
-
205
-
206
-
207
-
208
-
209
-
210
-
211
-
212
-
213
-
214
-
215
-
216
-
217
-
218
-
219
-
220
-
221
-
222
-
223
-
224
-
225
-
226
-
227
-
228
-
229
-
230
-
231
-
232
-
233
-
234
-
235
-
236
-
237
-
238
-
239
-
240
-
241
-
242
-
243
-
244
-
245
-
246
-
247
-
248
-
249
-
250
-
251
-
252
-
253
-
254
-
255
-
256
-
257
-
258
-
259
-
260
-
261
-
262
-
263
-
264
-
265
-
266
-
267
-
268
-
269
-
270
-
271
-
272
-
273
-
274
-
275
-
276
-
277
-
278
-
279
-
280
-
281
-
282
-
283
-
284
-
285
-
286
-
287
-
288
-
289
-
290
-
291
-
292
 |
 |
EN
5 Removal and replacement
119
Density sensor and top-of-page sensor
1
Remove the following covers:
•
right- and left-side covers (see page 93)
•
front cover (see page 118)
2
Press the tab (callout 1) on the sensor cover to release the cover, and then lift the cover up
and away from the printer.
Figure 66.
Removing the density sensor cover
3
Unplug one connector (callout 2).
4
Remove the two screws (callout 3).
5
Lift the density sensor straight up to remove it from the printer.
6
Unplug one connector (callout 4) from the top-of-page sensor.
7
Remove one screw (callout 5) and then lift the top-of-page sensor straight up and away from
the printer.
Figure 67.
Removing the density sensor
2
1
2
2
3
2
2
2
4
5