HP 2500 Service Manual - Page 136
Print-cartridge carousel, Removing the print-cartridge carousel 1 of 5
 |
View all HP 2500 manuals
Add to My Manuals
Save this manual to your list of manuals |
Page 136 highlights
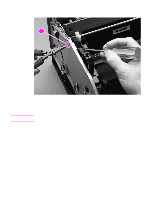
Print-cartridge carousel 1 Remove the following covers and assemblies: • right- and left-side covers (see page 93) • interface cover (see page 98) • formatter cage (see page 99) • back cover (see page 110) • top cover (see page 111) • air duct (see page 115) • rotary-drive assembly (see page 128) • top plate (see page 131) 2 Remove two screws (callout 1) from the back of the printer. 12 Figure 82. Removing the print-cartridge carousel (1 of 5) Reinstall note Because the remainder of the print-cartridge carousel removal procedures are performed from the left, right, and front of the printer, it is easy to forget to replace the two screws at the back of the printer. 134 Removal and replacement C9706-90926
-
 1
1 -
2
-
3
-
4
-
5
-
6
-
7
-
8
-
9
-
10
-
11
-
12
-
13
-
14
-
15
-
16
-
17
-
18
-
19
-
20
-
21
-
22
-
23
-
24
-
25
-
26
-
27
-
28
-
29
-
30
-
31
-
32
-
33
-
34
-
35
-
36
-
37
-
38
-
39
-
40
-
41
-
42
-
43
-
44
-
45
-
46
-
47
-
48
-
49
-
50
-
51
-
52
-
53
-
54
-
55
-
56
-
57
-
58
-
59
-
60
-
61
-
62
-
63
-
64
-
65
-
66
-
67
-
68
-
69
-
70
-
71
-
72
-
73
-
74
-
75
-
76
-
77
-
78
-
79
-
80
-
81
-
82
-
83
-
84
-
85
-
86
-
87
-
88
-
89
-
90
-
91
-
92
-
93
-
94
-
95
-
96
-
97
-
98
-
99
-
100
-
101
-
102
-
103
-
104
-
105
-
106
-
107
-
108
-
109
-
110
-
111
-
112
-
113
-
114
-
115
-
116
-
117
-
118
-
119
-
120
-
121
-
122
-
123
-
124
-
125
-
126
-
127
-
128
-
129
-
130
-
 131
131 -
 132
132 -
 133
133 -
 134
134 -
 135
135 -
 136
136 -
 137
137 -
 138
138 -
 139
139 -
 140
140 -
 141
141 -
142
-
143
-
144
-
145
-
146
-
147
-
148
-
149
-
150
-
151
-
152
-
153
-
154
-
155
-
156
-
157
-
158
-
159
-
160
-
161
-
162
-
163
-
164
-
165
-
166
-
167
-
168
-
169
-
170
-
171
-
172
-
173
-
174
-
175
-
176
-
177
-
178
-
179
-
180
-
181
-
182
-
183
-
184
-
185
-
186
-
187
-
188
-
189
-
190
-
191
-
192
-
193
-
194
-
195
-
196
-
197
-
198
-
199
-
200
-
201
-
202
-
203
-
204
-
205
-
206
-
207
-
208
-
209
-
210
-
211
-
212
-
213
-
214
-
215
-
216
-
217
-
218
-
219
-
220
-
221
-
222
-
223
-
224
-
225
-
226
-
227
-
228
-
229
-
230
-
231
-
232
-
233
-
234
-
235
-
236
-
237
-
238
-
239
-
240
-
241
-
242
-
243
-
244
-
245
-
246
-
247
-
248
-
249
-
250
-
251
-
252
-
253
-
254
-
255
-
256
-
257
-
258
-
259
-
260
-
261
-
262
-
263
-
264
-
265
-
266
-
267
-
268
-
269
-
270
-
271
-
272
-
273
-
274
-
275
-
276
-
277
-
278
-
279
-
280
-
281
-
282
-
283
-
284
-
285
-
286
-
287
-
288
-
289
-
290
-
291
-
292
 |
 |

134
Removal and replacement
C9706-90926
Print-cartridge carousel
1
Remove the following covers and assemblies:
•
right- and left-side covers (see page 93)
•
interface cover (see page 98)
•
formatter cage (see page 99)
•
back cover (see page 110)
•
top cover (see page 111)
•
air duct (see page 115)
•
rotary-drive assembly (see page 128)
•
top plate (see page 131)
2
Remove two screws (callout 1) from the back of the printer.
Figure 82.
Removing the print-cartridge carousel (1 of 5)
Reinstall note
Because the remainder of the print-cartridge carousel removal procedures are performed from
the left, right, and front of the printer, it is easy to forget to replace the two screws at the back of
the printer.
2
1