HP 2500 Service Manual - Page 140
Reinstalling the print-cartridge carousel
 |
View all HP 2500 manuals
Add to My Manuals
Save this manual to your list of manuals |
Page 140 highlights
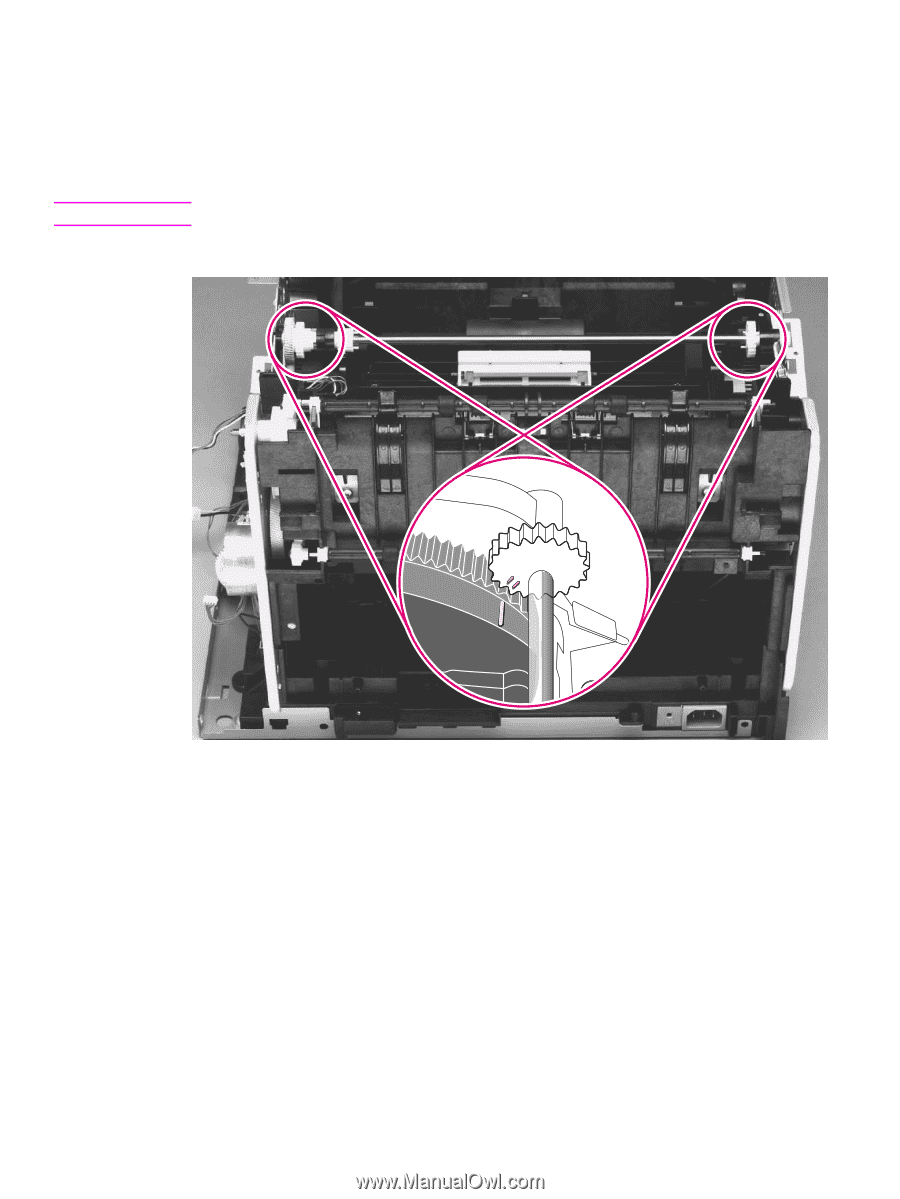
Note Check to see that the gears in the print-cartridge carousel are aligned correctly before placing the carousel back into the printer. 1 Rotate the carousel so that the marker for the yellow print cartridge faces the front of the printer. 2 Examine the gears: two marks on the smaller gear should line up with the single mark on the larger gear (see the detail of the gears in figure 85). The single mark on the larger gear is adjacent to the slot for the black cartridge, marked with a "K." 3 If the gears are not aligned correctly, locate the marks on the gears and realign the gears. Figure 85. Reinstalling the print-cartridge carousel 138 Removal and replacement C9706-90926
-
 1
1 -
2
-
3
-
4
-
5
-
6
-
7
-
8
-
9
-
10
-
11
-
12
-
13
-
14
-
15
-
16
-
17
-
18
-
19
-
20
-
21
-
22
-
23
-
24
-
25
-
26
-
27
-
28
-
29
-
30
-
31
-
32
-
33
-
34
-
35
-
36
-
37
-
38
-
39
-
40
-
41
-
42
-
43
-
44
-
45
-
46
-
47
-
48
-
49
-
50
-
51
-
52
-
53
-
54
-
55
-
56
-
57
-
58
-
59
-
60
-
61
-
62
-
63
-
64
-
65
-
66
-
67
-
68
-
69
-
70
-
71
-
72
-
73
-
74
-
75
-
76
-
77
-
78
-
79
-
80
-
81
-
82
-
83
-
84
-
85
-
86
-
87
-
88
-
89
-
90
-
91
-
92
-
93
-
94
-
95
-
96
-
97
-
98
-
99
-
100
-
101
-
102
-
103
-
104
-
105
-
106
-
107
-
108
-
109
-
110
-
111
-
112
-
113
-
114
-
115
-
116
-
117
-
118
-
119
-
120
-
121
-
122
-
123
-
124
-
125
-
126
-
127
-
128
-
129
-
130
-
131
-
132
-
133
-
134
-
 135
135 -
 136
136 -
 137
137 -
 138
138 -
 139
139 -
 140
140 -
 141
141 -
 142
142 -
 143
143 -
 144
144 -
 145
145 -
146
-
147
-
148
-
149
-
150
-
151
-
152
-
153
-
154
-
155
-
156
-
157
-
158
-
159
-
160
-
161
-
162
-
163
-
164
-
165
-
166
-
167
-
168
-
169
-
170
-
171
-
172
-
173
-
174
-
175
-
176
-
177
-
178
-
179
-
180
-
181
-
182
-
183
-
184
-
185
-
186
-
187
-
188
-
189
-
190
-
191
-
192
-
193
-
194
-
195
-
196
-
197
-
198
-
199
-
200
-
201
-
202
-
203
-
204
-
205
-
206
-
207
-
208
-
209
-
210
-
211
-
212
-
213
-
214
-
215
-
216
-
217
-
218
-
219
-
220
-
221
-
222
-
223
-
224
-
225
-
226
-
227
-
228
-
229
-
230
-
231
-
232
-
233
-
234
-
235
-
236
-
237
-
238
-
239
-
240
-
241
-
242
-
243
-
244
-
245
-
246
-
247
-
248
-
249
-
250
-
251
-
252
-
253
-
254
-
255
-
256
-
257
-
258
-
259
-
260
-
261
-
262
-
263
-
264
-
265
-
266
-
267
-
268
-
269
-
270
-
271
-
272
-
273
-
274
-
275
-
276
-
277
-
278
-
279
-
280
-
281
-
282
-
283
-
284
-
285
-
286
-
287
-
288
-
289
-
290
-
291
-
292
 |
 |
138
Removal and replacement
C9706-90926
Check to see that the gears in the print-cartridge carousel are aligned correctly before placing
the carousel back into the printer.
1
Rotate the carousel so that the marker for the yellow print cartridge faces the front of the
printer.
2
Examine the gears: two marks on the smaller gear should line up with the single mark on the
larger gear (see the detail of the gears in figure 85).
Note
The single mark on the larger gear is adjacent to the slot for the black cartridge, marked with a “K.”
3
If the gears are not aligned correctly, locate the marks on the gears and realign the gears.
Figure 85.
Reinstalling the print-cartridge carousel