HP Officejet 4620 User Guide - Page 46
Copy, Copy documents, Change copy settings, Black Copy, Color Copy
 |
View all HP Officejet 4620 manuals
Add to My Manuals
Save this manual to your list of manuals |
Page 46 highlights
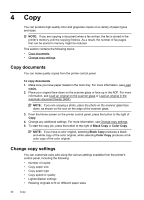
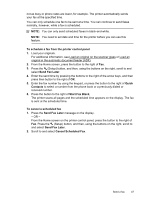
4 Copy You can produce high-quality color and grayscale copies on a variety of paper types and sizes. NOTE: If you are copying a document when a fax arrives, the fax is stored in the printer's memory until the copying finishes. As a result, the number of fax pages that can be stored in memory might be reduced. This section contains the following topics: • Copy documents • Change copy settings Copy documents You can make quality copies from the printer control panel. To copy documents 1. Make sure you have paper loaded in the main tray. For more information, see Load media. 2. Place your original face down on the scanner glass or face up in the ADF. For more information, see Load an original on the scanner glass or Load an original in the automatic document feeder (ADF). NOTE: If you are copying a photo, place the photo on the scanner glass face down, as shown on the icon on the edge of the scanner glass. 3. From the Home screen on the printer control panel, press the button to the right of Copy. 4. Change any additional settings. For more information, see Change copy settings. 5. To start the copy job, press the button to the right of Black Copy or Color Copy. NOTE: If you have a color original, selecting Black Copy produces a blackand-white copy of the color original, while selecting Color Copy produces a fullcolor copy of the color original. Change copy settings You can customize copy jobs using the various settings available from the printer's control panel, including the following: • Number of copies • Copy paper size • Copy paper type • Copy speed or quality • Lighter/Darker settings • Resizing originals to fit on different paper sizes 42 Copy
-
 1
1 -
2
-
3
-
4
-
5
-
6
-
7
-
8
-
9
-
10
-
11
-
12
-
13
-
14
-
15
-
16
-
17
-
18
-
19
-
20
-
21
-
22
-
23
-
24
-
25
-
26
-
27
-
28
-
29
-
30
-
31
-
32
-
33
-
34
-
35
-
36
-
37
-
38
-
39
-
40
-
 41
41 -
 42
42 -
 43
43 -
 44
44 -
 45
45 -
 46
46 -
 47
47 -
 48
48 -
 49
49 -
 50
50 -
 51
51 -
52
-
53
-
54
-
55
-
56
-
57
-
58
-
59
-
60
-
61
-
62
-
63
-
64
-
65
-
66
-
67
-
68
-
69
-
70
-
71
-
72
-
73
-
74
-
75
-
76
-
77
-
78
-
79
-
80
-
81
-
82
-
83
-
84
-
85
-
86
-
87
-
88
-
89
-
90
-
91
-
92
-
93
-
94
-
95
-
96
-
97
-
98
-
99
-
100
-
101
-
102
-
103
-
104
-
105
-
106
-
107
-
108
-
109
-
110
-
111
-
112
-
113
-
114
-
115
-
116
-
117
-
118
-
119
-
120
-
121
-
122
-
123
-
124
-
125
-
126
-
127
-
128
-
129
-
130
-
131
-
132
-
133
-
134
-
135
-
136
-
137
-
138
-
139
-
140
-
141
-
142
-
143
-
144
-
145
-
146
-
147
-
148
-
149
-
150
-
151
-
152
-
153
-
154
-
155
-
156
-
157
-
158
-
159
-
160
-
161
-
162
-
163
-
164
-
165
-
166
-
167
-
168
-
169
-
170
-
171
-
172
-
173
-
174
-
175
-
176
-
177
-
178
-
179
-
180
-
181
-
182
-
183
-
184
-
185
-
186
-
187
-
188
-
189
-
190
-
191
-
192
-
193
-
194
-
195
-
196
-
197
-
198
-
199
-
200
-
201
-
202
-
203
-
204
-
205
-
206
-
207
-
208
-
209
-
210
-
211
-
212
-
213
-
214
-
215
-
216
-
217
-
218
-
219
-
220
-
221
-
222
-
223
-
224
-
225
-
226
-
227
-
228
 |
 |