HP Pavilion zv6000 Hardware and Software Guide - Page 125
Advanced, Shared video memory, Setup Utility.
 |
View all HP Pavilion zv6000 manuals
Add to My Manuals
Save this manual to your list of manuals |
Page 125 highlights
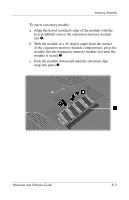
Memory Modules 2. Display the Setup message: ❏ If the notebook is on, restart the notebook through the operating system. ❏ If you are certain that the notebook is off and not in hibernation, turn the notebook on. 3. Press f10 while the "Press to enter Setup" message is displayed in the lower-left corner of the screen. 4. Select the Advanced menu. (Memory information and settings are displayed.) 5. To change the shared video memory setting, use the navigation and selection information at the bottom of the screen to choose your Shared video memory preference. 6. To set your preference and exit the Setup utility, press f10 and then follow the instructions on the screen. Your preferences are in effect when the notebook restarts in Windows. For more information about the Setup utility, including instructions for navigating and selecting items within the utility and instructions for closing the utility without saving any changes from your current Setup utility session, refer to Chapter 13, "Setup Utility." 8-8 Hardware and Software Guide
-
 1
1 -
2
-
3
-
4
-
5
-
6
-
7
-
8
-
9
-
10
-
11
-
12
-
13
-
14
-
15
-
16
-
17
-
18
-
19
-
20
-
21
-
22
-
23
-
24
-
25
-
26
-
27
-
28
-
29
-
30
-
31
-
32
-
33
-
34
-
35
-
36
-
37
-
38
-
39
-
40
-
41
-
42
-
43
-
44
-
45
-
46
-
47
-
48
-
49
-
50
-
51
-
52
-
53
-
54
-
55
-
56
-
57
-
58
-
59
-
60
-
61
-
62
-
63
-
64
-
65
-
66
-
67
-
68
-
69
-
70
-
71
-
72
-
73
-
74
-
75
-
76
-
77
-
78
-
79
-
80
-
81
-
82
-
83
-
84
-
85
-
86
-
87
-
88
-
89
-
90
-
91
-
92
-
93
-
94
-
95
-
96
-
97
-
98
-
99
-
100
-
101
-
102
-
103
-
104
-
105
-
106
-
107
-
108
-
109
-
110
-
111
-
112
-
113
-
114
-
115
-
116
-
117
-
118
-
119
-
 120
120 -
 121
121 -
 122
122 -
 123
123 -
 124
124 -
 125
125 -
 126
126 -
 127
127 -
 128
128 -
 129
129 -
 130
130 -
131
-
132
-
133
-
134
-
135
-
136
-
137
-
138
-
139
-
140
-
141
-
142
-
143
-
144
-
145
-
146
-
147
-
148
-
149
-
150
-
151
-
152
-
153
-
154
-
155
-
156
-
157
-
158
-
159
-
160
-
161
-
162
-
163
-
164
-
165
-
166
-
167
-
168
-
169
-
170
-
171
-
172
-
173
-
174
-
175
-
176
-
177
-
178
-
179
-
180
-
181
-
182
-
183
-
184
-
185
-
186
-
187
-
188
-
189
-
190
-
191
-
192
-
193
-
194
-
195
-
196
-
197
-
198
-
199
-
200
-
201
-
202
-
203
-
204
-
205
-
206
-
207
-
208
-
209
-
210
-
211
-
212
-
213
-
214
-
215
-
216
-
217
-
218
-
219
-
220
-
221
-
222
-
223
-
224
-
225
-
226
-
227
 |
 |
