HP StorageWorks 4000s NAS 4000s and 9000s Administration Guide - Page 146
Publishing a New Share in DFS, Shares, Create folder
 |
View all HP StorageWorks 4000s manuals
Add to My Manuals
Save this manual to your list of manuals |
Page 146 highlights
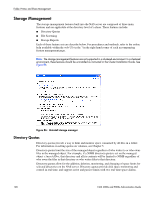
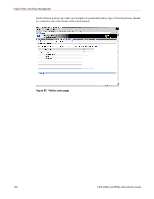
Folder, Printer, and Share Management Publishing a New Share in DFS Once a root has been established either on the local machine or one in the network, shares can be published in order to extend the virtual name space. For example, several shares can be created for a DFS root labeled "Engineering." The shares might be titled "Documentation," "Technical Specs," and "Project Info." When mapping to \\computername\engineering, all three of these shares would be found under the mapped drive even though they exist on different NAS devices, drives or shares points. To publish a share in a DFS root: Figure 84: DFS share example 1. Select Shares from the WebUI. 2. Type in a new share name 3. Type in a folder name (select the checkbox Create folder if appropriate) 4. Verify that the Windows checkbox is selected. (DFS is dependent on the SMB protocol) 5. Under DFS, check the box if unchecked. Note: The default behavior can be set to publish all shares to DFS. In this case the box will be checked. See the section above Setting DFS Sharing Defaults. 6. Enter in the name of the DFS root to publish the share ("Engineering" in this example). The network name will be displayed below the entry. 7. Click OK. A share name will be published in the namespace. To view the namespace, map a drive to the DFS root. All published shares will be seen in the namespace. See the example in Figure 85. 146 NAS 4000s and 9000s Administration Guide
-
 1
1 -
2
-
3
-
4
-
5
-
6
-
7
-
8
-
9
-
10
-
11
-
12
-
13
-
14
-
15
-
16
-
17
-
18
-
19
-
20
-
21
-
22
-
23
-
24
-
25
-
26
-
27
-
28
-
29
-
30
-
31
-
32
-
33
-
34
-
35
-
36
-
37
-
38
-
39
-
40
-
41
-
42
-
43
-
44
-
45
-
46
-
47
-
48
-
49
-
50
-
51
-
52
-
53
-
54
-
55
-
56
-
57
-
58
-
59
-
60
-
61
-
62
-
63
-
64
-
65
-
66
-
67
-
68
-
69
-
70
-
71
-
72
-
73
-
74
-
75
-
76
-
77
-
78
-
79
-
80
-
81
-
82
-
83
-
84
-
85
-
86
-
87
-
88
-
89
-
90
-
91
-
92
-
93
-
94
-
95
-
96
-
97
-
98
-
99
-
100
-
101
-
102
-
103
-
104
-
105
-
106
-
107
-
108
-
109
-
110
-
111
-
112
-
113
-
114
-
115
-
116
-
117
-
118
-
119
-
120
-
121
-
122
-
123
-
124
-
125
-
126
-
127
-
128
-
129
-
130
-
131
-
132
-
133
-
134
-
135
-
136
-
137
-
138
-
139
-
140
-
 141
141 -
 142
142 -
 143
143 -
 144
144 -
 145
145 -
 146
146 -
 147
147 -
 148
148 -
 149
149 -
 150
150 -
 151
151 -
152
-
153
-
154
-
155
-
156
-
157
-
158
-
159
-
160
-
161
-
162
-
163
-
164
-
165
-
166
-
167
-
168
-
169
-
170
-
171
-
172
-
173
-
174
-
175
-
176
-
177
-
178
-
179
-
180
-
181
-
182
-
183
-
184
-
185
-
186
-
187
-
188
-
189
-
190
-
191
-
192
-
193
-
194
-
195
-
196
-
197
-
198
-
199
-
200
-
201
-
202
-
203
-
204
-
205
-
206
-
207
-
208
-
209
-
210
-
211
-
212
-
213
-
214
-
215
-
216
-
217
-
218
-
219
-
220
-
221
-
222
-
223
-
224
-
225
-
226
-
227
-
228
-
229
-
230
-
231
-
232
-
233
-
234
-
235
-
236
-
237
-
238
-
239
-
240
-
241
-
242
-
243
-
244
-
245
-
246
 |
 |
