HP StorageWorks 4000s NAS 4000s and 9000s Administration Guide - Page 155
Removing the Print Server Role, Adding an Additional Printer
 |
View all HP StorageWorks 4000s manuals
Add to My Manuals
Save this manual to your list of manuals |
Page 155 highlights
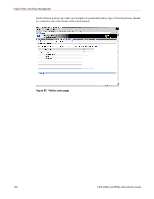
Folder, Printer, and Share Management Removing the Print Server Role To remove the print server role: 1. Click Start > Settings > Control Panel, double-click Administrative Tools, and then double-click Manage Your Server. 2. Click on Add or Remove a Roll. 3. A wizard will start. Click Next. 4. Select Printer Server from the list of Server Roles and click Next. 5. Select the checkbox Remove the printer role, click Next. 6. The Printer role will be removed, click Finish. Adding an Additional Printer To add additional printers to the NAS device: 1. Select Start > Settings > Printers and Faxes > Add Printer. 2. The add printer wizard will start. Click Next. 3. Select Local Printer and uncheck "automatically detect install my plug and play printers." Click Next. Note: Local Printer is used to create a TCP/IP port connections to a network enabled printer over the network. The NAS server only supports network attached printers and does not support directly connected printers via USB or Parallel Port. 4. Select Create a new port, and select Standard TCP/IP Port (recommended). 5. The Add Standard TCP/IP Printer Port Wizard starts. Click Next. 6. Type the name or IP address of the printer. The IP address is usually listed on the printer configuration page. The wizard completes the Port Name field. Click Next. 7. The wizard attempts to connect to the printer. If the wizard is able to connect, the Completing the Add Standard TCP/IP Printer Port Wizard page appears, and click Finish. If the wizard is not able to connect, the Additional Port Information Required page appears. a. Verify that the IP address or name that was entered is correct. b. Select Standard to identify the printer network adapter. A list of manufacturers and models of the network adapters is displayed. Select the appropriate printer from the Standard list. c. If the printer network adapter uses nonstandard settings, click Custom and then click Settings. The Configure Standard TCP/IP Port Monitor page appears. Specify the settings that are recommended by the manufacturer of the printer network adapter, and then click OK. d. Click Next. 8. Select the manufacturer and the type of printer from the presented list, click Next. If the printer does not exist in the list, click have disk and load the drivers or select a compatible driver. 9. Enter the name of the desired printer to be presented on the NAS device, click Next. NAS 4000s and 9000s Administration Guide 155
-
 1
1 -
2
-
3
-
4
-
5
-
6
-
7
-
8
-
9
-
10
-
11
-
12
-
13
-
14
-
15
-
16
-
17
-
18
-
19
-
20
-
21
-
22
-
23
-
24
-
25
-
26
-
27
-
28
-
29
-
30
-
31
-
32
-
33
-
34
-
35
-
36
-
37
-
38
-
39
-
40
-
41
-
42
-
43
-
44
-
45
-
46
-
47
-
48
-
49
-
50
-
51
-
52
-
53
-
54
-
55
-
56
-
57
-
58
-
59
-
60
-
61
-
62
-
63
-
64
-
65
-
66
-
67
-
68
-
69
-
70
-
71
-
72
-
73
-
74
-
75
-
76
-
77
-
78
-
79
-
80
-
81
-
82
-
83
-
84
-
85
-
86
-
87
-
88
-
89
-
90
-
91
-
92
-
93
-
94
-
95
-
96
-
97
-
98
-
99
-
100
-
101
-
102
-
103
-
104
-
105
-
106
-
107
-
108
-
109
-
110
-
111
-
112
-
113
-
114
-
115
-
116
-
117
-
118
-
119
-
120
-
121
-
122
-
123
-
124
-
125
-
126
-
127
-
128
-
129
-
130
-
131
-
132
-
133
-
134
-
135
-
136
-
137
-
138
-
139
-
140
-
141
-
142
-
143
-
144
-
145
-
146
-
147
-
148
-
149
-
 150
150 -
 151
151 -
 152
152 -
 153
153 -
 154
154 -
 155
155 -
 156
156 -
 157
157 -
 158
158 -
 159
159 -
 160
160 -
161
-
162
-
163
-
164
-
165
-
166
-
167
-
168
-
169
-
170
-
171
-
172
-
173
-
174
-
175
-
176
-
177
-
178
-
179
-
180
-
181
-
182
-
183
-
184
-
185
-
186
-
187
-
188
-
189
-
190
-
191
-
192
-
193
-
194
-
195
-
196
-
197
-
198
-
199
-
200
-
201
-
202
-
203
-
204
-
205
-
206
-
207
-
208
-
209
-
210
-
211
-
212
-
213
-
214
-
215
-
216
-
217
-
218
-
219
-
220
-
221
-
222
-
223
-
224
-
225
-
226
-
227
-
228
-
229
-
230
-
231
-
232
-
233
-
234
-
235
-
236
-
237
-
238
-
239
-
240
-
241
-
242
-
243
-
244
-
245
-
246
 |
 |
