HP StorageWorks 4000s NAS 4000s and 9000s Administration Guide - Page 44
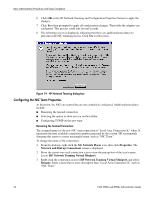
Configuring the NIC Team Properties
 |
View all HP StorageWorks 4000s manuals
Add to My Manuals
Save this manual to your list of manuals |
Page 44 highlights
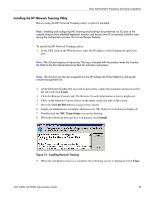
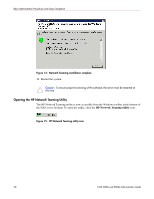
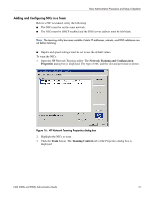
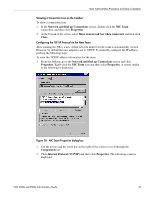
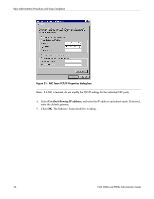
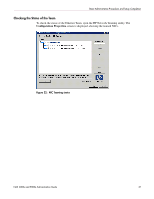
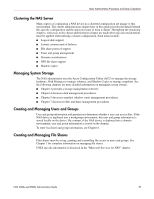
Basic Administrative Procedures and Setup Completion 6. Click OK in the HP Network Teaming and Configuration Properties Screen to apply the changes. 7. Click Yes when prompted to apply all configuration changes. Wait while the adapters are configured. This process could take several seconds. 8. The following screen is displayed, indicating that there are additional procedures to perform in the NIC teaming process. Click Yes to reboot now. Figure 19: HP Network Teaming dialog box Configuring the NIC Team Properties At this point, the NICs are teamed but are not completely configured. Additional procedures include: ■ Renaming the teamed connection ■ Selecting the option to show an icon on the taskbar ■ Configuring TCP/IP on the new team Renaming the Teamed Connection The assigned name for the new NIC team connection is "Local Area Connection X," where X represents the next available connection number generated by the system. HP recommends changing this name to a more meaningful name, such as "NIC Team." To change the name of the connection: 1. From the desktop, right-click the My Network Places icon, then click Properties. The Network and Dial up Connections screen is displayed. 2. Move the cursor over each connection icon to view the pop up box of the icon's name. Locate HP Network Teaming Virtual Miniport. 3. Right-click the connection icon for HP Network Teaming Virtual Miniport, and select Rename. Enter a name that is more descriptive than "Local Area Connection X," such as "NIC Team." 44 NAS 4000s and 9000s Administration Guide
-
 1
1 -
2
-
3
-
4
-
5
-
6
-
7
-
8
-
9
-
10
-
11
-
12
-
13
-
14
-
15
-
16
-
17
-
18
-
19
-
20
-
21
-
22
-
23
-
24
-
25
-
26
-
27
-
28
-
29
-
30
-
31
-
32
-
33
-
34
-
35
-
36
-
37
-
38
-
 39
39 -
 40
40 -
 41
41 -
 42
42 -
 43
43 -
 44
44 -
 45
45 -
 46
46 -
 47
47 -
 48
48 -
 49
49 -
50
-
51
-
52
-
53
-
54
-
55
-
56
-
57
-
58
-
59
-
60
-
61
-
62
-
63
-
64
-
65
-
66
-
67
-
68
-
69
-
70
-
71
-
72
-
73
-
74
-
75
-
76
-
77
-
78
-
79
-
80
-
81
-
82
-
83
-
84
-
85
-
86
-
87
-
88
-
89
-
90
-
91
-
92
-
93
-
94
-
95
-
96
-
97
-
98
-
99
-
100
-
101
-
102
-
103
-
104
-
105
-
106
-
107
-
108
-
109
-
110
-
111
-
112
-
113
-
114
-
115
-
116
-
117
-
118
-
119
-
120
-
121
-
122
-
123
-
124
-
125
-
126
-
127
-
128
-
129
-
130
-
131
-
132
-
133
-
134
-
135
-
136
-
137
-
138
-
139
-
140
-
141
-
142
-
143
-
144
-
145
-
146
-
147
-
148
-
149
-
150
-
151
-
152
-
153
-
154
-
155
-
156
-
157
-
158
-
159
-
160
-
161
-
162
-
163
-
164
-
165
-
166
-
167
-
168
-
169
-
170
-
171
-
172
-
173
-
174
-
175
-
176
-
177
-
178
-
179
-
180
-
181
-
182
-
183
-
184
-
185
-
186
-
187
-
188
-
189
-
190
-
191
-
192
-
193
-
194
-
195
-
196
-
197
-
198
-
199
-
200
-
201
-
202
-
203
-
204
-
205
-
206
-
207
-
208
-
209
-
210
-
211
-
212
-
213
-
214
-
215
-
216
-
217
-
218
-
219
-
220
-
221
-
222
-
223
-
224
-
225
-
226
-
227
-
228
-
229
-
230
-
231
-
232
-
233
-
234
-
235
-
236
-
237
-
238
-
239
-
240
-
241
-
242
-
243
-
244
-
245
-
246
 |
 |
