HP StorageWorks 4000s NAS 4000s and 9000s Administration Guide - Page 213
Add New Node, Re-analyze, Finish, In the Add Nodes Wizard window, click
 |
View all HP StorageWorks 4000s manuals
Add to My Manuals
Save this manual to your list of manuals |
Page 213 highlights
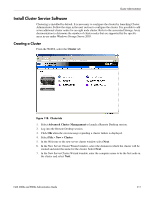
Cluster Administration 2. Ensure that the additional node has access to only the quorum LUN utilized as the cluster quorum disk. Caution: Presenting other LUNs to the non-clustered system could lead to data corruption. 3. Click Add New Node. 4. Enter the name of the node and specify the password for the cluster service account. Select OK to continue. Figure 119: Adding a new node 5. In the Add Nodes Wizard window, click Next. 6. Specify the domain and select Next. 7. In the Add Nodes Wizard window, confirm the name of the node joining the cluster and select Next to continue. 8. The next screen analyzes the configuration to determine the cluster configuration. Potential configuration errors are displayed. Fix any potential errors and select Re-analyze. Click Next to continue. 9. In the Add Nodes Wizard window, enter the password for the cluster account and click Next to continue. 10. The next screen displays a proposed cluster configuration summary. Confirm that all settings are correct and select Next to join the cluster. 11. Click Next and then Finish to complete the cluster wizard. After the node has successfully joined the cluster present all additional storage LUNS to the node. Please refer to the Cluster Storage Guide located in the Cluster tab for additional information on adding and configuring additional physical disk resources. NAS 4000s and 9000s Administration Guide 213
-
 1
1 -
2
-
3
-
4
-
5
-
6
-
7
-
8
-
9
-
10
-
11
-
12
-
13
-
14
-
15
-
16
-
17
-
18
-
19
-
20
-
21
-
22
-
23
-
24
-
25
-
26
-
27
-
28
-
29
-
30
-
31
-
32
-
33
-
34
-
35
-
36
-
37
-
38
-
39
-
40
-
41
-
42
-
43
-
44
-
45
-
46
-
47
-
48
-
49
-
50
-
51
-
52
-
53
-
54
-
55
-
56
-
57
-
58
-
59
-
60
-
61
-
62
-
63
-
64
-
65
-
66
-
67
-
68
-
69
-
70
-
71
-
72
-
73
-
74
-
75
-
76
-
77
-
78
-
79
-
80
-
81
-
82
-
83
-
84
-
85
-
86
-
87
-
88
-
89
-
90
-
91
-
92
-
93
-
94
-
95
-
96
-
97
-
98
-
99
-
100
-
101
-
102
-
103
-
104
-
105
-
106
-
107
-
108
-
109
-
110
-
111
-
112
-
113
-
114
-
115
-
116
-
117
-
118
-
119
-
120
-
121
-
122
-
123
-
124
-
125
-
126
-
127
-
128
-
129
-
130
-
131
-
132
-
133
-
134
-
135
-
136
-
137
-
138
-
139
-
140
-
141
-
142
-
143
-
144
-
145
-
146
-
147
-
148
-
149
-
150
-
151
-
152
-
153
-
154
-
155
-
156
-
157
-
158
-
159
-
160
-
161
-
162
-
163
-
164
-
165
-
166
-
167
-
168
-
169
-
170
-
171
-
172
-
173
-
174
-
175
-
176
-
177
-
178
-
179
-
180
-
181
-
182
-
183
-
184
-
185
-
186
-
187
-
188
-
189
-
190
-
191
-
192
-
193
-
194
-
195
-
196
-
197
-
198
-
199
-
200
-
201
-
202
-
203
-
204
-
205
-
206
-
207
-
 208
208 -
 209
209 -
 210
210 -
 211
211 -
 212
212 -
 213
213 -
 214
214 -
 215
215 -
 216
216 -
 217
217 -
 218
218 -
219
-
220
-
221
-
222
-
223
-
224
-
225
-
226
-
227
-
228
-
229
-
230
-
231
-
232
-
233
-
234
-
235
-
236
-
237
-
238
-
239
-
240
-
241
-
242
-
243
-
244
-
245
-
246
 |
 |
