HP rp7440 nPartition Administrator's Guide, Second Edition - Page 185
Renaming an nPartition, From Partition Manager Version 1.0, use
 |
View all HP rp7440 manuals
Add to My Manuals
Save this manual to your list of manuals |
Page 185 highlights
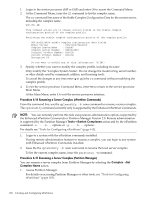
1. Access Partition Manager. For details on accessing Partition Manager or other tools, see "Tools for Configuring nPartitions" (page 165). 2. Select the nPartition from which you want to remove cells. 3. Specify for Partition Manager to remove one or more cells from the nPartition. From Partition Manager Version 1.0, use the Partition→Modify Partition action and select the Add/Remove Cells tab. To remove cells from the nPartition, select the cells from the "Cells in the Partition" list and click the Remove button. From Partition Manager Version 2.0, use the nPartition→Modify nPartition action and select the Add/Remove Cells tab. To remove cells from the nPartition, click on the checkbox for the cells so that no checkmark appears (the checkbox is empty). 4. After specifying that the cells be removed from the nPartition, click the OK button. 5. Review all information presented in the Notes and Warnings, the Summary of Changes, and the HA Checks tabs. 6. Either check or leave unchecked the option for booting the nPartition after the reconfiguration occurs. For Partition Manager Version 1.0, this option is the Automatically boot partition... checkbox. For Partition Manager Version 2.0, this option is the Boot nPartition to system firmware... checkbox. If removing an active cell, leaving this option unchecked (not selected) results in the nPartition being inactive after its reboot for reconfig occurs. If removing a cell from an inactive nPartition, selecting this option results in the nPartition becoming active after its reconfiguration occurs. 7. Either cancel or proceed with the changes (the removal of cell). Click the Cancel button to cancel the changes. To proceed with removing the cells, click the Finish button or click the OK button. 8. As needed, perform a reboot for reconfig on the modified nPartition (HP-UX: shutdown -R; Windows: shutdown /r; Linux: shutdown -r time; OpenVMS: @SYS$SYSTEM:SHUTDOWN with an automatic system reboot). • If you have removed only inactive cells from an nPartition, then you do not need to perform a reboot for reconfig of the nPartition. • If you have removed any active cells from the nPartition, then you must perform a reboot for reconfig and will have seen a detailed message about rebooting from Partition Manager. Issue the reboot for reconfig command. If you did not select the option for automatically booting the nPartition to system firmware, then the nPartition is inactive (at the shutdown for reconfig state) after the reboot for reconfig occurs. In this situation, you can make the nPartition active by using the BO command at the service processor Command Menu. Renaming an nPartition You can change the name of an nPartition by using any one of the following procedures: • "Renaming an nPartition (BCH Menu)" (page 186) • "Renaming an nPartition (nPartition Commands)" (page 186) • "Renaming an nPartition (Partition Manager)" (page 187) Each nPartition has both an nPartition name and an nPartition number. The nPartition name is a short description useful for identifying the nPartition. You can customize nPartition names to Renaming an nPartition 185
-
 1
1 -
2
-
3
-
4
-
5
-
6
-
7
-
8
-
9
-
10
-
11
-
12
-
13
-
14
-
15
-
16
-
17
-
18
-
19
-
20
-
21
-
22
-
23
-
24
-
25
-
26
-
27
-
28
-
29
-
30
-
31
-
32
-
33
-
34
-
35
-
36
-
37
-
38
-
39
-
40
-
41
-
42
-
43
-
44
-
45
-
46
-
47
-
48
-
49
-
50
-
51
-
52
-
53
-
54
-
55
-
56
-
57
-
58
-
59
-
60
-
61
-
62
-
63
-
64
-
65
-
66
-
67
-
68
-
69
-
70
-
71
-
72
-
73
-
74
-
75
-
76
-
77
-
78
-
79
-
80
-
81
-
82
-
83
-
84
-
85
-
86
-
87
-
88
-
89
-
90
-
91
-
92
-
93
-
94
-
95
-
96
-
97
-
98
-
99
-
100
-
101
-
102
-
103
-
104
-
105
-
106
-
107
-
108
-
109
-
110
-
111
-
112
-
113
-
114
-
115
-
116
-
117
-
118
-
119
-
120
-
121
-
122
-
123
-
124
-
125
-
126
-
127
-
128
-
129
-
130
-
131
-
132
-
133
-
134
-
135
-
136
-
137
-
138
-
139
-
140
-
141
-
142
-
143
-
144
-
145
-
146
-
147
-
148
-
149
-
150
-
151
-
152
-
153
-
154
-
155
-
156
-
157
-
158
-
159
-
160
-
161
-
162
-
163
-
164
-
165
-
166
-
167
-
168
-
169
-
170
-
171
-
172
-
173
-
174
-
175
-
176
-
177
-
178
-
179
-
 180
180 -
 181
181 -
 182
182 -
 183
183 -
 184
184 -
 185
185 -
 186
186 -
 187
187 -
 188
188 -
 189
189 -
 190
190 -
191
-
192
-
193
-
194
-
195
-
196
-
197
-
198
-
199
-
200
-
201
-
202
-
203
-
204
-
205
-
206
-
207
-
208
-
209
-
210
-
211
-
212
-
213
-
214
-
215
-
216
-
217
-
218
-
219
-
220
-
221
-
222
-
223
-
224
-
225
-
226
-
227
-
228
-
229
-
230
-
231
-
232
-
233
-
234
-
235
-
236
-
237
-
238
-
239
-
240
-
241
-
242
-
243
-
244
-
245
-
246
-
247
-
248
-
249
-
250
-
251
-
252
-
253
-
254
-
255
-
256
-
257
-
258
-
259
-
260
-
261
-
262
-
263
-
264
-
265
-
266
 |
 |
