Kodak 1252972 User Guide - Page 18
Using the OK button, when an image is displayed on the LCD screen and you want to adjust
 |
UPC - 041771252977
View all Kodak 1252972 manuals
Add to My Manuals
Save this manual to your list of manuals |
Page 18 highlights
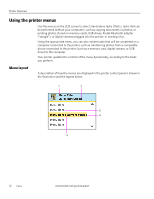
Printer Overview Using the OK button Press OK to: • Accept the setting displayed in the selected row in the current menu. • Accept the preview on the LCD screen of something that you want to print, copy, or scan. • Select a photo for printing. Tip: When previewing a group of images from a digital camera, portable USB drive, or memory card connected to the printer, press and hold OK to select all images not previously selected for printing in the default quantity stored in your printer. (Images already selected will not be affected.) Press and hold OK again to deselect all images. Using the Menu button Press Menu when: • You want to set up a new task and anything other than a menu is visible on the LCD screen. • You are viewing an image on the LCD screen and want to use the Photo Options menu. • You want to view the parent of the last menu displayed. Using the Zoom buttons Press Zoom+ when an image is displayed on the LCD screen and you want to adjust the area to be printed, copied, or scanned. When this feature is available, the printer displays a prompt to press Zoom on the image shown on the LCD screen. Once you have activated zoom for the selected item, you can then use both the Zoom+ (zoom in) and the Zoom- (zoom out) buttons. Zoom in Zoom out 10 www.kodak.com/go/aiosupport
-
 1
1 -
2
-
3
-
4
-
5
-
6
-
7
-
8
-
9
-
10
-
11
-
12
-
 13
13 -
 14
14 -
 15
15 -
 16
16 -
 17
17 -
 18
18 -
 19
19 -
 20
20 -
 21
21 -
 22
22 -
 23
23 -
24
-
25
-
26
-
27
-
28
-
29
-
30
-
31
-
32
-
33
-
34
-
35
-
36
-
37
-
38
-
39
-
40
-
41
-
42
-
43
-
44
-
45
-
46
-
47
-
48
-
49
-
50
-
51
-
52
-
53
-
54
-
55
-
56
-
57
-
58
-
59
-
60
-
61
-
62
-
63
-
64
-
65
-
66
-
67
-
68
-
69
-
70
-
71
-
72
-
73
-
74
-
75
-
76
-
77
-
78
-
79
-
80
-
81
-
82
-
83
-
84
-
85
-
86
-
87
-
88
-
89
-
90
-
91
-
92
-
93
-
94
-
95
-
96
-
97
-
98
-
99
-
100
-
101
-
102
-
103
-
104
-
105
-
106
-
107
-
108
-
109
-
110
-
111
-
112
-
113
-
114
-
115
-
116
-
117
-
118
-
119
-
120
 |
 |