Kodak 1252972 User Guide - Page 60
Scanning multiple originals simultaneously, Adjusting scan settings
 |
UPC - 041771252977
View all Kodak 1252972 manuals
Add to My Manuals
Save this manual to your list of manuals |
Page 60 highlights
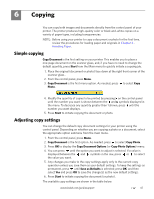
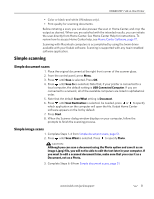
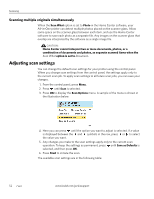
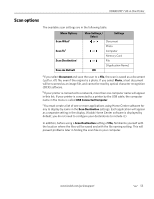
Scanning Scanning multiple originals simultaneously When the Scan What option is set to Photo in the Home Center software, your All-in-One printer can detect multiple photos placed on the scanner glass. Allow some space on the scanner glass between each item, and use the Home Center software to save each photo as a separate file. Any images on the scanner glass that overlap are interpreted by the software as a single image file. CAUTION: Home Center cannot interpret two or more documents, photos, or a combination of documents and photos, as separate scanned items when the Scan What option is set to Document. Adjusting scan settings You can change the default scan settings for your printer using the control panel. When you change scan settings from the control panel, the settings apply only to the current scan job. To apply scan settings to all future scan jobs, you can save your changes. 1. From the control panel, press Menu. 2. Press until Scan is selected. 3. Press OK to display the Scan Options menu. A sample of the menu is shown in the illustration below. 4. Here you can press until the option you want to adjust is selected. If a value is displayed between the and symbols in the row, press or to select the value you want. 5. Any changes you make to the scan settings apply only to the current scan operation. To keep the settings as permanent, press until Save as Defaults is selected, and then press OK. 6. Press Start to initiate the scan. The available scan settings are in the following table: 52 www.kodak.com/go/aiosupport
-
 1
1 -
2
-
3
-
4
-
5
-
6
-
7
-
8
-
9
-
10
-
11
-
12
-
13
-
14
-
15
-
16
-
17
-
18
-
19
-
20
-
21
-
22
-
23
-
24
-
25
-
26
-
27
-
28
-
29
-
30
-
31
-
32
-
33
-
34
-
35
-
36
-
37
-
38
-
39
-
40
-
41
-
42
-
43
-
44
-
45
-
46
-
47
-
48
-
49
-
50
-
51
-
52
-
53
-
54
-
 55
55 -
 56
56 -
 57
57 -
 58
58 -
 59
59 -
 60
60 -
 61
61 -
 62
62 -
 63
63 -
 64
64 -
 65
65 -
66
-
67
-
68
-
69
-
70
-
71
-
72
-
73
-
74
-
75
-
76
-
77
-
78
-
79
-
80
-
81
-
82
-
83
-
84
-
85
-
86
-
87
-
88
-
89
-
90
-
91
-
92
-
93
-
94
-
95
-
96
-
97
-
98
-
99
-
100
-
101
-
102
-
103
-
104
-
105
-
106
-
107
-
108
-
109
-
110
-
111
-
112
-
113
-
114
-
115
-
116
-
117
-
118
-
119
-
120
 |
 |