Konica Minolta Kodak Ngenuity 9090DB User Guide
Konica Minolta Kodak Ngenuity 9090DB Manual
 |
View all Konica Minolta Kodak Ngenuity 9090DB manuals
Add to My Manuals
Save this manual to your list of manuals |
Konica Minolta Kodak Ngenuity 9090DB manual content summary:
- Konica Minolta Kodak Ngenuity 9090DB | User Guide - Page 1
- Konica Minolta Kodak Ngenuity 9090DB | User Guide - Page 2
and disconnect the power cord from the power outlet. Contact Kodak Service. • Do not disassemble, service or modify the scanner except as explained in the User's Guide. • Do not move the scanner with the power cord and interface cable attached. This may cause damage to the cord/cable. Remove the - Konica Minolta Kodak Ngenuity 9090DB | User Guide - Page 3
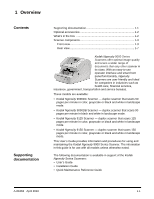
OVERVIEW 1-1 INSTALLATION 2-1 CONTROL PANEL AND NGENUITY OPERATOR UTILITY 3-1 ADVANCED FEATURES 4-1 MAINTENANCE 5-1 TROUBLESHOOTING 6-1 APPENDICES A-C - Konica Minolta Kodak Ngenuity 9090DB | User Guide - Page 4
, insurance, government, transportation and service bureaus. These models are available: • Kodak Ngenuity 9090DC Scanner - duplex scanner that scans 90 pages per minute in color, grayscale or black and white in landscape mode. • Kodak Ngenuity 9090DB Scanner - duplex scanner that scans 90 pages per - Konica Minolta Kodak Ngenuity 9090DB | User Guide - Page 5
kit • Kodak Ngenuity Series Scanners brochure • Installation CD which includes: - VRS Software - VRS User Manual and Release notes - Ngenuity Operator Utility (NOU) - ISIS/TWAIN Drivers - USB drivers - Kodak Ngenuity User's Guide - Kodak Ngenuity Installation Guide - Kodak Ngenuity Quick Maintenance - Konica Minolta Kodak Ngenuity 9090DB | User Guide - Page 6
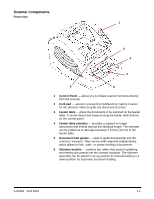
control panel. 4 Feeder table extender - provides a support for longer documents that extend beyond the standard length table. 5 Document feed guides - used to guide document(s) into the scanner's transport. They can be scanner transport. The skimmer assembly can be placed in an up position for manual - Konica Minolta Kodak Ngenuity 9090DB | User Guide - Page 7
cover - opens in an upward position and will stay open in a full-up position with the support of two gas springs that are located inside the scanner. 10 Document output guides - used to guide the scanned document(s) into a neat stack on the exit tray. They can be widthadjusted independently for - Konica Minolta Kodak Ngenuity 9090DB | User Guide - Page 8
Back of exit tray Tabs (slide into slots) Top/Front view of scanner - exit tray removed SlotsTop row Bottom row Stops for bracing kickstand wire These exit tray down and out. Snap the kickstand wire in the slots of the scanner cover. This is useful when scanning small documents. NOTE: If you have an - Konica Minolta Kodak Ngenuity 9090DB | User Guide - Page 9
that require the use of the exit tray extender. NOTE: Positioning the document stop guide too close to the back of the exit tray (towards the back of the scanner) can cause documents to jam as they exit the scanner. 13 14 14 Exit tray extender - pull the extender out when scanning longer - Konica Minolta Kodak Ngenuity 9090DB | User Guide - Page 10
and SCSI card are not provided). 4 USB connector - connects the USB cable to the scanner and host PC. 5 Fan - for cooling the scanner. The fan is part of the scanner's power supply. Make sure to properly vent the scanner for optimal performance. 6 Power connector - connects the power supply to the - Konica Minolta Kodak Ngenuity 9090DB | User Guide - Page 11
Installation: with a USB connection 2-1 Installation: with an optional SCSI connection 2-2 This chapter provides installation instructions for the Kodak Ngenuity 9000 Series Scanners. Instructions for a USB connection and an optional SCSI connection follow. 1. Verify that your host PC meets the - Konica Minolta Kodak Ngenuity 9090DB | User Guide - Page 12
the Ngenuity Operator Utility (NOU). Do not reboot the host PC after installing each software application. NOTE: For the latest drivers, go to www.Kodak.com/go/scanners. 5. Power down the host PC and remove the power cord. 6. Install the SCSI card (Adaptec 29160) in the host PC. See the instructions - Konica Minolta Kodak Ngenuity 9090DB | User Guide - Page 13
Utility Home Screen (default) will update when the scanner self tests have passed and communication with the scanner has been established. NOTE: If the Ngenuity Operator Utility failed to connect with the scanner, refer to Chapter 6, Troubleshooting for more information. A-61662 April 2010 2-3 - Konica Minolta Kodak Ngenuity 9090DB | User Guide - Page 14
Operator Utility 3-8 Ngenuity Operator Utility main screen 3-8 Menu bar 3-9 Home screen 3-10 Settings button 3-12 Maintenance button 3-14 The control panel is located on the front of the scanner. The LEDs and audible tones notify you of the current state of the scanner (e.g., power state - Konica Minolta Kodak Ngenuity 9090DB | User Guide - Page 15
panel consists of: Power Mode, Back Door, Maintenance and Manual Feed. Power Mode - this green LED indicates the power status fast Ready>Active Steady green Ready>Sleep Blinking, fast Sleep Blinking, slow When the scanner is in sleep mode, the Power Mode LED is the only indicator that is - Konica Minolta Kodak Ngenuity 9090DB | User Guide - Page 16
ADF test, camera calibration, downloading firmware, imprinter cleaning, etc.). Scanner self-test fault detected; scanner service may be required. Use the Ngenuity Operator Utility for more information on the self test failure. Manual Feed - this green LED indicates that the feed mode has been - Konica Minolta Kodak Ngenuity 9090DB | User Guide - Page 17
7. Lift the skimmer. 8. Remove any paper from the feeder. 9. Start a scan, either single or batch. The table will move up, and the Manual Feed LED will light. The scanner motor will start and beep indicating it is ready for scanning. 10. Carefully insert the page, keeping your hands and fingers away - Konica Minolta Kodak Ngenuity 9090DB | User Guide - Page 18
buttons allow you to manually set the lowest position Two custom functions (F1 and F2) can be assigned via the Ngenuity Operator Utility. Available functions are: Feed Test Batch, Page Eject by one of the indicators (i.e., page sensor, error, scanner internal errors, etc.). When an error is indicated, - Konica Minolta Kodak Ngenuity 9090DB | User Guide - Page 19
remain lit or blink depending on the multifeed condition. For example: • If the multifeed mode is set to Stop, the indicator remains lit and the scanner stops when a multifeed is detected. • If the multifeed mode is set to Notify, the indicator will light momentarily along with a sound or prompt for - Konica Minolta Kodak Ngenuity 9090DB | User Guide - Page 20
has risen (or is rising) to where the skimmer is resting on the documents in the feeder. • Manual Feed mode: the scanner is ready to scan. The LED will remain a steady green while the scanner is scanning. Clear/Restart - allows you to clear an error when the error is resolved and resume scanning - Konica Minolta Kodak Ngenuity 9090DB | User Guide - Page 21
connection type will be displayed on the Home screen of the NOU. NOTE: The Ngenuity Operator Utility remains accessible, but not functional after connectivity with the scanner has been established and then the scanner is powered off or if the USB cable is disconnected. Any changes made to existing - Konica Minolta Kodak Ngenuity 9090DB | User Guide - Page 22
with the most current versions of software and firmware. Only software and firmware from Kodak is certified to work with Ngenuity Scanners. Firmware updates should only be performed when instructed by Kodak Technical Support. Exit - closes the Ngenuity Operator Utility. A-61662 April 2010 3-9 - Konica Minolta Kodak Ngenuity 9090DB | User Guide - Page 23
Help menu Home screen Displays help topics for the following: View Operator Manual, Product Support, and About Scanner Operator Utility. View Operators Manual - launches a PDF file for the Kodak Ngenuity 9000 Series Scanners User's Guide. NOTE: You must have Adobe Reader installed on your PC to - Konica Minolta Kodak Ngenuity 9090DB | User Guide - Page 24
the Self Test monitor returns a fault(s), power cycle the scanner and check the Scanner Self Test monitor again. If the problem persists, contact Technical Support. Maintenance monitor - this section of the Home screen displays any scanner maintenance and the type of maintenance needed (i.e., clean - Konica Minolta Kodak Ngenuity 9090DB | User Guide - Page 25
cameras, see Chapter 5, Maintenance. When you click the Settings button on the Ngenuity Operator Utility main screen, the Configure Scanner Settings screen will be displayed. 3-12 You can configure basic scanner settings (e.g., Sleep timeout, Multifeed range, Custom Functions and Audio volume and - Konica Minolta Kodak Ngenuity 9090DB | User Guide - Page 26
function will be performed when F1/F2 is pressed. • Feed Test Batch: activates the Test feed mode which is used to test and verify the scanner's feeding capabilities and allows you to feed transport cleaning sheets. This is the default setting for the F1 key. • Page Eject: will activate the - Konica Minolta Kodak Ngenuity 9090DB | User Guide - Page 27
on the Ngenuity Operator Utility main screen, the Maintenance screen will be displayed. 3-14 This screen provides scanner statistics for Clean Transport Rollers 5K - 100K 50K Clean Optics (camera covers, imaging guides, sensors) 5K - 150K 50K Replace Feed Rollers (skimmer rollers and - Konica Minolta Kodak Ngenuity 9090DB | User Guide - Page 28
4-9 Multifeed screen 4-10 About screen 4-12 This chapter provides information about advanced features that can be used with Kodak Ngenuity 9000 Series Scanners. The controls for operating the Advanced Features are accessible within the VirtualReScan® (VRS) Interactive Viewer. NOTE: When VRS - Konica Minolta Kodak Ngenuity 9090DB | User Guide - Page 29
the VRS Interactive Viewer, Ngenuity VRS Professional software must be loaded on the host PC that the scanner is connected to. VRS Professional ISIS-based Applications • VRS TWAIN-based Applications NOTE: This User's Guide only documents the VRS-based scanning setup. For scanning applications that - Konica Minolta Kodak Ngenuity 9090DB | User Guide - Page 30
If you have the optional Imprinter, see Appendix B for installation procedures, maintenance and instructions for using the front page (pre-scan) and back page (post-scan) imprinter. Clicking the Scanner Driver Settings icon displays the Advanced Properties window. To display the functions contained - Konica Minolta Kodak Ngenuity 9090DB | User Guide - Page 31
Color screen The Color screen allows you to dropout a form's background so that only the entered data is included in the electronic image (i.e., remove the form's lines and boxes). Front side dropout color - select the desired dropout color you want to eliminate from the front side. Selections are - Konica Minolta Kodak Ngenuity 9090DB | User Guide - Page 32
of Top=0.00 and Left=0.00 will always be the very left corner of the lead edge of the page that was fed into the scanner. The resulting image is a cut out of the original, larger image. Therefore, if you scan a letter-size page and have Letter paper size selected, you - Konica Minolta Kodak Ngenuity 9090DB | User Guide - Page 33
portrait mode with the left edge first, the result will be the front side with text will first be rotated right 90 degrees in the scanner, then rotated back to portrait by VRS auto crop. The rear image will be rotated right and will not be rotated by VRS auto crop - Konica Minolta Kodak Ngenuity 9090DB | User Guide - Page 34
tri-fold documents. NOTE: Document types other than Normal may reduce scanner speed. Allow Large Skew - if enabled, this option maximizes image data capture corners. Very Long Document - when enabled, this option adjusts the scanner's transport speed to accommodate a long document (more than 40 inches - Konica Minolta Kodak Ngenuity 9090DB | User Guide - Page 35
The Very Long Document option does not support the simultaneous use of some other options offered through VRS ImageControls and Direct Drivers. Following is a table that identifies those other controls as well as how the scanner and software handle the conflict when you attempt to use them together. - Konica Minolta Kodak Ngenuity 9090DB | User Guide - Page 36
any postcapture image processing settings affect the color content of the final output file. ICC: select this option to set up scanner cameras to be compatible with the scanner's ICC color correction profile and to cause VRS to embed ICC-compatible profile data into the image file. ICC profile data - Konica Minolta Kodak Ngenuity 9090DB | User Guide - Page 37
activates that option for both the front and back camera. The Multifeed screen provides the following options. Multifeed Mode - determines the response of the scanner if a multifeed occurs. • Off: no multifeed detection occurs. Scanning continues and all scanned images are retained. • Notify: the - Konica Minolta Kodak Ngenuity 9090DB | User Guide - Page 38
on top of the batch of documents to be scanned, and press Clear/Reset button on the scanner to restart scanning. - To keep the image: press MF Ignore button on the scanner. The scanner will automatically eject the multifeed document and continue scanning, keeping the multifeed image. NOTE: If the - Konica Minolta Kodak Ngenuity 9090DB | User Guide - Page 39
About screen The About screen displays the scanner version and copyright information. 4-12 A-61662 April 2010 - Konica Minolta Kodak Ngenuity 9090DB | User Guide - Page 40
Replacing the imaging guides 5-15 Lamps 5-15 Camera calibration 5-15 Supplies and consumables 5-17 Keeping the scanner's hardware and life of your scanner. The Maintenance monitor on the Home screen of the Ngenuity Operator Utility (NOU) provides reminders as to when scanner maintenance is - Konica Minolta Kodak Ngenuity 9090DB | User Guide - Page 41
transport rollers 50,000 pages Clean Optics: imaging guides, cameras glass covers, sensors. Optics does not Scanner consumables and cleaning supplies are available from resellers, web merchants and from the Kodak on-line store (http:/scannerstore.kodak.com). • Ngenuity Roller Kit • Ngenuity - Konica Minolta Kodak Ngenuity 9090DB | User Guide - Page 42
rubber tires. • Do not use cleaners in confined areas, use with adequate ventilation. • Do not use flammable compressed aerosols on or around the scanner. NOTE: To access the Material Safety Data Sheet (MSDS), you will need to provide the catalog number of the supply. See "Supplies and Consumables - Konica Minolta Kodak Ngenuity 9090DB | User Guide - Page 43
cleaned and/or replaced at the same time to ensure optimal scanner function. Maintenance reminder intervals (both cleaning and replacing) are based may begin to slip on paper or cause multifeeds. To prevent feeding problems and avoid rubber tire replacements, it is recommended that you clean the - Konica Minolta Kodak Ngenuity 9090DB | User Guide - Page 44
for cleaning to ensure best results. 1. Turn off the scanner and open the transport cover. 2. Remove the pick roller by rotating the blue pick roller release lever up, push the pick roller to the right - Konica Minolta Kodak Ngenuity 9090DB | User Guide - Page 45
the roller as far right as possible. Hold it in place. The spring-loaded drive roller shaft will move to the right side of the scanner's upper tray. Hold the driver roller shaft in place and slide the drive roller off to the left and off the shaft. Gently release the - Konica Minolta Kodak Ngenuity 9090DB | User Guide - Page 46
Cleaning the separator roller 9. Pull the separator roller door forward and hold it in place while you remove the separator roller by lifting it off the cradle. 10. Using a cleaning wipe, scrub the separator roller tires in a side-toside motion. Rotate the roller to clean the entire surface. 11. - Konica Minolta Kodak Ngenuity 9090DB | User Guide - Page 47
the black frame. 1. Open the transport cover. 2. Gently pull the 2 fastening clips that secure the top imaging guide towards the front of the scanner to release and remove the imaging guide from the transport. Fastening clips (2) 3. Spray the glass cleaner on a lint free cloth, taking care that any - Konica Minolta Kodak Ngenuity 9090DB | User Guide - Page 48
. 7. When the camera cover is clean, re-insert the cleaned imaging guide into the scanner by holding the frame of the imaging guide so that the fastening clips are on the back side of the imaging guide. Slide the guides under the transport tray towards the feeder table and ease the back side of - Konica Minolta Kodak Ngenuity 9090DB | User Guide - Page 49
to clean these sensors. Do not use any type of cotton swab or cloth as these items may leave lint in the sensors. NOTE: If problems persist after cleaning the sensors, it may be necessary to use forced air to clean the sensors. If using forced air, use the extension tube - Konica Minolta Kodak Ngenuity 9090DB | User Guide - Page 50
12. Exit sensor: The exit sensor is located on the transport toward the back of the scanner. Clean the exit sensor by placing the brush end of the blower brush into the exit sensor area and squeeze the blower brush several times. - Konica Minolta Kodak Ngenuity 9090DB | User Guide - Page 51
50,000 pages or as needed. NOTE: It is recommended that you clean the imaging guides again after cleaning the transport with a transport cleaning sheet. 1. Establish communication between the scanner and the Ngenuity Operator Utility. 2. Verify that one of the Custom Functions is set to Feed Test - Konica Minolta Kodak Ngenuity 9090DB | User Guide - Page 52
procedures Replacing tires This section provides procedures for replacing the following parts. When replacing parts, turn the scanner off by pressing the power switch located in the back of the scanner. With proper cleaning, tire life of each skimmer roller (pick and drive) is approximately 600,000 - Konica Minolta Kodak Ngenuity 9090DB | User Guide - Page 53
Replacing the separator roller 8. Pull the separator roller door forward and hold it in place while you remove the separator roller by lifting it off the cradle. 9. Remove the roller from the rest of the assembly as shown. 5-14 10. Reassemble the components using a new roller, duplicating the - Konica Minolta Kodak Ngenuity 9090DB | User Guide - Page 54
/or solvent. The LED illumination system on Ngenuity Scanners should last the life of the scanner with normal use. If something happens that requires the replacement of the LEDs, contact Kodak Technical Support. Before calibrating, clean the scanner optics to ensure a successful calibration. See the - Konica Minolta Kodak Ngenuity 9090DB | User Guide - Page 55
links in the Maintenance section of the Ngenuity Operator Utility Home screen. The Camera calibration dialog box will be displayed. 3. Click Both, and then click Start. The message, Lift skimmer, then manually feed calibration sheets into scanner will be displayed. 4. Lift the skimmer. The - Konica Minolta Kodak Ngenuity 9090DB | User Guide - Page 56
Supplies and consumables Contact your scanner supplier to order supplies or go to: www.scannerstore.kodak.com. Supplies/Consumables Small Roller Kit Medium Roller Kit (Includes: 24 skimmer rollers, 6 separator rollers) Large Roller Kit Cleaning Kit (Includes: transport cleaning sheets, roller - Konica Minolta Kodak Ngenuity 9090DB | User Guide - Page 57
6 Troubleshooting Contents Clearing a document jam 6-1 Problem solving 6-2 Contacting Service 6-3 Clearing a document jam IMPORTANT: Only remove jammed documents from the transport when the scanner transport cover is OPEN. 1. Pull the scanner transport cover release lever forward to open the - Konica Minolta Kodak Ngenuity 9090DB | User Guide - Page 58
it may not function properly. Use the chart below as a guide to check possible solutions to help you resolve the situation before calling Technical Support. If a problem persists after reviewing the problems and possible solutions below, turn the scanner off, unplug the power cord and call Technical - Konica Minolta Kodak Ngenuity 9090DB | User Guide - Page 59
errors Cause Remedy • Imaging guide(s) and/or camera cover(s) Support. Contacting Service 1. Visit www.Kodak.com/go/dicontacts to obtain the most current phone number for your country. 2. When calling, please have the following information ready: • A description of your problem. • The scanner - Konica Minolta Kodak Ngenuity 9090DB | User Guide - Page 60
9125: Landscape 125 ppm/ 250 ipm 9090DC: Landscape 90 ppm / 180 ipm 9090DB: Landscape 90 ppm / 180 ipm Daily duty cycle 90,000 to 150, scanner with normal use Image enhancement Onboard Ngenuity VRS 4.5 (or greater) Professional. Interface USB 2.0 (cable included); SCSI III, D68-SCSI-3 Support - Konica Minolta Kodak Ngenuity 9090DB | User Guide - Page 61
pre- and post-scan imprinter, Roller Kit, Cleaning Kit System requirements Following is the minimum recommended system configuration to run Kodak Ngenuity 9000 Series Scanners: Recommended: • Intel Core 2 Duo / AMD Athlon 64 x2 Dual Core, 2.4 GHz or better • HDD: 500 GB • DIMM DDR 3200: 2 GB - Konica Minolta Kodak Ngenuity 9090DB | User Guide - Page 62
pad replacement B-9 Using the imprinter B-9 Print position: hardware B-9 Print position: software B-10 This appendix provides installation procedures, maintenance and instructions for using the front page (pre-scan) and back page (postscan) imprinter. Front page (pre-scan) imprinting prints the - Konica Minolta Kodak Ngenuity 9090DB | User Guide - Page 63
and ink cartridge To ensure proper installation of the ink cartridge, install the imprinter cartridge before installing the imprinter into the scanner. Be sure the ink cartridge is properly seated. Connector Printing position scale Thumbscrew Carriage Ink cartridge holder Ink cartridge Locating - Konica Minolta Kodak Ngenuity 9090DB | User Guide - Page 64
place the ink cartridge (bottom end first) into the holder and snap it into place. Center position 5. Turn off the scanner and power down the PC. 6. Remove the scanner exit tray. 7. Open the front page imprinter door. 8. Insert the imprinter's spring-loaded locating pin into the correspond- ing hole - Konica Minolta Kodak Ngenuity 9090DB | User Guide - Page 65
the plug and the slot on the connector. 11. Close the imprinter door. 12. Replace the exit tray. 13. Turn on the scanner and the PC. 14. Launch the Ngenuity Operator Utility and confirm the imprinter is recognized. NOTE: Do not leave the ink cartridge in the imprinter when not in use - Konica Minolta Kodak Ngenuity 9090DB | User Guide - Page 66
imprinter and ink cartridge To ensure proper installation of the ink cartridge, install the imprinter cartridge before installing the imprinter into the scanner. Be sure the ink cartridge is properly seated. 1. Remove the imprinter and ink cartridge from the box. 2. Remove the protective tape from - Konica Minolta Kodak Ngenuity 9090DB | User Guide - Page 67
the key on the plug and the slot on the connector. 10. Close the back page imprinter door. 11. Turn on the scanner and the PC. 12. Launch the Ngenuity Operator Utility and confirm the imprinter is recognized. NOTE: Do not leave the ink cartridge in the imprinter when not in use - Konica Minolta Kodak Ngenuity 9090DB | User Guide - Page 68
from the scanner. See the sections entitled, "Removing the front imprinter" or "Removing the back imprinter" earlier in this appendix for instructions. 3. Remove Reinstall the imprinter into the scanner. 8. Turn on the scanner and the PC. 9. Launch the Ngenuity Operator Utility and confirm the - Konica Minolta Kodak Ngenuity 9090DB | User Guide - Page 69
using the Ngenuity Operator Utility to be able to clean the print head using the scanner. See the scanner. 2. Remove the front (or back) imprinter unit from the scanner. See the sections entitled, "Removing the front imprinter" or "Removing the back imprinter" earlier in this chapter for instructions - Konica Minolta Kodak Ngenuity 9090DB | User Guide - Page 70
replaced. The life expectancy of the spit pad is expected to last as long or longer than the transport rollers. Contact your Kodak Service Representative for spit pad replacement. Using the imprinter Print position: hardware Imprinter operation is controlled via the hardware and software. To print - Konica Minolta Kodak Ngenuity 9090DB | User Guide - Page 71
icon in the Windows Taskbar on the host PC as soon as the scan source is selected. NOTE: For instructions on how to select the scan source (scanner), see Chapter 3, "Control Panel and Ngenuity Operator Utility". 1. Right-click on the VRS icon located in the Taskbar to launch the Interactive Viewer - Konica Minolta Kodak Ngenuity 9090DB | User Guide - Page 72
3. Within the Interactive Viewer, access the Advanced Properties screen by clicking the Scanner Driver Settings icon (tools image). 4. In the Advanced Properties screen, click on the Imprinter menu item to display the Imprinter controls. 5. Enable the imprinter you - Konica Minolta Kodak Ngenuity 9090DB | User Guide - Page 73
The following options can be set via the Text Controls dialog box: B-12 Enable - click this checkbox to enable the Page Counters. • Print Width - select to append zeros or spaces in front of the page count or spaces at the end of the page count to retain a fixed length for all digits that will - Konica Minolta Kodak Ngenuity 9090DB | User Guide - Page 74
content format codes to include in the text string from the drop-down list. These codes are replaced with actual symbols or text by the scanner when the document is scanned. The special content format choices and pre-formatted special content code are shown in the table below. Special Content Euro - Konica Minolta Kodak Ngenuity 9090DB | User Guide - Page 75
millimeters, but you can enter decimal numbers in 0.1-inch increments for inches. NOTE: The horizontal location for imprinting must be manually set inside the scanner. To specify the position of imprinted text on a document, perform the following: 1. In the Units group, select a unit of measurement - Konica Minolta Kodak Ngenuity 9090DB | User Guide - Page 76
: Selecting Large or Wide may change the length of text strings, causing the text to print off the end of the document. By default, the scanner prints standard, Latin font characters. A-61662 April 2010 B-15 - Konica Minolta Kodak Ngenuity 9090DB | User Guide - Page 77
imaging guides, camera glass covers and sensors. This term does not include LEDs. Paper jam - refers to a single document that fails to pass through the scanner transport and exit into the exit tray. Scan source - the scanner selected for use through the scanning application on the host PC. Ngenuity - Konica Minolta Kodak Ngenuity 9090DB | User Guide - Page 78
-
 1
1 -
 2
2 -
 3
3 -
 4
4 -
 5
5 -
 6
6 -
 7
7 -
8
-
9
-
10
-
11
-
12
-
13
-
14
-
15
-
16
-
17
-
18
-
19
-
20
-
21
-
22
-
23
-
24
-
25
-
26
-
27
-
28
-
29
-
30
-
31
-
32
-
33
-
34
-
35
-
36
-
37
-
38
-
39
-
40
-
41
-
42
-
43
-
44
-
45
-
46
-
47
-
48
-
49
-
50
-
51
-
52
-
53
-
54
-
55
-
56
-
57
-
58
-
59
-
60
-
61
-
62
-
63
-
64
-
65
-
66
-
67
-
68
-
69
-
70
-
71
-
72
-
73
-
74
-
75
-
76
-
77
-
78
 |
 |