Konica Minolta Kodak Ngenuity 9090DB User Guide - Page 63
Installing the front imprinter and ink cartridge
 |
View all Konica Minolta Kodak Ngenuity 9090DB manuals
Add to My Manuals
Save this manual to your list of manuals |
Page 63 highlights
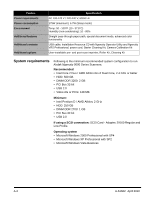
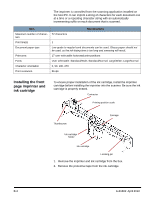
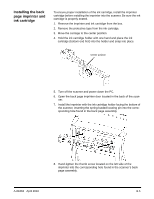
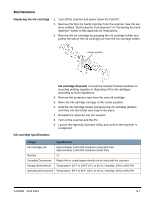
The imprinter is controlled from the scanning application installed on the host PC. It can imprint a string of characters for each document one at a time or a repeating character string with an automatically incrementing suffix on each document that is scanned. Item Maximum number of characters Print line(s) Document paper type Print area Fonts Character orientation Print resolution 72 characters Specifications 1 Low grade to regular bond documents can be used. Glossy paper should not be used, as the ink drying time is too long and smearing will result. 17 user-selectable horizontal print positions User selectable: Standard/Wide; Standard/Normal; Large/Wide; Large/Normal 0, 90, 180, 270 96 dpi Installing the front page imprinter and ink cartridge To ensure proper installation of the ink cartridge, install the imprinter cartridge before installing the imprinter into the scanner. Be sure the ink cartridge is properly seated. Connector Printing position scale Thumbscrew Carriage Ink cartridge holder Ink cartridge Locating pin 1. Remove the imprinter and ink cartridge from the box. 2. Remove the protective tape from the ink cartridge. B-2 A-61662 April 2010
-
 1
1 -
2
-
3
-
4
-
5
-
6
-
7
-
8
-
9
-
10
-
11
-
12
-
13
-
14
-
15
-
16
-
17
-
18
-
19
-
20
-
21
-
22
-
23
-
24
-
25
-
26
-
27
-
28
-
29
-
30
-
31
-
32
-
33
-
34
-
35
-
36
-
37
-
38
-
39
-
40
-
41
-
42
-
43
-
44
-
45
-
46
-
47
-
48
-
49
-
50
-
51
-
52
-
53
-
54
-
55
-
56
-
57
-
 58
58 -
 59
59 -
 60
60 -
 61
61 -
 62
62 -
 63
63 -
 64
64 -
 65
65 -
 66
66 -
 67
67 -
 68
68 -
69
-
70
-
71
-
72
-
73
-
74
-
75
-
76
-
77
-
78
 |
 |
