Konica Minolta Kodak Ngenuity 9090DB User Guide - Page 12
Installation: with an optional SCSI connection
 |
View all Konica Minolta Kodak Ngenuity 9090DB manuals
Add to My Manuals
Save this manual to your list of manuals |
Page 12 highlights
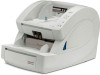
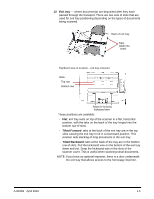
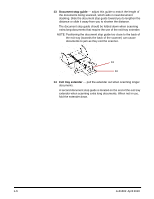
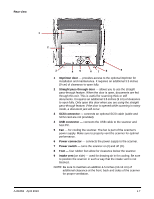
Installation: with an optional SCSI connection The Kodak Ngenuity Scanner is equipped to accommodate a SCSI connection for communication between the scanner and host PC. The optional SCSI connection can be used in lieu of the standard USB connection. To use a SCSI connection, a SCSI card and cable is required. Kodak does not provide a SCSI card or cable with the Ngenuity Scanner; therefore, these items must be purchased separately. A SCSI connection kit is not available through Kodak; however, Kodak has certified that Adaptec's 29160 LP or regular profile card is compatible with Ngenuity Scanners. The SCSI cable must be a D68-pin SCSI-3 cable. 1. Verify that your host PC meets the system requirements as specified in Appendix A, Specifications. 2. Unpack the scanner. NOTE: The scanner weighs approximately 112 pounds (50.8 kg). Be sure to incorporate the appropriate manpower before moving or lifting the scanner. 3. Without the scanner attached, turn on the host PC. 4. Load the Installation CD into the CD-ROM drive and install the software in the following order: Ngenuity VRS software first, then the Ngenuity Operator Utility (NOU). Do not reboot the host PC after installing each software application. NOTE: For the latest drivers, go to www.Kodak.com/go/scanners. 5. Power down the host PC and remove the power cord. 6. Install the SCSI card (Adaptec 29160) in the host PC. See the instructions that are included with the SCSI card. 7. Connect the host PC to the scanner. 8. Connect power to the scanner and reconnect power to the host PC. 9. Turn the scanner on and wait for the initialization sequence to complete. 10. Turn on the host PC. 11. Follow the prompts within the New Hardware Found wizard. 12. Launch the Ngenuity Operator Utility (NOU) by double-clicking the NOU icon found on the desktop of the host PC. 2-2 A-61662 April 2010
-
 1
1 -
2
-
3
-
4
-
5
-
6
-
 7
7 -
 8
8 -
 9
9 -
 10
10 -
 11
11 -
 12
12 -
 13
13 -
 14
14 -
 15
15 -
 16
16 -
 17
17 -
18
-
19
-
20
-
21
-
22
-
23
-
24
-
25
-
26
-
27
-
28
-
29
-
30
-
31
-
32
-
33
-
34
-
35
-
36
-
37
-
38
-
39
-
40
-
41
-
42
-
43
-
44
-
45
-
46
-
47
-
48
-
49
-
50
-
51
-
52
-
53
-
54
-
55
-
56
-
57
-
58
-
59
-
60
-
61
-
62
-
63
-
64
-
65
-
66
-
67
-
68
-
69
-
70
-
71
-
72
-
73
-
74
-
75
-
76
-
77
-
78
 |
 |
