Konica Minolta Kodak Ngenuity 9090DB User Guide - Page 48
Do not spray sol, vent in or around the internal components of the scanner.
 |
View all Konica Minolta Kodak Ngenuity 9090DB manuals
Add to My Manuals
Save this manual to your list of manuals |
Page 48 highlights
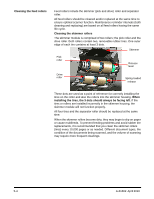
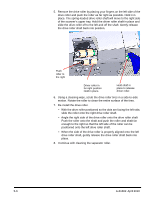
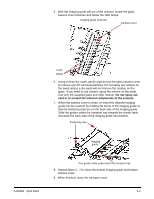
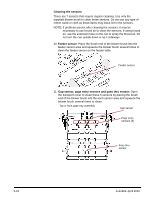
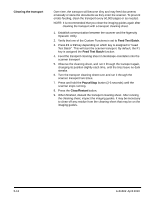
5. With the imaging guide still out of the scanner, locate the glass camera cover between and below the LED lamps. Imaging guide removed Camera cover Lamp LEDs 6. Using a clean dry swab, gently wipe across the glass camera cover to remove any dirt and dust particles. Do not spray any solvent on the swab unless a dry swab will not remove the residue on the glass. If you need to use solvent, spray the solvent on the swab. Use only the supplied glass and roller cleaner. Do not spray solvent in or around the internal components of the scanner. 7. When the camera cover is clean, re-insert the cleaned imaging guide into the scanner by holding the frame of the imaging guide so that the fastening clips are on the back side of the imaging guide. Slide the guides under the transport tray towards the feeder table and ease the back side of the imaging guide into position. Fastening clips Imaging guide A-61662 April 2010 Five guides slide underneath the transport tray 8. Repeat Steps 2 - 7 to clean the bottom imaging guide and bottom camera cover. 9. When finished, close the transport cover. 5-9
-
 1
1 -
2
-
3
-
4
-
5
-
6
-
7
-
8
-
9
-
10
-
11
-
12
-
13
-
14
-
15
-
16
-
17
-
18
-
19
-
20
-
21
-
22
-
23
-
24
-
25
-
26
-
27
-
28
-
29
-
30
-
31
-
32
-
33
-
34
-
35
-
36
-
37
-
38
-
39
-
40
-
41
-
42
-
 43
43 -
 44
44 -
 45
45 -
 46
46 -
 47
47 -
 48
48 -
 49
49 -
 50
50 -
 51
51 -
 52
52 -
 53
53 -
54
-
55
-
56
-
57
-
58
-
59
-
60
-
61
-
62
-
63
-
64
-
65
-
66
-
67
-
68
-
69
-
70
-
71
-
72
-
73
-
74
-
75
-
76
-
77
-
78
 |
 |
