Konica Minolta Kodak Ngenuity 9090DB User Guide - Page 76
Front Annotation/Back Annotation, Offset from Left
 |
View all Konica Minolta Kodak Ngenuity 9090DB manuals
Add to My Manuals
Save this manual to your list of manuals |
Page 76 highlights
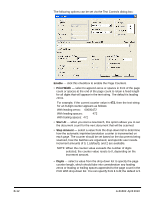
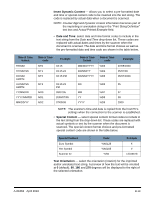
Units - use the options in the Units group to specify text positioning values in inches, millimeters, or pixels (dpi dependent). The default unit of measurement is inches. Annotation Position - allows you to specify the horizontal location for annotating. • Offset from Left: specify the distance of an annotation string from the left edge of a page. The minimum value is 0 (default) and the maximum value is dependent on the resulting image size. You must enter whole numbers for pixels and millimeters, but you can enter decimal numbers in 0.1-inch increments for inches. This option is only available if Front and/or Back Annotation is selected. • Front Annotation/Back Annotation: annotation can be performed on the front, back, or both sides of a document and is enabled using the Front Annotation and Back Annotation check boxes. To specify the position of annotation text on a document: 1. In the Units group, select a unit of measurement for the offset. 2. In the Offset from Top text box, specify the distance from the top edge of the page the annotation string should appear. (This value also controls the mechanical imprinter text offset.) 3. Select where you want the annotation: Front, Back or Front and Back. 4. In the Offset from Left text box, specify the distance from the left edge of the page the annotation string should appear. 5. Click OK when finished. NOTE: Because this measurement affects where the annotation is added to the actual image, be sure to select an offset measurement that remains within the length and width of the image. Font Height and Font Width - select whether you want imprinted text to print normally or in larger and/or wider characters on a document. Selecting Large prints taller characters; selecting Wide prints wider characters. The default print size is Normal. The font size selections only control the imprinted text; the font used for annotation is fixed and cannot be changed. NOTE: Selecting Large or Wide may change the length of text strings, causing the text to print off the end of the document. By default, the scanner prints standard, Latin font characters. A-61662 April 2010 B-15
-
 1
1 -
2
-
3
-
4
-
5
-
6
-
7
-
8
-
9
-
10
-
11
-
12
-
13
-
14
-
15
-
16
-
17
-
18
-
19
-
20
-
21
-
22
-
23
-
24
-
25
-
26
-
27
-
28
-
29
-
30
-
31
-
32
-
33
-
34
-
35
-
36
-
37
-
38
-
39
-
40
-
41
-
42
-
43
-
44
-
45
-
46
-
47
-
48
-
49
-
50
-
51
-
52
-
53
-
54
-
55
-
56
-
57
-
58
-
59
-
60
-
61
-
62
-
63
-
64
-
65
-
66
-
67
-
68
-
69
-
70
-
 71
71 -
 72
72 -
 73
73 -
 74
74 -
 75
75 -
 76
76 -
 77
77 -
 78
78
 |
 |
